




 本文介绍了Android的LayoutAnimation,用于为ViewGroup添加动画并控制子View的显示顺序。讲解了如何通过LayoutAnimationsController实现动画播放,包括XML配置和Java代码设置。还详细探讨了如何自定义播放顺序,复写getTransformedIndex方法来实现更灵活的动画控制。
1、简介
在Android中,最简单的动画就是补间动画(Tweened Animations)了。通过补间动画,可以对一个控件进行位移、缩放、旋转、改变透明度等动画。但是补间动画只能对一个控件使用,如果要对某一组控件播放一样的动画的话,可以考虑layout-animation。
Layout Animation 可以用来为 ViewGroup 添加动画,并且按照预定的顺序把一个动画或者一个动画集合应用到 ViewGroup 的每一个子View。我们可以使用 LayoutAnimationController 来指定一个应用到 ViewGroup 的每个子View的动画。
2、LayoutAnimationsController
LayoutAnimationsController可以用于实现使多个控件按顺序一个一个的显示。
- LayoutAnimationsController用于为一个layout里面的控件,或者是一个ViewGroup里面的控件设置统一的动画效果。
- 每一个控件都有相同的动画效果。
- 控件的动画效果可以在不同的时间显示出来。
- LayoutAnimationsController可以在xml文件当中设置,以可以在代码当中进行设置。
3、Xml配置
1、在res/anim文件夹下创建一个名为layout_anim.xml文件
2、由于layout-animation是对于某一组控件的操作,就需要一个基本的动画来定义单个控件的动画。另外还可以定义动画的显示顺序和延迟:
<layoutAnimation xmlns:android="http://schemas.android.com/apk/res/android"
    android:delay="30%"
    android:animationOrder="reverse"
android:animation="@anim/zoom_in"/>- android:delay表示动画播放的延时,既可以是百分比,也可以是float小数。
- android:animationOrder表示动画的播放顺序,有三个取值normal(顺序)、reverse(倒序)、random(随机)。
- android:animation指向了子控件所要播放的动画。
其中delay的单位为秒,animation为设置动画的文件,animationOrder为进入方式。
<!-- res/anim/zoom_in.xml -->
<?xml version="1.0" encoding="utf-8"?>
<set xmlns:android="http://schemas.android.com/apk/res/android"
    android:interpolator="@android:anim/decelerate_interpolator" >

    <scale
        android:duration="1000"
        android:fromXScale="0.1"
        android:fromYScale="0.1"
        android:pivotX="50%"
        android:pivotY="50%"
        android:toXScale="1.0"
        android:toYScale="1.0" />
    <alpha
        android:duration="1000"
        android:fromAlpha="0"
        android:toAlpha="1.0" />
</set>
我们写好了 LayoutAnimation 和 子动画,就要把它配置到我们的 ViewGroup里面,这里就用一个简单的ListView。
<?xml version="1.0" encoding="utf-8"?>
<LinearLayout xmlns:android="http://schemas.android.com/apk/res/android"
    xmlns:tools="http://schemas.android.com/tools"
    android:id="@+id/activity_main"
    android:layout_width="match_parent"
    android:layout_height="match_parent">

    <ListView
        android:id="@+id/lv"
        android:scrollbars="vertical"
        android:layoutAnimation="@anim/layout_anim"
        android:layout_width="match_parent"
        android:layout_height="match_parent"/>
</LinearLayout>
public class MainActivity extends AppCompatActivity {
@Override
protected void onCreate(Bundle savedInstanceState) {
super.onCreate(savedInstanceState);
setContentView(R.layout.activity_main);
ListView listView = (ListView) findViewById(R.id.lv);
List<String> list = new ArrayList<String>();
for(int i=0;i<20;i++)
{
list.add("因人而异"+i);
}
ArrayAdapter<String> adapter = new ArrayAdapter<String>(this, android.R.layout.simple_list_item_1, list);
listView.setAdapter(adapter);
}
}因为我们在 Xml 中已经指定好 ListView 的 LayoutAnimation 啦,所以我们只要给它添加一个适配器就 OK了。
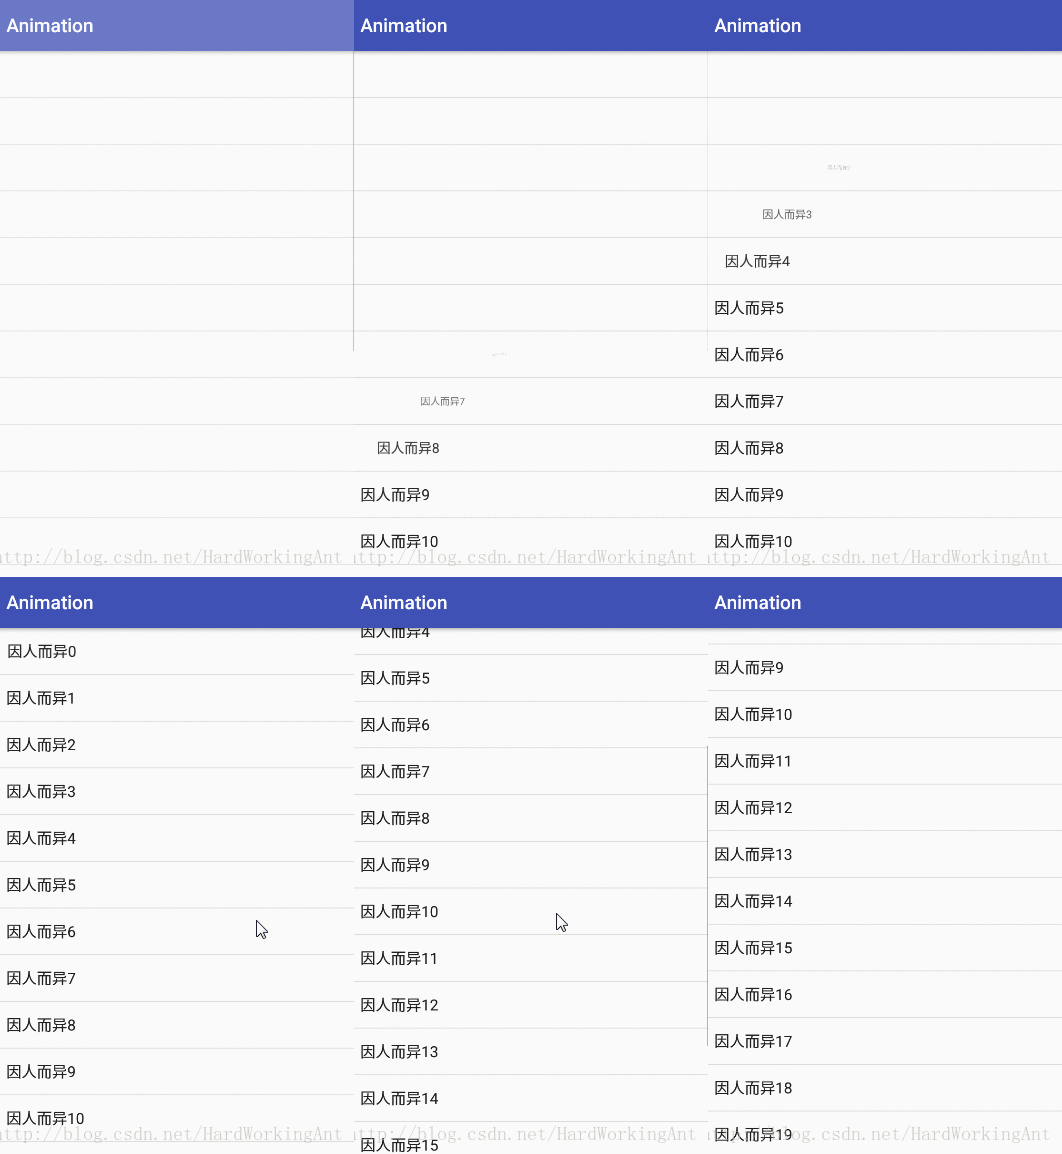
4、Java代码配置
Animation animation = AnimationUtils.loadAnimation(this, R.anim.zoom_in);
LayoutAnimationController lac=new LayoutAnimationController(animation);
lac.setOrder(LayoutAnimationController.ORDER_NORMAL);
listView.setLayoutAnimation(lac);
listView.startLayoutAnimation();
用 Java 代码配置就不用写LayoutAnimation啦,我们只要在上面的代码中手动去加载子动画,然后用LayoutAnimationController去把子动画配置到每一个子View中就可以啦。

可以看到我们把顺序已经被我们改为正序啦。
5、自定义播放顺序
通过上面的介绍,相信大家对 LayoutAnimationController 的功能已经有了一个比较清晰的认识,这种对 ViewGroup 的操作,对我们的动画效果有很大的帮助,但Android原生布局动画,仅支持顺序、倒序、随机3种动画执行顺序,这就使我们的动画有些简陋,不能适用于所有我们需要的效果。现在我就讲讲如何自定义一个播放 LayoutAnimation动画的顺序。
我们要自定义,首先就要知道 Android API 是如何实现顺序、倒序、随机这3种动画执行顺序的,我们来看看:
protected int getTransformedIndex(AnimationParameters params) {
        switch (getOrder()) {
            case ORDER_REVERSE:
                return params.count - 1 - params.index;
            case ORDER_RANDOM:
                if (mRandomizer == null) {
                    mRandomizer = new Random();
                }
                return (int) (params.count * mRandomizer.nextFloat());
            case ORDER_NORMAL:
            default:
                return params.index;
        }
    }
Android 就是通过 getTransformedIndex 这个方法来实现的,代码很清晰,我们可以看到reverse,normal,random。count 就是ViewGroup里子View的总数,index 则是当前子View的索引。拿 reverse 来举例,不难发现,返回的 int 值随着 index 的增大而变小,可能你已经发现了,没错,这个返回的 int 值就是播放动画的顺序,这样 index 在后面的在播放动画的时候就变到前面播放啦。并且这个方法是protected的,明显就是可由子类来扩展。
public class MyLayoutAnimationController extends LayoutAnimationController {

    public enum OrderCustom {
        CUSTOMNORMAL,
        CUSTOMREVERSE
    }

    private Callback onIndexListener;

    public void setOnIndexListener(Callback onIndexListener) {
        this.onIndexListener = onIndexListener;
    }

    public MyLayoutAnimationController(Animation animation, float delay) {
        super(animation, delay);
    }

    public interface Callback {
        public int getTransformedIndex(MyLayoutAnimationController controller, int count, int index);
    }

    @Override
    protected int getTransformedIndex(AnimationParameters params) {
        if (onIndexListener != null) {
            return onIndexListener.getTransformedIndex(this, params.count, params.index);
        } else {
            return super.getTransformedIndex(params);
        }
    }

    public static MyLayoutAnimationController generateController(Animation animation, float delay) {
        return generateController(animation, delay, null);
    }

    public static MyLayoutAnimationController generateController(@NonNull Animation animation,
                                                                 float delay, @Nullable final OrderCustom custom) {
        MyLayoutAnimationController controller = new MyLayoutAnimationController(animation, delay);
        controller.setOnIndexListener(new Callback() {
            @Override
            public int getTransformedIndex(MyLayoutAnimationController controller, int count, int index) {
                if (custom != null) {
                    switch (custom) {
                        case CUSTOMNORMAL:
                            return Utils.getTransformedIndex(count, index);
                        case CUSTOMREVERSE:
                            return Utils.getTransformedIndexREVERSE(count, index);
                        default:
                            break;
                    }
                }
                return index;
            }
        });

        return controller;
    }

    public static void setLayoutAnimation(@NonNull ViewGroup viewGroup,
                                          @NonNull Animation animation, float delay, @Nullable final OrderCustom custom) {
        MyLayoutAnimationController controller = generateController(animation, delay, custom);
        viewGroup.setLayoutAnimation(controller);
    }

    public static void setLayoutAnimation(@NonNull ViewGroup viewGroup,
                                          @AnimRes int animResId, float delay, @Nullable final OrderCustom custom) {
        Animation animation = AnimationUtils.loadAnimation(viewGroup.getContext(), animResId);
        setLayoutAnimation(viewGroup, animation, delay, custom);
    }
}
上面的代码就是我自定义的 LayoutAnimation 的动画顺序的实现,首先我们当然要为我们的自定义属性赋值。
public enum OrderCustom {
        CUSTOMNORMAL,
        CUSTOMREVERSE
    }
根据当前枚举类型的值,确定调用哪一种我们定义的顺序。
我把实现顺序的代码放进一个 Utils.java里:
public class Utils {

    private Utils() {
        throw new RuntimeException("工具类禁止新建实例");
    }

    public static int getTransformedIndexREVERSE(int count, int index){
        return (count-1) - getTransformedIndex(count, index);
    }

    public static int getTransformedIndex(int count, int index){
        if (index%2==0){
            //1:index为偶数的项
            return index/2;
        }else {
            //2:index为奇数的项
            if(count%2==0){
                //2.1:当总项数是偶数
                return (count/2-1) + (index+1)/2;
            }else {
                //2.2:当总项数是奇数
                return (count/2) + (index+1)/2;
            }
        }
    }
}
可以看出 CUSTOMNORMAL 对应的是 getTransformedIndex 方法,而方法的目的就是改变当前索引的值,也就是改变当前子View的播放顺序。经过这个方法,我们原来的索引0,2,4…就变成了0,1,2..,1,3,5..就变成了count/2 + 1,count/2 + 2,count/2 + 3啦,也就是先正序播放索引为偶数的,再正序播放索引为奇数的。
getTransformedIndexREVERSE 方法则正好相反,会倒序播放索引为偶数的,再倒序播放索引为奇数的。
private Callback onIndexListener;

public void setOnIndexListener(Callback onIndexListener) {
     this.onIndexListener = onIndexListener;
}

public interface Callback {
     public int getTransformedIndex(MyLayoutAnimationController controller, int count, int index);
}
CallBack 就是我为 MyLayoutAnimationController 设置的回调监听器,去做参数传递和枚举值选择。
@Override
protected int getTransformedIndex(AnimationParameters params) {
    if (onIndexListener != null) {
         return onIndexListener.getTransformedIndex(this, params.count, params.index);
    } else {
         return super.getTransformedIndex(params);
    }
}
这就是我们复写的 getTransformedIndex,它会自动调用。这里就用到了我们的 CallBack,如果监听器不为空,则调用CallBack 的getTransformedIndex 去调用我们写得自定义控件播放动画的顺序。否则就调用父类的。
public static MyLayoutAnimationController generateController(@NonNull Animation animation,
                                                                 float delay, @Nullable final OrderCustom custom) {
    MyLayoutAnimationController controller = new MyLayoutAnimationController(animation, delay);
    controller.setOnIndexListener(new Callback() {
        @Override
        public int getTransformedIndex(MyLayoutAnimationController controller, int count, int index) {
            if (custom != null) {
                switch (custom) {
                    case CUSTOMNORMAL:
                        return Utils.getTransformedIndex(count, index);
                    case CUSTOMREVERSE:
                        return Utils.getTransformedIndexREVERSE(count, index);
                   default:
                       break;
                }
            }
            return index;
        }
    });
    return controller;
}
generateController 就是我们用来创建 MyLayoutAnimationController 对象,并且构建监听器的方法。
public static void setLayoutAnimation(@NonNull ViewGroup viewGroup,
                                          @NonNull Animation animation, float delay, @Nullable final OrderCustom custom) {
    MyLayoutAnimationController controller = generateController(animation, delay, custom);
    viewGroup.setLayoutAnimation(controller);
}

public static void setLayoutAnimation(@NonNull ViewGroup viewGroup,
                                          @AnimRes int animResId, float delay, @Nullable final OrderCustom custom) {
    Animation animation = AnimationUtils.loadAnimation(viewGroup.getContext(), animResId);
    setLayoutAnimation(viewGroup, animation, delay, custom);
}
最后就是我们用来与外部交互的方法啦,根据指定的动画、单个子View动画延时、子View动画执行顺序算法枚举值 创建一个新的MyLayoutAnimationController实例,将此实例作为参数为viewGroup设置布局动画。
代码看上去有些复杂却并不难理解,关键还是如何去复写getTransformedIndex。
现在就把它添加到我们的代码中。
SwitchActivity.java:
public class SwitchActivity extends AppCompatActivity {
    private LinearLayout ll = null;

    @Override
    protected void onCreate(Bundle savedInstanceState) {
        super.onCreate(savedInstanceState);
        setContentView(R.layout.button);
        ll = (LinearLayout) findViewById(R.id.ll);
        int count = ll.getChildCount();
        for(int i =0;i<count;i++){
            final int index = i;
            ll.getChildAt(i).setOnClickListener(new View.OnClickListener() {
                @Override
                public void onClick(View v) {
                    Intent intent = new Intent(SwitchActivity.this, CustomActivity.class);
                    intent.putExtra("index",index);
                    startActivity(intent);
                }
            });
        }
    }
}
布局就是两个 Button 用来选择使用的自定义控件播放动画的顺序。通过点击的Button的在LinearLayout中索引。
CustomActivity.java:
public class CustomActivity extends AppCompatActivity {

    private MyLayoutAnimationController.OrderCustom[] customs = new MyLayoutAnimationController.OrderCustom[]{
            MyLayoutAnimationController.OrderCustom.CUSTOMNORMAL,
            MyLayoutAnimationController.OrderCustom.CUSTOMREVERSE
    };

    private int color = Constant.color_flyme_blue_sky;

    private LinearLayout ll = null;

    private int anim = R.anim.scale_anim;

    private int index = 0;

    @Override
    protected void onCreate(@Nullable Bundle savedInstanceState) {
        super.onCreate(savedInstanceState);
        index = getIntent().getIntExtra("index", index);
        int customIndex = index % customs.length;
        setContentView(R.layout.scale);

        ll = (LinearLayout) findViewById(R.id.ll);

        for (int i = 0; i < ll.getChildCount(); i++) {
            LinearLayout layout = (LinearLayout) ll.getChildAt(i);
            for (int j = 0; j < layout.getChildCount(); j++) {
                layout.getChildAt(j).setBackgroundColor(color);
            }
            MyLayoutAnimationController.setLayoutAnimation(layout, anim, 0.8f, customs[customIndex]);
            customIndex = (customIndex + 1) % customs.length;
        }
    }
}
这就是实现我们动画的 Activity 啦,activity_main.xml 里有两个LinearLayout,分别有四个Button,这两个LinearLayout分别实现我们自定义的这两种播放动画的顺序。
color是一个对颜色收集的常量类。
public final class Constant {
    //4种常用背景色
    public static final int color_info = 0XFF2094F3;        //信息
    public static final int color_confirm = 0XFF4CB04E;     //确认
    public static final int color_warning = 0XFFFEC005;     //警告
    public static final int color_danger = 0XFFF44336;      //危险
    //中国传统36色
    public static final int color_cn_zhuqing = 0XFF7D9768;          //竹青
    public static final int color_cn_wan = 0XFFBE968E;              //绾
    public static final int color_cn_li = 0XFF76664D;               //黎
    public static final int color_cn_huanglu = 0XFFE3A335;          //黄栌
    public static final int color_cn_ou = 0XFFEED0D8;               //藕
    public static final int color_cn_chabai = 0XFFEFF4ED;           //茶白
    public static final int color_cn_zitan = 0XFF6A2C1F;            //紫檀
    public static final int color_cn_cang = 0XFF8EA7AB;             //苍
    public static final int color_cn_dingxiang = 0XFFD6B5D4;        //丁香
    public static final int color_cn_yuebai = 0XFFEEF6F8;           //月白
    public static final int color_cn_su = 0XFFE1EEE7;               //素
    public static final int color_cn_lanhui = 0XFF9CAAC4;           //蓝灰
    public static final int color_cn_yaluanqing = 0XFFEAF5F1;       //鸭卵青
    public static final int color_cn_xiangyabai = 0XFFFEFEF6;       //象牙白
    public static final int color_cn_ya = 0XFFE9DDB5;               //牙
    public static final int color_cn_xue = 0XFFF8FCFD;              //雪
    public static final int color_cn_dailan = 0XFF566177;           //黛蓝
    public static final int color_cn_shuilv = 0XFFD3EAE2;           //水绿
    public static final int color_cn_wuhei = 0XFF392E3F;            //乌黑
    public static final int color_cn_shuang = 0XFFE9F0F8;           //霜
    public static final int color_cn_fei = 0XFFED5736;              //妃
    public static final int color_cn_mohui = 0XFF748A98;            //墨灰
    public static final int color_cn_xuehui = 0XFFEDEDEF;           //雪灰
    public static final int color_cn_yanzhi = 0XFF97282F;           //胭脂
    public static final int color_cn_yaqing = 0XFF424B50;           //鸦青
    public static final int color_cn_zi = 0XFF493131;               //淄
    public static final int color_cn_qihei = 0XFF131522;            //漆黑
    public static final int color_cn_haitanghong = 0XFFD13658;      //海棠红
    public static final int color_cn_mo = 0XFF272923;               //墨
    public static final int color_cn_liuhuang = 0XFFC9DD23;         //柳黄
    public static final int color_cn_tuoyan = 0XFFF99070;           //酡颜
    public static final int color_cn_pinhong = 0XFFF00057;          //品红
    public static final int color_cn_yan = 0XFFD36870;              //嫣
    public static final int color_cn_xueqing = 0XFFA49BC8;          //雪青
    public static final int color_cn_feicui = 0XFF5BB995;           //翡翠
    public static final int color_cn_hupo = 0XFFCA6924;             //琥珀
    //flyme6中7配色
    public static final int color_flyme_blue_sky = 0XFF198DED;      //天蓝
    public static final int color_flyme_blue_green = 0XFF04C0CF;    //蓝绿
    public static final int color_flyme_green = 0XFF3BC06B;         //绿
    public static final int color_flyme_yellow = 0XFFFFBE26;        //黄
    public static final int color_flyme_orange = 0XFFFC5B23;        //橙
    public static final int color_flyme_red_dark = 0XFFD33A2A;      //深红
    public static final int color_flyme_red_bright = 0XFFF12528;    //鲜红

    private Constant(){
        throw new RuntimeException("禁止创建实例!");
    }
}
动画也很简单,scale_anim.xml:
<?xml version="1.0" encoding="utf-8"?>
<scale xmlns:android="http://schemas.android.com/apk/res/android"
    android:duration="500"
    android:fromXScale="1.0"
    android:toXScale="0.1"
    android:pivotX="50%"
    android:pivotY="50%"
    android:fromYScale="1.0"
    android:toYScale="0.1" />
可以看到点击不同的 Button,上下两个 LinearLayout 的子View动画播放顺序就交换啦。
好啦,关于LayoutAnimation的介绍就到这里。
结束语:本文仅用来学习记录,参考查阅。





 扫一扫
扫一扫


 621
621

 被折叠的 条评论
为什么被折叠?
被折叠的 条评论
为什么被折叠?
 到【灌水乐园】发言





