


屏幕后处理
在渲染完整个场景得到屏幕图像后,再对这个图像进行处理,实现各种特效。在渲染后的屏幕图像,即抓屏,OnRenderImage函数接口可以对该图像进行操作返回最终的图像,利用Graphics.Blit()函数处理图片。默认情况下,OnRenderImage在透明和不透明的pass执行完后被调用。大致的流程:向摄像机添加脚本--》实现OnRenderImage函数--》调用Graphics.Blit()使用特定的shader处理图像--》将最终的图像返回屏幕。注意:使用之前需要检查条件是否满足这样的操作,平台是否支持该操作。
饱和度、亮度、对比度
using System;
using System.Collections;
using System.Collections.Generic;
using UnityEngine;

[ExecuteInEditMode]//在编辑模式下能够执行该程序
[RequireComponent(typeof(Camera))]
public class RenderDemo : MonoBehaviour
{
    //是否支持屏幕特效
    private bool isEnabled;
    private void Check()
    {
        //SystemInfo 基本能够获取运行平台的所有属性信息。
        if (SystemInfo.supportsImageEffects==false|| SystemInfo.supportsRenderTextures==false)
        {
            isEnabled = false;
            Debug.LogWarning("不支持屏幕特效或纹理渲染");
        }
        else
        {
            isEnabled = true;
        }
    }

    private void Start()
    {
        Check();
    }

    protected Material CheckShaderAndCreateMaterial(Shader shader,Material material)
    {
        if (null ==shader)
        {
            return null;
        }

        if (shader.isSupported && material && material.shader==shader)
        {
            return material;
        }

        if (!shader.isSupported)
        {
            return null;
        }
        else
        {
            material=new Material(shader);
            //hideFlags用于控制对象的破坏,保存和在检查器中的可见性。
            //不保存到场景中,加载新场景是不会被销毁。
            material.hideFlags = HideFlags.DontSave;
            if (material)
            {
                return material;
            }
            else
            {
               return null;
            }
        }
    }
    public Shader briSatConShader;
    private Material briSatConMaterial;
    public Material material {
        get {
            briSatConMaterial = CheckShaderAndCreateMaterial(briSatConShader, briSatConMaterial);
            return briSatConMaterial;
        }
    }

    [Range(0.0f, 3.0f)]
    public float brightness = 1.0f;

    [Range(0.0f, 3.0f)]
    public float saturation = 1.0f;

    [Range(0.0f, 3.0f)]
    public float contrast = 1.0f;
    void OnRenderImage(RenderTexture src, RenderTexture dest) {
        if (material != null) {
            material.SetFloat("_Brightness", brightness);
            material.SetFloat("_Saturation", saturation);
            material.SetFloat("_Contrast", contrast);

            Graphics.Blit(src, dest, material);
        } else {
            Graphics.Blit(src, dest);
        }
    }
}
Shader "Unlit/First"
{
    Properties
    {
        _MainTex ("Texture", 2D) = "white" {}
        _Birghtness("Birghtness",Float)=1.0
        _Saturation("Saturation",Float)=1.0
        _Contrast("Contrast",Float)=1.0
    }
    SubShader
    {
        Pass
        {
            ZTest Always Cull Off ZWrite Off
            CGPROGRAM
            #pragma vertex vert
            #pragma fragment frag
            #include "UnityCG.cginc"

            sampler2D _MainTex;
            float4 _MainTex_ST;
            fixed _Birghtness;
            fixed _Saturation;
            fixed _Contrast;


            struct v2f
            {
                float4 pos : SV_POSITION;
                float2 uv : TEXCOORD0;

            };
            v2f vert (appdata_img v)
            {
                v2f o;
                o.pos = UnityObjectToClipPos(v.vertex);
                o.uv = v.texcoord;
                return o;
            }
            fixed4 frag (v2f i) : SV_Target
            {
                fixed4 renderTex = tex2D(_MainTex, i.uv);
                //亮度
                fixed3 finalColor=renderTex.rgb * _Birghtness;
                //饱和度
                //通过固定的系数算的luminance 亮度
                fixed luminance=0.2125 * renderTex.r + 0.7154 * renderTex.g + 0.0721 * renderTex.b;
                fixed3 luminanceColor=fixed3(luminance,luminance,luminance);
                finalColor= lerp(luminanceColor,finalColor,_Saturation);

                //对比度 像创建对比度为0的颜色值 也就是各个分量为0.5
                fixed3 avgColor=fixed3(0.5,0.5,0.5);
                finalColor=lerp(avgColor,finalColor,_Contrast);
                return fixed4(finalColor,renderTex.a);
            }
            ENDCG
        }
    }
    FallBack Off
}
边缘检测
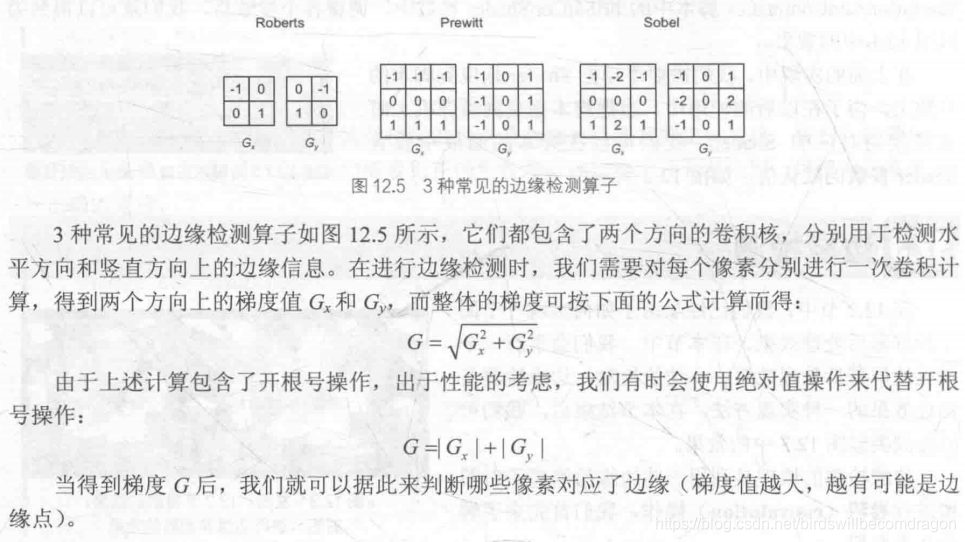
原理利用一些边缘检测算子对图像进行卷积操作。
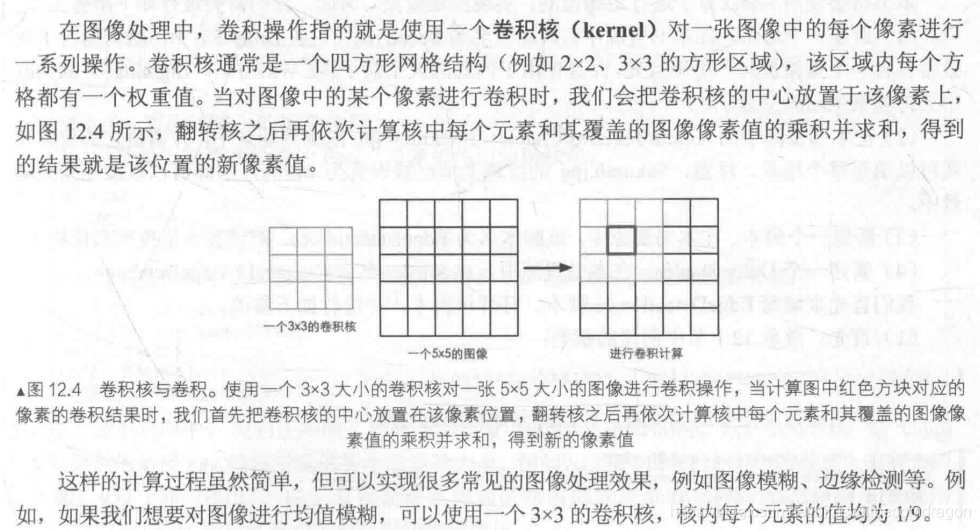
如果相邻像素间存在差异明显的颜色、亮度、纹理等属性,就可认为之间存在边界----差值可用梯度(gradient)描述.
using System;
using System.Collections;
using System.Collections.Generic;
using UnityEngine;

public class Two : RenderDemo
{
    public Shader edgeDetectShader;
    private Material edgeDetectMaterial = null;
    public Material material {
        get {
            edgeDetectMaterial = CheckShaderAndCreateMaterial(edgeDetectShader, edgeDetectMaterial);
            return edgeDetectMaterial;
        }
    }

    [Range(0.0f, 1.0f)]
    public float edgesOnly = 0.0f;

    public Color edgeColor = Color.black;

    public Color backgroundColor = Color.white;

    void OnRenderImage (RenderTexture src, RenderTexture dest) {
        if (material != null) {
            material.SetFloat("_EdgeOnly", edgesOnly);
            material.SetColor("_EdgeColor", edgeColor);
            material.SetColor("_BackgroundColor", backgroundColor);

            Graphics.Blit(src, dest, material);
        } else {
            Graphics.Blit(src, dest);
        }
    }
}
Shader "Unlit/Two"
{
    Properties
    {
        _MainTex ("Texture", 2D) = "white" {}
        _EdgeColor("_EdgeColor",Color)=(0,0,0,0)
        _BackGroundColor("_BackGroundColor",Color)=(1,1,1,1)
        _EdgeOnly("_EdgeOnly",Float)=0
    }
    SubShader
    {
        Pass
        {
            ZTest Always Cull Off ZWrite Off
            CGPROGRAM
            #pragma vertex vert
            #pragma fragment frag

            #include "UnityCG.cginc"

            fixed4 _EdgeColor;
            fixed4 _BackGroundColor;
            //边缘线强度
            fixed _EdgeOnly;
            sampler2D _MainTex;
            fixed4 _MainTex_TexelSize;//得到纹素值  ,卷积需要对相邻区域内的纹理进行采样,需要利用纹素值来计算各个相邻区域的纹理坐标

            struct v2f
            {
                float4 vertex : POSITION;
                half2 uv[9] : TEXCOORD0;
            };

            v2f vert (appdata_img v)
            {
                v2f o;
                o.vertex = UnityObjectToClipPos(v.vertex);
                half2 uv=v.texcoord;
                //维数为9的数组,sobel算子采样时需要9个纹域纹理坐标
                o.uv[0]=uv+_MainTex_TexelSize.xy * half2(-1,-1);
                o.uv[1]=uv+_MainTex_TexelSize.xy * half2(0,-1);
                o.uv[2]=uv+_MainTex_TexelSize.xy * half2(1,-1);
                o.uv[3]=uv+_MainTex_TexelSize.xy * half2(-1,0);
                o.uv[4]=uv+_MainTex_TexelSize.xy * half2(0,0);//中心位置的纹理。
                o.uv[5]=uv+_MainTex_TexelSize.xy * half2(1,0);
                o.uv[6]=uv+_MainTex_TexelSize.xy * half2(-1,1);
                o.uv[7]=uv+_MainTex_TexelSize.xy * half2(0,1);
                o.uv[8]=uv+_MainTex_TexelSize.xy * half2(1,1);

                return o;
            }
            fixed luminance(fixed4 color) {
				return  0.2125 * color.r + 0.7154 * color.g + 0.0721 * color.b;
			}
			//sobel算子的定义--计算的edge越小,该位置就越可能是边缘点。
			half Sobel(v2f i) {
				const half Gx[9] = {-1,  0,  1,
										-2,  0,  2,
										-1,  0,  1};
				const half Gy[9] = {-1, -2, -1,
										0,  0,  0,
										1,  2,  1};
				half texColor;
				half edgeX = 0;
				half edgeY = 0;
				for (int it = 0; it < 9; it++) {
					texColor = luminance(tex2D(_MainTex, i.uv[it]));
					edgeX += texColor * Gx[it];
					edgeY += texColor * Gy[it];
				}

				half edge = 1 - abs(edgeX) - abs(edgeY);

				return edge;
			}

            fixed4 frag (v2f i) : SV_Target
            {
                //将计算采样纹理坐标转移到片元着色器,可以减少运算,提高性能。
                //利用Sobel得到梯度值
                fixed edge=Sobel(i);

                fixed4 withEdgeColoe=lerp(_EdgeColor,tex2D(_MainTex,i.uv[4]),edge);
                fixed4 onlyEgdeColor=lerp(_EdgeColor,_BackGroundColor,edge);
                fixed4 finalColor=lerp(withEdgeColoe,onlyEgdeColor,_EdgeOnly);
                return finalColor;
            }
            ENDCG
        }
    }
    FallBack Off
}
高斯模糊
卷积的另一个应用---高斯模糊。模糊实现:均值模糊(卷积后得到的像素值是其相邻内各个像素值的平均值);中值模糊(选择邻域内对所有像素排序后的中值替换原颜色);
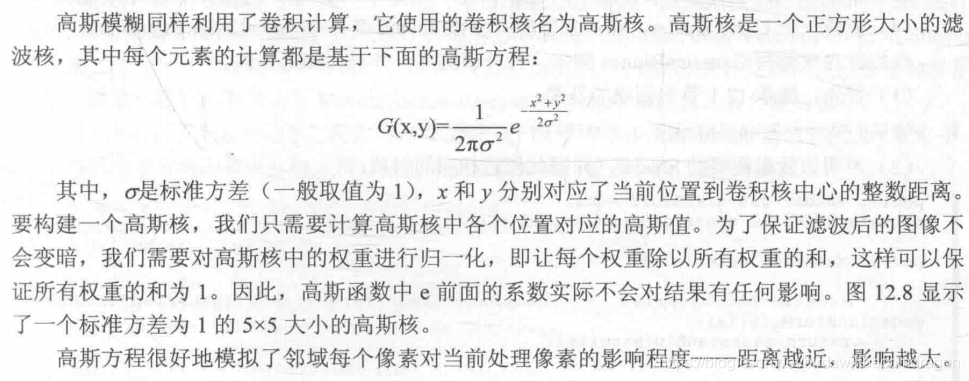
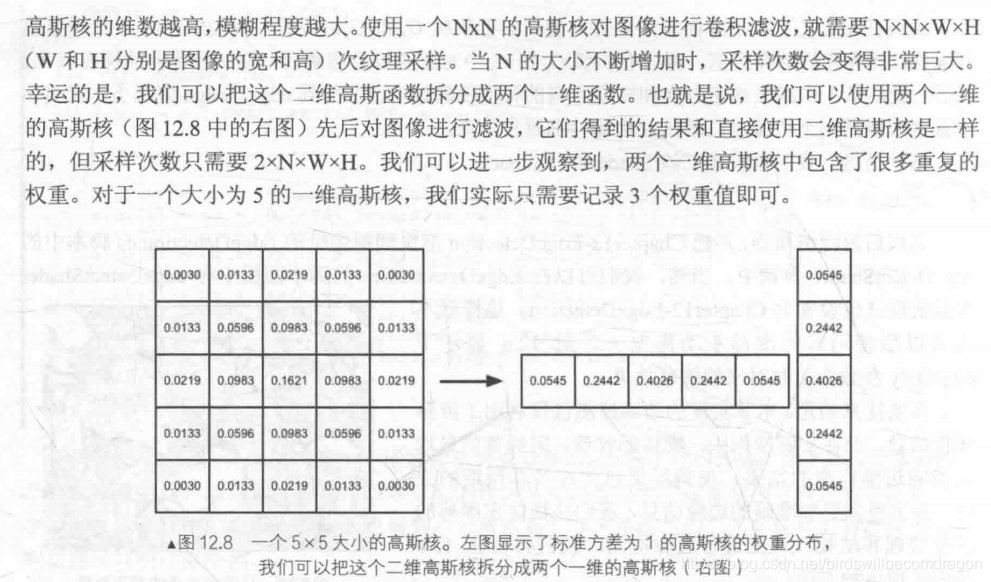
一个pass使用竖直方向的一维高斯核对图像进行滤波,第二个pass再使用水平方向的一维高斯核对图像进行滤波。
Shader "Unlit/3"
{
   Properties {
		_MainTex ("Base (RGB)", 2D) = "white" {}
		_BlurSize ("Blur Size", Float) = 1.0
	}
	SubShader {

	    // 使用 CGINCLUDE ENDCG 组织代码 不需要包含pass 使用时只需要 指定其中的顶点或片着色器即可调用
		CGINCLUDE
		#include "UnityCG.cginc"

		sampler2D _MainTex;
		half4 _MainTex_TexelSize;
		//控制采样距离
		float _BlurSize;

		struct v2f {
			float4 pos : SV_POSITION;
			half2 uv[5]: TEXCOORD0;
		};

		v2f vertBlurVertical(appdata_img v) {
			v2f o;
			o.pos = UnityObjectToClipPos(v.vertex);

			half2 uv = v.texcoord;

			o.uv[0] = uv;
			o.uv[1] = uv + float2(0.0, _MainTex_TexelSize.y * 1.0) * _BlurSize;
			o.uv[2] = uv - float2(0.0, _MainTex_TexelSize.y * 1.0) * _BlurSize;
			o.uv[3] = uv + float2(0.0, _MainTex_TexelSize.y * 2.0) * _BlurSize;
			o.uv[4] = uv - float2(0.0, _MainTex_TexelSize.y * 2.0) * _BlurSize;

			return o;
		}

		v2f vertBlurHorizontal(appdata_img v) {
			v2f o;
			o.pos = UnityObjectToClipPos(v.vertex);

			half2 uv = v.texcoord;

			o.uv[0] = uv;
			o.uv[1] = uv + float2(_MainTex_TexelSize.x * 1.0, 0.0) * _BlurSize;
			o.uv[2] = uv - float2(_MainTex_TexelSize.x * 1.0, 0.0) * _BlurSize;
			o.uv[3] = uv + float2(_MainTex_TexelSize.x * 2.0, 0.0) * _BlurSize;
			o.uv[4] = uv - float2(_MainTex_TexelSize.x * 2.0, 0.0) * _BlurSize;

			return o;
		}

		fixed4 fragBlur(v2f i) : SV_Target {
		    //采样纹理坐标转移到片元中,减少运算,可提高性能,顶点到片元的插值时线性的,不会影响计算结果
			float weight[3] = {0.4026, 0.2442, 0.0545};

			fixed3 sum = tex2D(_MainTex, i.uv[0]).rgb * weight[0];

			for (int it = 1; it < 3; it++) {
				sum += tex2D(_MainTex, i.uv[it*2-1]).rgb * weight[it];
				sum += tex2D(_MainTex, i.uv[it*2]).rgb * weight[it];
			}

			return fixed4(sum, 1.0);
		}

		ENDCG

		ZTest Always Cull Off ZWrite Off

		Pass {
		    //定义该pass的name 以便于再其他shader中进行调用
			NAME "GAUSSIAN_BLUR_VERTICAL"

			CGPROGRAM
		    //指明CGINCLUDE 中的调用方法
			#pragma vertex vertBlurVertical
			#pragma fragment fragBlur

			ENDCG
		}

		Pass {

			NAME "GAUSSIAN_BLUR_HORIZONTAL"

			CGPROGRAM

			#pragma vertex vertBlurHorizontal
			#pragma fragment fragBlur

			ENDCG
		}
	}
	FallBack "Diffuse"
}
using System;
using System.Collections;
using System.Collections.Generic;
using UnityEngine;

public class Thredd : RenderDemo
{
    public Shader briSatConShader;
    private Material briSatConMaterial;
    public Material material {
        get {
            briSatConMaterial = CheckShaderAndCreateMaterial(briSatConShader, briSatConMaterial);
            return briSatConMaterial;
        }
    }

    //高斯模糊迭代次数
    [Range(0, 4)]
    public float iteration = 3;
    //模糊范围 过大会造成虚影
    [Range(0.2f, 3)]
    public float blurSpread = 0.6f;

    //缩放系数 过大需要处理的像素越少,会造成图像像素化
    [Range(1,8)]
    public int downSample=2;

    /*private void OnRenderImage(RenderTexture src, RenderTexture dest)
    {
        if (material!=null)
        {
            int rtw = src.width;
            int rth = src.height;
            //临时的texture
            RenderTexture buffer = RenderTexture.GetTemporary(rtw, rth, 0);
            //先执行 第一个pass 结果存在临时buffer
            Graphics.Blit(src,buffer,material,0);
            //再执行第二个pass
            Graphics.Blit(buffer,dest,material,1);
            //释放临时的buffer
            RenderTexture.ReleaseTemporary(buffer);
        }
        else
        {
            Graphics.Blit(src,dest);
        }

    }*/
    /*private void OnRenderImage(RenderTexture src, RenderTexture dest)
    {
        if (material!=null)
        {
            //对图像进行降采样减少需要处理的像素个数提高性能,
            //除以缩放系数
            int rtw = src.width/downSample;
            int rth = src.height/downSample;
            //临时的texture
            RenderTexture buffer = RenderTexture.GetTemporary(rtw, rth, 0);
            //双线性过滤-将纹理样本平均
            buffer.filterMode = FilterMode.Bilinear;
            //先执行 第一个pass 结果存在临时buffer
            Graphics.Blit(src,buffer,material,0);
            //再执行第二个pass
            Graphics.Blit(buffer,dest,material,1);
            //释放临时的buffer
            RenderTexture.ReleaseTemporary(buffer);
        }
        else
        {
            Graphics.Blit(src,dest);
        }

    }*/
    private void OnRenderImage(RenderTexture src, RenderTexture dest)
    {
        if (material!=null)
        {
            //对图像进行降采样减少需要处理的像素个数提高性能,
            //除以缩放系数
            int rtw = src.width/downSample;
            int rth = src.height/downSample;
            //临时的texture
            RenderTexture buffer = RenderTexture.GetTemporary(rtw, rth, 0);
            //双线性过滤-将纹理样本平均
            buffer.filterMode = FilterMode.Bilinear;
            Graphics.Blit(src,buffer);
            //迭代模糊次数
            for (int i=0;i<iteration;i++)
            {
                material.SetFloat("_BlueSize",1.0f+ i * blurSpread);

                RenderTexture buffer0 = RenderTexture.GetTemporary(rtw, rth, 0);
                Graphics.Blit(buffer,buffer0,material,0);
                RenderTexture.ReleaseTemporary(buffer);
                buffer = buffer0;

                buffer0 = RenderTexture.GetTemporary(rtw, rth, 0);
                Graphics.Blit(buffer,buffer0,material,1);
                RenderTexture.ReleaseTemporary(buffer);
                buffer = buffer0;
            }
            Graphics.Blit(buffer,dest);
            //释放临时的buffer
            RenderTexture.ReleaseTemporary(buffer);
        }
        else
        {
            Graphics.Blit(src,dest);
        }
    }
}
Bloom
让屏幕画面中较亮的区域向外扩散,造成朦胧的效果。原理:设定一个阈值提取图像中较亮区域,把它们存储到一张渲染图中,在进行高斯模糊,模拟光线扩散的效果,最后和原图混合得到最终效果。三个pass : 第一个pass提取较亮的区域,第二和第三个pass进行高斯模糊,第四个pass将高斯模糊后的结果与原图混合。
public class Bloom : RenderDemo{

	public Shader bloomShader;
	private Material bloomMaterial = null;
	public Material material {
		get {
			bloomMaterial = CheckShaderAndCreateMaterial(bloomShader, bloomMaterial);
			return bloomMaterial;
		}
	}

	[Range(0, 4)]
	public int iterations = 3;

	[Range(0.2f, 3.0f)]
	public float blurSpread = 0.6f;

	[Range(1, 8)]
	public int downSample = 2;
	//提取较亮区域的阈值,开启HDR后,会得到更加精确颜色值,此时像素亮度可能会大于1
	[Range(0.0f, 4.0f)]
	public float luminanceThreshold = 0.6f;

	void OnRenderImage (RenderTexture src, RenderTexture dest) {
		if (material != null) {
			material.SetFloat("_LuminanceThreshold", luminanceThreshold);

			int rtW = src.width/downSample;
			int rtH = src.height/downSample;

			RenderTexture buffer0 = RenderTexture.GetTemporary(rtW, rtH, 0);
			buffer0.filterMode = FilterMode.Bilinear;

			Graphics.Blit(src, buffer0, material, 0);

			for (int i = 0; i < iterations; i++) {
				material.SetFloat("_BlurSize", 1.0f + i * blurSpread);

				RenderTexture buffer1 = RenderTexture.GetTemporary(rtW, rtH, 0);

				Graphics.Blit(buffer0, buffer1, material, 1);

				RenderTexture.ReleaseTemporary(buffer0);
				buffer0 = buffer1;
				buffer1 = RenderTexture.GetTemporary(rtW, rtH, 0);

				Graphics.Blit(buffer0, buffer1, material, 2);

				RenderTexture.ReleaseTemporary(buffer0);
				buffer0 = buffer1;
			}

			material.SetTexture ("_Bloom", buffer0);
			Graphics.Blit (src, dest, material, 3);

			RenderTexture.ReleaseTemporary(buffer0);
		} else {
			Graphics.Blit(src, dest);
		}
	}
}
// Upgrade NOTE: replaced 'mul(UNITY_MATRIX_MVP,*)' with 'UnityObjectToClipPos(*)'
Shader "Unlit/4" {
Properties {
_MainTex ("Base (RGB)", 2D) = "white" {}
_Bloom ("Bloom (RGB)", 2D) = "black" {}
_LuminanceThreshold ("Luminance Threshold", Float) = 0.5
_BlurSize ("Blur Size", Float) = 1.0
}
SubShader {
CGINCLUDE
#include "UnityCG.cginc"
sampler2D _MainTex;
half4 _MainTex_TexelSize;
sampler2D _Bloom;
float _LuminanceThreshold;
float _BlurSize;
struct v2f {
float4 pos : SV_POSITION;
half2 uv : TEXCOORD0;
};
v2f vertExtractBright(appdata_img v) {
v2f o;
o.pos = UnityObjectToClipPos(v.vertex);
o.uv = v.texcoord;
return o;
}
//计算得到亮度
fixed luminance(fixed4 color) {
return 0.2125 * color.r + 0.7154 * color.g + 0.0721 * color.b;
}
//亮度区域
fixed4 fragExtractBright(v2f i) : SV_Target {
fixed4 c = tex2D(_MainTex, i.uv);
//亮度减去阈值==较亮的区域 最终的范围要在0~1之间
fixed val = clamp(luminance(c) - _LuminanceThreshold, 0.0, 1.0);
return c * val;
}
//混合较亮区域
struct v2fBloom {
float4 pos : SV_POSITION;
half4 uv : TEXCOORD0;
};
v2fBloom vertBloom(appdata_img v) {
v2fBloom o;
o.pos = UnityObjectToClipPos (v.vertex);
o.uv.xy = v.texcoord;
o.uv.zw = v.texcoord;
#if UNITY_UV_STARTS_AT_TOP
if (_MainTex_TexelSize.y < 0.0)
o.uv.w = 1.0 - o.uv.w;
#endif
return o;
}
fixed4 fragBloom(v2fBloom i) : SV_Target {
//相加混合原图和bloom图
return tex2D(_MainTex, i.uv.xy) + tex2D(_Bloom, i.uv.zw);
}
ENDCG
ZTest Always Cull Off ZWrite Off
Pass {
CGPROGRAM
#pragma vertex vertExtractBright
#pragma fragment fragExtractBright
ENDCG
}
UsePass "Unlit/3/GAUSSIAN_BLUR_VERTICAL"
UsePass "Unlit/3/GAUSSIAN_BLUR_HORIZONTAL"
Pass {
CGPROGRAM
#pragma vertex vertBloom
#pragma fragment fragBloom
ENDCG
}
}
FallBack Off
}
运动模糊
相机曝光时,拍摄场景发生变化,就会产生模糊的效果。运动模糊的实现方法:利用一块累计缓存(accumulation buffer)来混合多张连续的图像。当物体快速移动产生多张图像后,取其平均值作为最后的运动模糊图像-----性能消耗大,需要一帧里渲染多次场景。第二种:速度缓存(velocity buffer),这个缓存存储了各个像素当前的运动速度,再利用该值决定模糊的方向和大小。
public class MotionBlur : RenderDemo{

	public Shader motionBlurShader;
	private Material motionBlurMaterial = null;

	public Material material {
		get {
			motionBlurMaterial = CheckShaderAndCreateMaterial(motionBlurShader, motionBlurMaterial);
			return motionBlurMaterial;
		}
	}

	[Range(0.0f, 0.9f)]
	//运动模糊参数 越大越模糊
	public float blurAmount = 0.5f;

	private RenderTexture accumulationTexture;

	void OnDisable() {
		DestroyImmediate(accumulationTexture);
	}

	void OnRenderImage (RenderTexture src, RenderTexture dest) {
		if (material != null) {
			//是否满足条件
			if (accumulationTexture == null || accumulationTexture.width != src.width || accumulationTexture.height != src.height) {
				DestroyImmediate(accumulationTexture);
				accumulationTexture = new RenderTexture(src.width, src.height, 0);
				//不会显示在Hierarchy中,也不会保存到场景中,也不会由Resources.UnloadUnusedAssets卸载。
				accumulationTexture.hideFlags = HideFlags.HideAndDontSave;
				//替换渲染图
				Graphics.Blit(src, accumulationTexture);
			}
			//我们正在设计中累积帧的运动而没有清除/丢弃,因此请消除来自Unity的任何性能警告
			//纹理恢复操作,发生在渲染到纹理而纹理有没有提前清空或销毁,
			//不清空纹理,后续进行叠加
			accumulationTexture.MarkRestoreExpected();

			material.SetFloat("_BlurAmount", 1.0f - blurAmount);
            //叠加纹理
			Graphics.Blit (src, accumulationTexture, material);
			Graphics.Blit (accumulationTexture, dest);
		} else {
			Graphics.Blit(src, dest);
		}
	}
}
// Upgrade NOTE: replaced 'mul(UNITY_MATRIX_MVP,*)' with 'UnityObjectToClipPos(*)'
Shader "Unlit/6" {
Properties {
_MainTex ("Base (RGB)", 2D) = "white" {}
_BlurAmount ("Blur Amount", Float) = 1.0
}
SubShader {
CGINCLUDE
#include "UnityCG.cginc"
sampler2D _MainTex;
fixed _BlurAmount;
struct v2f {
float4 pos : SV_POSITION;
half2 uv : TEXCOORD0;
};
v2f vert(appdata_img v) {
v2f o;
o.pos = UnityObjectToClipPos(v.vertex);
o.uv = v.texcoord;
return o;
}
//更新RGB通道
fixed4 fragRGB (v2f i) : SV_Target {
return fixed4(tex2D(_MainTex, i.uv).rgb, _BlurAmount);
}
//跟新Alpha通道 混合图像,不写入渲染纹理中
half4 fragA (v2f i) : SV_Target {
return tex2D(_MainTex, i.uv);
}
ENDCG
ZTest Always Cull Off ZWrite Off
Pass {
//开启混合
Blend SrcAlpha OneMinusSrcAlpha
//只输出RGB
ColorMask RGB
CGPROGRAM
#pragma vertex vert
#pragma fragment fragRGB
ENDCG
}
Pass {
Blend One Zero
//只输出Alpha
ColorMask A
CGPROGRAM
#pragma vertex vert
#pragma fragment fragA
ENDCG
}
}
FallBack Off
}
https://blog.csdn.net/poem_qianmo/article/details/42060963

 3930
3930


 扫一扫
扫一扫


 被折叠的 条评论
为什么被折叠?
被折叠的 条评论
为什么被折叠?
 到【灌水乐园】发言


