



1、Redis Sentinel的客户端
Sentinel节点集合具备了监控、通知、自动故障转移、配置提供者若干功能,也就是说实际上最了解主节点信息的就是Sentinel节点集合,而各个主节点可以通过<master-name>进行标识的,所以,无论是哪种编程语言的客户端,如果需要正确地连接Redis Sentinel,必须有Sentinel节点集合和masterName两个参数。
2、Redis Sentinel客户端基本实现原理
实现一个Redis Sentinel客户端的基本步骤如下:
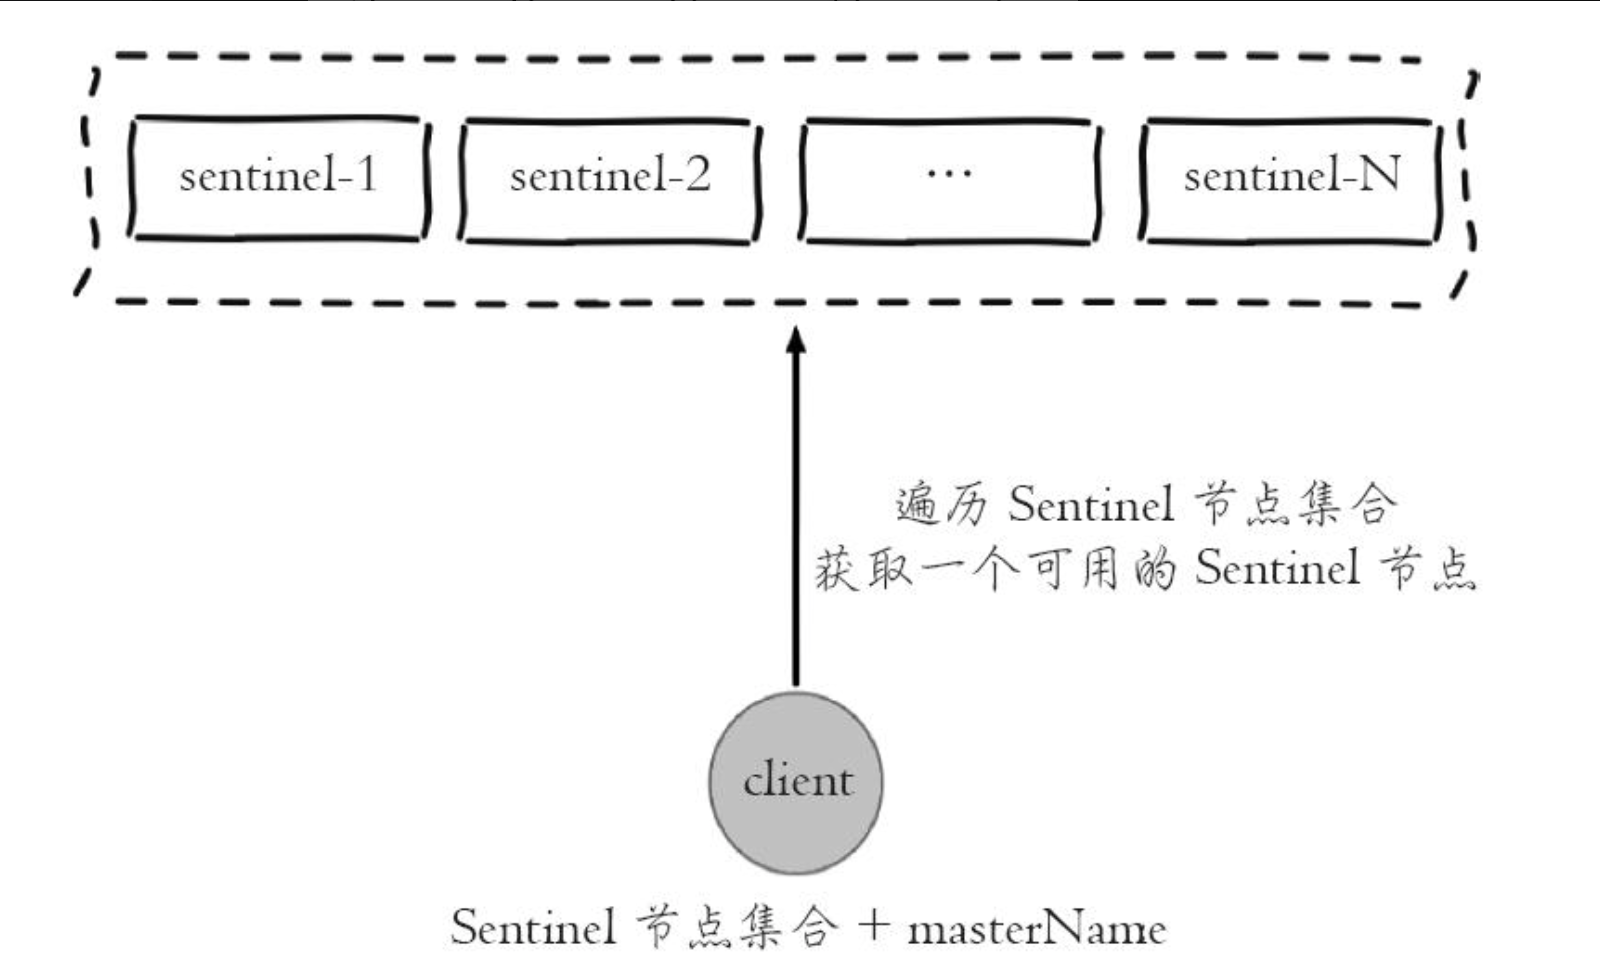
1)遍历Sentinel节点集合获取一个可用的Sentinel节点,后面会介绍Sentinel节点之间可以共享数据,所以从任意一个Sentinel节点获取主节点信息都是可以的,如图所示。
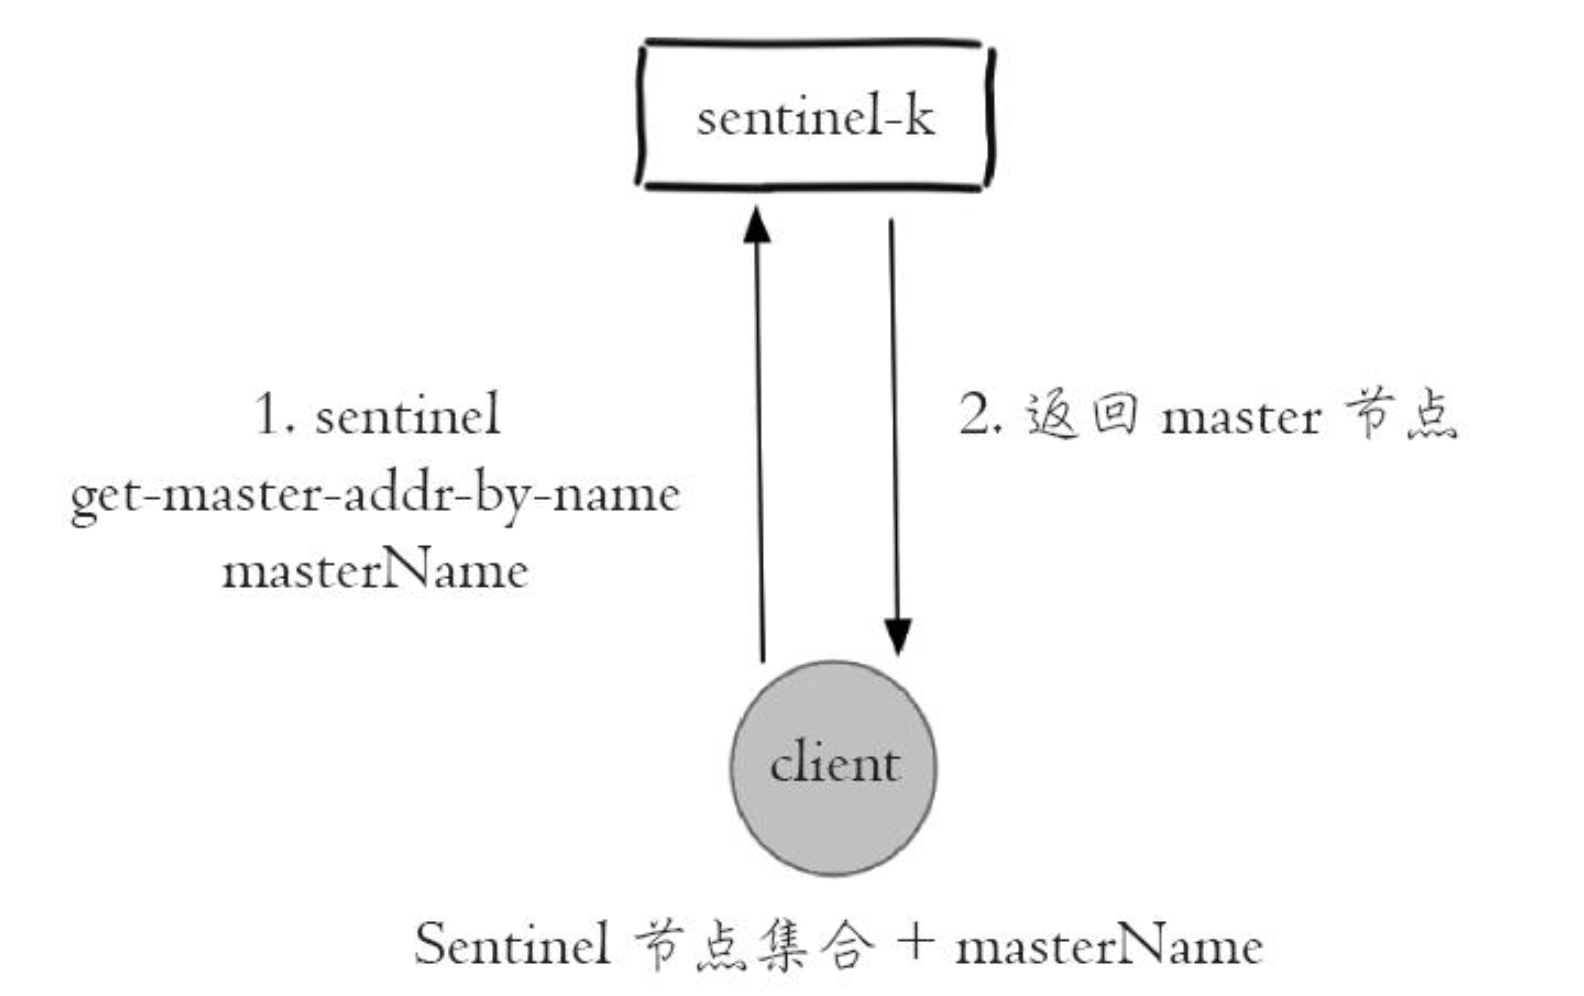
2)通过sentinel get-master-addr-by-name master-name这个API来获取对应主节点的相关信息,如图所示。
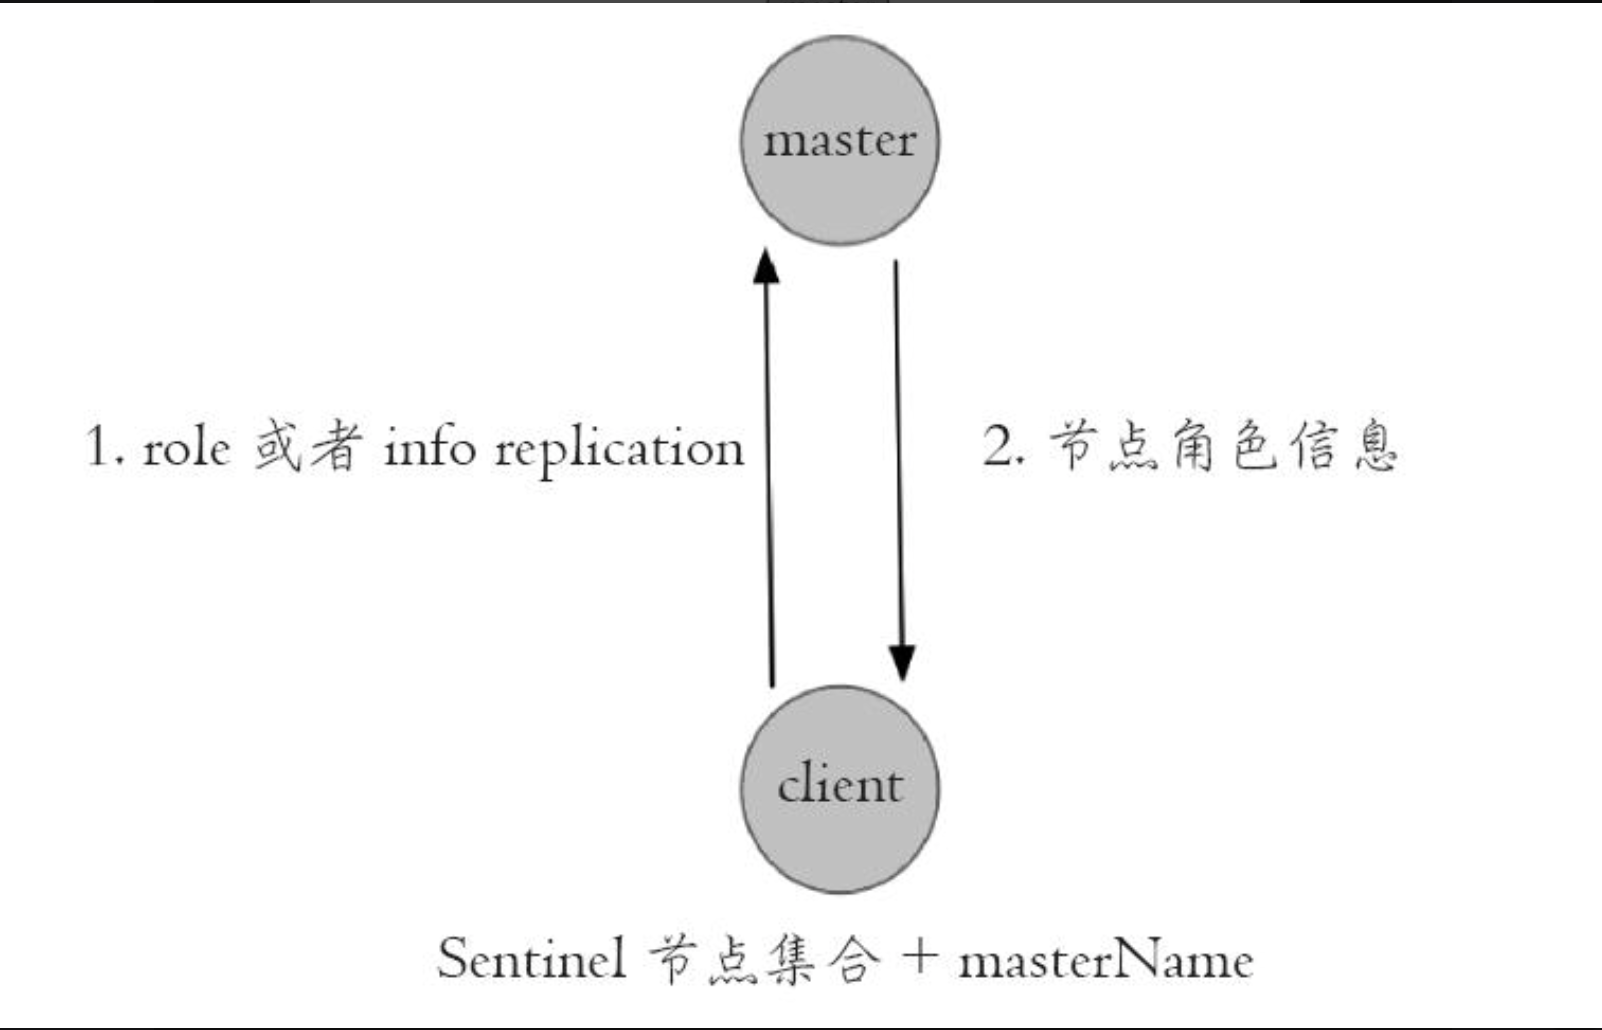
3)验证当前获取的“主节点”是真正的主节点,这样做的目的是为了防止故障转移期间主节点的变化,如图所示。
4)保持和Sentinel节点集合的“联系”,时刻获取关于主节点的相关“信息”,如图所示。
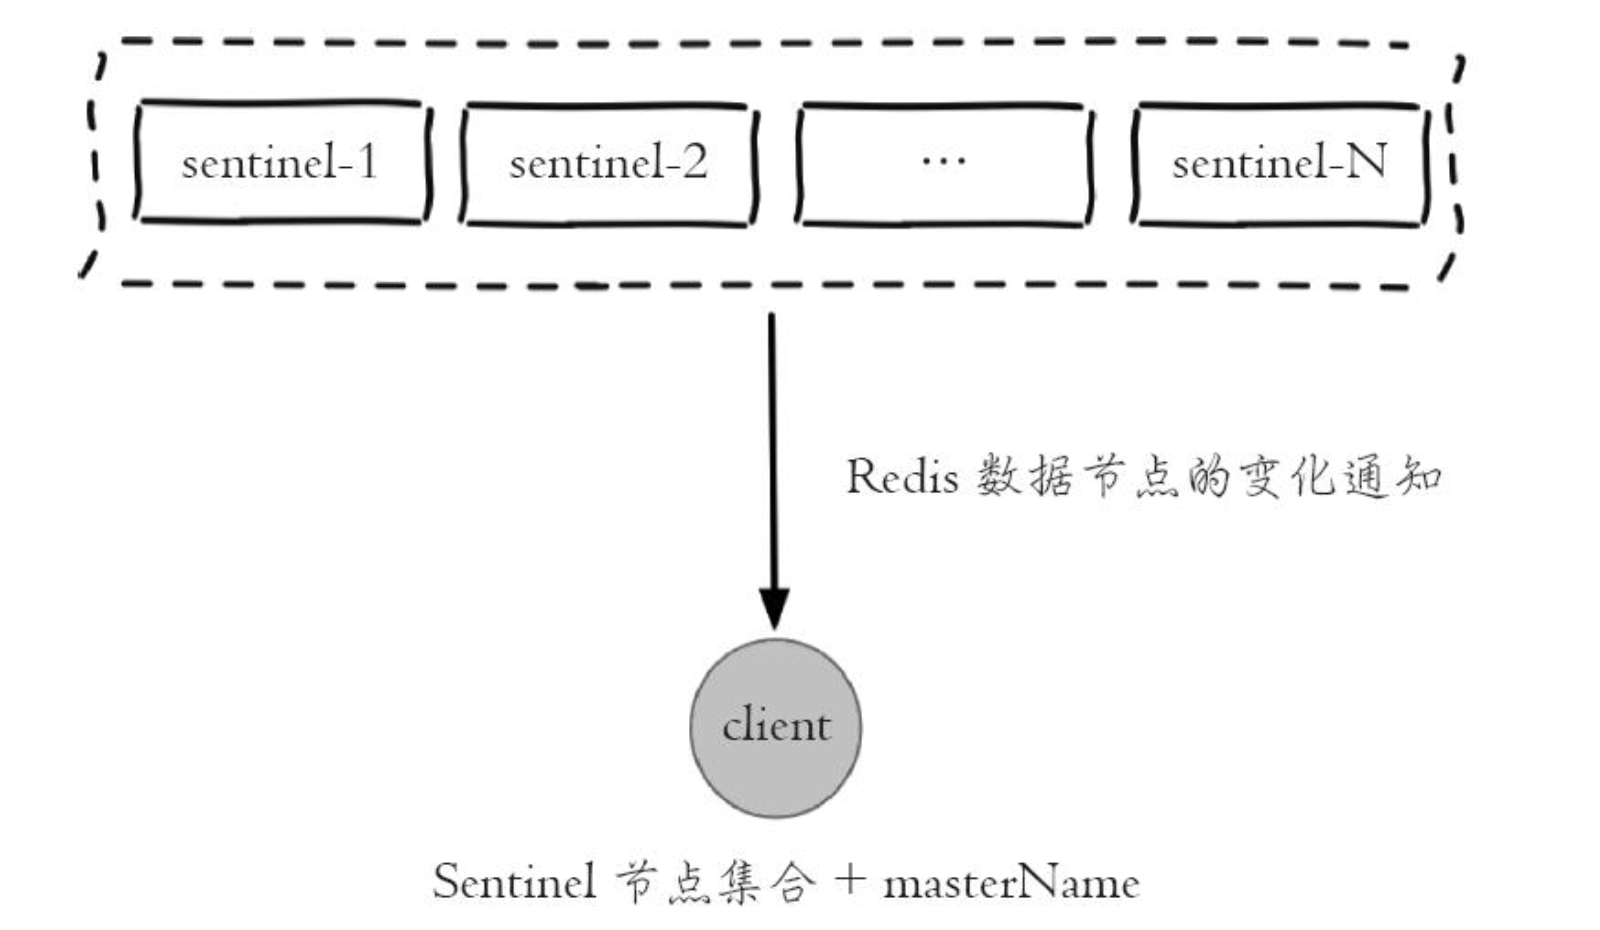
从上面的模型可以看出,Redis Sentinel客户端只有在初始化和切换主节点时需要和Sentinel节点集合进行交互来获取主节点信息,所以在设计客户端时需要将Sentinel节点集合考虑成配置(相关节点信息和变化)发现服务。
上述过程只是从客户端设计的角度进行分析,在开发客户端时要考虑的细节还有很多,但是这些问题并不需要深究,下面将介绍如何使用Java的Redis客户端操作Redis Sentinel。
3、Java操作Redis Sentinel
我们依然使用Jedis2.8.2(以下简称Jedis)作为Redis的Java客户端,Jedis能够很好地支持Redis Sentinel,并且使用Jedis连接Redis Sentinel也很简单,按照RedisSentinel的原理,需要有masterName和Sentinel节点集合两个参数。
Jedis的连接池JedisPool,为了不与之相混淆,Jedis针对RedisSentinel给出了一个JedisSentinelPool,很显然这个连接池保存的连接还是针对主节点的。Jedis给出很多构造方法,其中最全的如下所示:
public JedisSentinelPool(String masterName, Set<String> sentinels,
    final GenericObjectPoolConfig poolConfig, final int connectionTimeout,
    final int soTimeout,
    final String password, final int database,
    final String clientName)
具体参数含义如下:
masterName——主节点名。sentinels——Sentinel节点集合。poolConfig——common-pool连接池配置。connectTimeout——连接超时。soTimeout——读写超时。password——主节点密码。database——当前数据库索引。clientName——客户端名。
例如要想通过简单的几个参数获取JedisSentinelPool,可以直接按照下面方式进行JedisSentinelPool的初始化。
JedisSentinelPool jedisSentinelPool = new JedisSentinelPool(masterName,
    sentinelSet, poolConfig, timeout);
此时timeout既代表连接超时又代表读写超时,password为空,database默认使用0,clientName为空。具体可以参考JedisSentinelPool源码。
和JedisPool非常类似,我们在使用JedisSentinelPool时也要尽可能按照common-pool的标准模式进行代码的书写。
Jedis jedis = null;
try {
    jedis = jedisSentinelPool.getResource();
    // jedis command
} catch (Exception e) {
    logger.error(e.getMessage(), e);
} finally {
    if (jedis != null)
        jedis.close();
}
- jedis.close()是和第4章介绍的一样,并不是关闭Jedis连接。
- JedisSentinelPool和JedisPool一样,尽可能全局只有一个。
- Jedis源码中的JedisSentinelPool介绍一下JedisSentinelPool的实现过程,下面给出的代码就是JedisSentinelPool的初始化方法。
public JedisSentinelPool(String masterName, Set<String> sentinels,
    final GenericObjectPoolConfig poolConfig, final int connectionTimeout,
    final int soTimeout, final String password, final int database,
    final String clientName) {
…
    HostAndPort master = initSentinels(sentinels, masterName);
    initPool(master);
…
}
下面的代码就是JedisSentinelPool初始化代码的重要函数initSentinels(Setsentinels,final StringmasterName),包含了Sentinel 节点集合和masterName参数,用来获取指定主节点的ip地址和端口。
private HostAndPort initSentinels(Set<String> sentinels, final String masterName) {
// 主节点
    HostAndPort master = null;
// 遍历所有sentinel节点
    for (String sentinel : sentinels) {
// 连接sentinel节点
        HostAndPort hap = toHostAndPort(Arrays.asList(sentinel.split(":")));
        Jedis jedis = new Jedis(hap.getHost(), hap.getPort());
// 使用sentinel get-master-addr-by-name masterName获取主节点信息
        List<String> masterAddr = jedis.sentinelGetMasterAddrByName(masterName);
// 命令返回列表为空或者长度不为2,继续从下一个sentinel节点查询
        if (masterAddr == null || masterAddr.size() != 2) {
            continue;
        }
// 解析masterAddr获取主节点信息
        master = toHostAndPort(masterAddr);
// 找到后直接跳出for循环
        break;
    }
    if (master == null) {
// 直接抛出异常,
        throw new Exception();
    }
// 为每个sentinel节点开启主节点switch的监控线程
    for (String sentinel : sentinels) {
        final HostAndPort hap = toHostAndPort(Arrays.asList(sentinel.split(":")));
        MasterListener masterListener = new MasterListener(masterName, hap.getHost(),
            hap.getPort());
        masterListener.start();
    }
// 返回结果
    return master;
}
具体过程如下:
1)遍历Sentinel节点集合,找到一个可用的Sentinel节点,如果找不到就从Sentinel节点集合中去找下一个,如果都找不到直接抛出异常给客户端:
new JedisException("Can connect to sentinel, but " + masterName + " seems to be not monitored…")
2)找到一个可用的Sentinel节点,执行sentinelGetMasterAddrByName(masterName),找到对应主节点信息:
List<String> masterAddr = jedis.sentinelGetMasterAddrByName(masterName);
3)JedisSentinelPool中没有发现对主节点角色验证的代码,这是因为get-master-addr-by-name master-name这个API本身就会自动获取真正的主节点(例如故障转移期间)。
4)为每一个Sentinel节点单独启动一个线程,利用Redis的发布订阅功能,每个线程订阅Sentinel节点上切换master的相关频道+switch-master。
for (String sentinel : sentinels) {
    final HostAndPort hap = toHostAndPort(Arrays.asList(sentinel.split(":")));
    MasterListener masterListener = new MasterListener(masterName, hap.
        getHost(), hap.getPort());
    masterListener.start();
}
下面代码就是MasterListener的核心监听代码,代码中比较重要的部分就是订阅Sentinel节点的+switch-master频道,它就是Redis Sentinel在结束对主节点故障转移后会发布切换主节点的消息,Sentinel节点基本将故障转移的各个阶段发生的行为都通过这种发布订阅的形式对外提供,开发者只需订阅感兴趣的频道即可,这里我们比较关心的是+switch-master这个频道。
Jedis sentinelJedis = new Jedis(sentinelHost, sentinelPort);
// 客户端订阅Sentinel节点上"+switch-master"(切换主节点)频道
sentinelJedis.subscribe(new JedisPubSub() {
    @Override
    public void onMessage(String channel, String message) {
        String[] switchMasterMsg = message.split(" ");
        if (switchMasterMsg.length > 3) {
// 判断是否为当前masterName
            if (masterName.equals(switchMasterMsg[0])) {
// 发现当前masterName发生switch,使用initPool重新初始化连接池
                initPool(toHostAndPort(switchMasterMsg[3], switchMasterMsg[4]));
            }
        }
    }
}, "+switch-master");





 扫一扫
扫一扫


 4402
4402

 被折叠的 条评论
为什么被折叠?
被折叠的 条评论
为什么被折叠?
 到【灌水乐园】发言





