




PaliGemma 目标检测微调实战:JAX 训练、JSONL 数据与检测评估
这篇教程根据我复现 PaliGemma 目标检测微调流程时整理,重点演示如何准备 JSONL 检测数据、加载 big_vision 与 JAX 模型、构造训练输入、微调并计算检测指标。
PaliGemma 的训练方式和常见 PyTorch 检测模型不同,数据会被组织成图像加文本序列。本文适合想理解视觉语言模型如何做检测微调的同学。
本文会重点跑通以下流程:
- 从数据集后台获取 PaliGemma JSONL 检测数据
- 安装 big_vision 并配置 Kaggle 权重下载
- 加载 PaliGemma JAX checkpoint 和 tokenizer
- 构造图像、token、mask 等训练输入
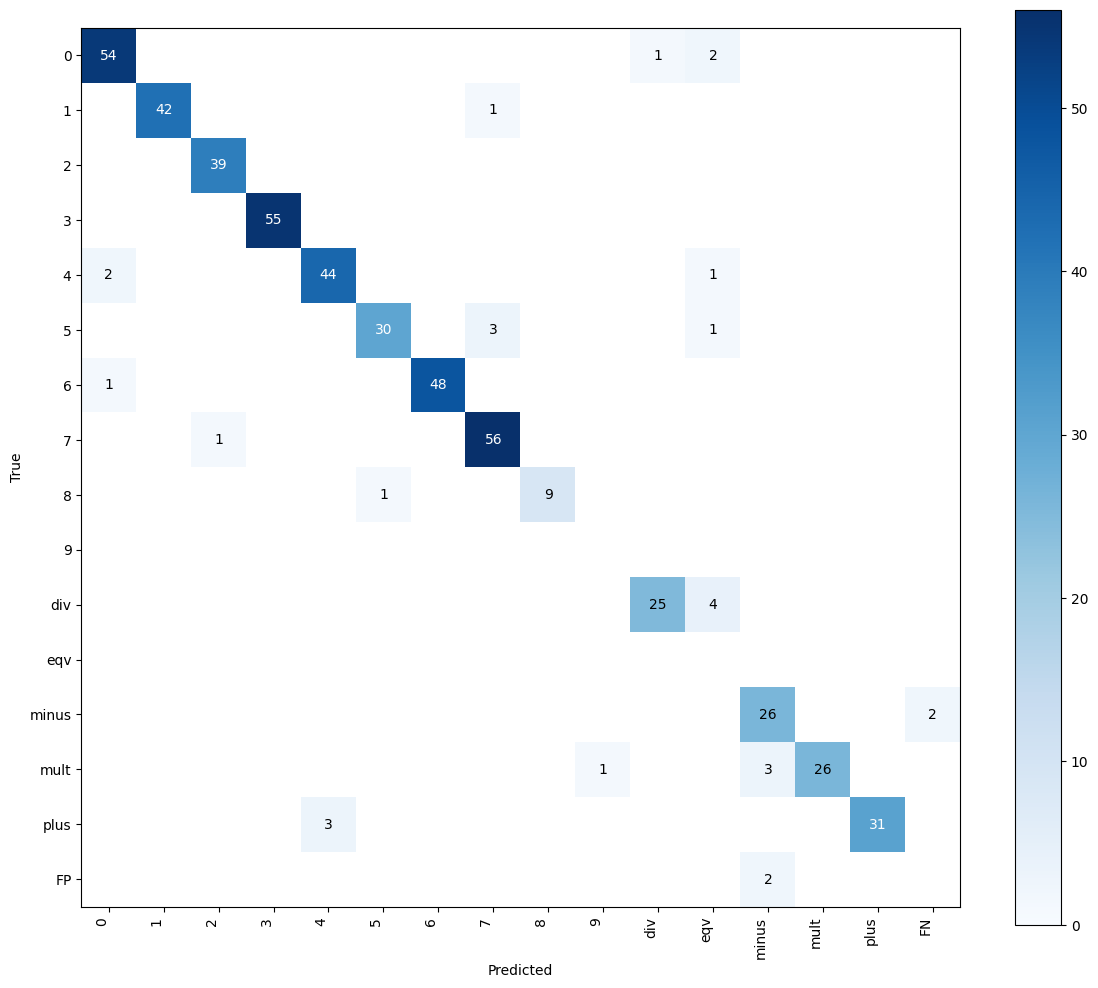
- 训练后可视化预测、计算 mAP 和混淆矩阵
如果你正在系统学习目标检测、实例分割、OCR、多目标跟踪或视觉大模型,建议收藏本文;配套 notebook、示例图片和运行环境说明后续会继续整理。如果环境配置卡住,可以在评论区说明具体报错。
📚 文章目录
⚙️ 环境准备
先检查 GPU 运行环境,并准备后续训练和推理依赖。建议优先使用 Colab GPU 或本地 NVIDIA GPU 环境。
!nvidia-smi
📦 从数据集后台获取 JSONL 数据集
从数据集后台导出 PaliGemma JSONL 数据,解压后修改 DATASET_DIR。
!pip install -q supervision
from types import SimpleNamespace

# 从数据集后台下载 PaliGemma JSONL 格式数据集后,修改 DATASET_DIR 指向解压目录。
DATASET_DIR = "/content/dataset"  # 修改为数据集后台导出的数据集目录
dataset = SimpleNamespace(location=DATASET_DIR, version="1")
!head -n 5 {dataset.location}/dataset/_annotations.train.jsonl
!head -n 5 {dataset.location}/dataset/_annotations.valid.jsonl
import cv2
import json
import supervision as sv
from typing import List

def read_n_lines(file_path: str, n: int) -> List[str]:
    with open(file_path, 'r') as file:
        lines = [next(file).strip() for _ in range(n)]
    return lines

images = []
lines = read_n_lines(f"{dataset.location}/dataset/_annotations.train.jsonl", 25)
first = json.loads(lines[0])

CLASSES = first.get('prefix').replace("detect ", "").split(" ; ")

for line in lines:
    data = json.loads(line)
    image = cv2.imread(f"{dataset.location}/dataset/{data.get('image')}")
    (h, w, _) = image.shape
    detections = sv.Detections.from_lmm(
        lmm='paligemma',
        result=data.get('suffix'),
        resolution_wh=(w, h),
        classes=CLASSES)

    image = sv.BoundingBoxAnnotator(thickness=4).annotate(image, detections)
    image = sv.LabelAnnotator(text_scale=2, text_thickness=4).annotate(image, detections)
    images.append(image)

sv.plot_images_grid(images, (5, 5))
🧩 安装 big_vision 依赖
PaliGemma JAX 版本依赖 big_vision 仓库和若干 JAX 生态包。
import os
import sys

# TPUs with
if "COLAB_TPU_ADDR" in os.environ:
  raise "It seems you are using Colab with remote TPUs which is not supported."

# 如果当前环境还没有 big_vision 仓库,则先拉取并安装依赖。
if not os.path.exists("big_vision_repo"):
  !git clone --quiet --branch=main --depth=1 \
     https://github.com/google-research/big_vision big_vision_repo

# 将 big_vision 加入 Python import 路径
if "big_vision_repo" not in sys.path:
  sys.path.append("big_vision_repo")

# 安装缺失依赖。这里默认已经具备可用的 JAX GPU 环境。
!pip3 install -q "overrides" "ml_collections" "einops~=0.7" "sentencepiece"
import os
from google.colab import userdata

# `userdata.get` 是 Colab API;如果不在 Colab 中运行,请改用环境变量或 ~/.kaggle/kaggle.json。

os.environ["KAGGLE_USERNAME"] = userdata.get('KAGGLE_USERNAME')
os.environ["KAGGLE_KEY"] = userdata.get('KAGGLE_KEY')
import base64
import functools
import html
import io
import os
import warnings

import jax
import jax.numpy as jnp
import numpy as np
import ml_collections

import tensorflow as tf
import sentencepiece

from IPython.core.display import display, HTML
from PIL import Image
from tqdm.notebook import tqdm

# Import model definition from big_vision
from big_vision.models.proj.paligemma import paligemma
from big_vision.trainers.proj.paligemma import predict_fns

# Import big vision utilities
import big_vision.datasets.jsonl
import big_vision.utils
import big_vision.sharding

# Don't let TF use the GPU or TPUs
tf.config.set_visible_devices([], "GPU")
tf.config.set_visible_devices([], "TPU")

backend = jax.lib.xla_bridge.get_backend()
print(f"JAX version:  {jax.__version__}")
print(f"JAX platform: {backend.platform}")
print(f"JAX devices:  {jax.device_count()}")
🧠 下载并配置 PaliGemma 模型
模型权重来自 Kaggle,需要提前配置 Kaggle 凭据。
import os
import kagglehub

MODEL_PATH = "./pt_224_128.params.f16.npz"
if not os.path.exists(MODEL_PATH):
    print("正在从 Kaggle 下载 checkpoint,可能需要几分钟...")
    # Kaggle 归档中包含多种格式,这里只下载 float16 模型。
    MODEL_PATH = kagglehub.model_download('google/paligemma/jax/paligemma-3b-pt-224', 'paligemma-3b-pt-224.f16.npz')
    print(f"Model path: {MODEL_PATH}")

TOKENIZER_PATH = "./paligemma_tokenizer.model"
if not os.path.exists(TOKENIZER_PATH):
    print("正在下载 tokenizer...")
    !gsutil cp gs://big_vision/paligemma_tokenizer.model {TOKENIZER_PATH}
    print(f"Tokenizer path: {TOKENIZER_PATH}")
# 定义模型
model_config = ml_collections.FrozenConfigDict({
    "llm": {"vocab_size": 257_152},
    "img": {"variant": "So400m/14", "pool_type": "none", "scan": True, "dtype_mm": "float16"}
})
model = paligemma.Model(**model_config)
tokenizer = sentencepiece.SentencePieceProcessor(TOKENIZER_PATH)

# 加载参数,在 T4 Colab 上可能需要约 1 分钟。
params = paligemma.load(None, MODEL_PATH, model_config)

# 定义 decode 函数,用于从模型中采样输出。
decode_fn = predict_fns.get_all(model)['decode']
decode = functools.partial(decode_fn, devices=jax.devices(), eos_token=tokenizer.eos_id())
# 创建可训练参数的 pytree mask。
def is_trainable_param(name, param):  # pylint: disable=unused-argument
  if name.startswith("llm/layers/attn/"):  return True
  if name.startswith("llm/"):              return False
  if name.startswith("img/"):              return False
  raise ValueError(f"Unexpected param name {name}")
trainable_mask = big_vision.utils.tree_map_with_names(is_trainable_param, params)

# 如果有多个设备,可以把参数分片到不同设备上,降低单设备显存占用。
mesh = jax.sharding.Mesh(jax.devices(), ("data"))

data_sharding = jax.sharding.NamedSharding(
    mesh, jax.sharding.PartitionSpec("data"))

params_sharding = big_vision.sharding.infer_sharding(
    params, strategy=[('.*', 'fsdp(axis="data")')], mesh=mesh)

# Yes: Some donated buffers are not usable.
warnings.filterwarnings(
    "ignore", message="Some donated buffers were not usable")

@functools.partial(jax.jit, donate_argnums=(0,), static_argnums=(1,))
def maybe_cast_to_f32(params, trainable):
  return jax.tree.map(lambda p, m: p.astype(jnp.float32) if m else p,
                      params, trainable)

# 一次性加载所有参数更快,但对内存要求更高;这里逐个参数处理。
params, treedef = jax.tree.flatten(params)
sharding_leaves = jax.tree.leaves(params_sharding)
trainable_leaves = jax.tree.leaves(trainable_mask)
for idx, (sharding, trainable) in enumerate(zip(sharding_leaves, trainable_leaves)):
  params[idx] = big_vision.utils.reshard(params[idx], sharding)
  params[idx] = maybe_cast_to_f32(params[idx], trainable)
  params[idx].block_until_ready()
params = jax.tree.unflatten(treedef, params)

# 打印参数结构,查看模型组成。
def parameter_overview(params):
  for path, arr in big_vision.utils.tree_flatten_with_names(params)[0]:
    print(f"{path:80s} {str(arr.shape):22s} {arr.dtype}")

print(" == Model params == ")
parameter_overview(params)
🧱 构造训练输入
把图片、prefix、suffix 转成模型需要的图像张量和 token mask。
def preprocess_image(image, size=224):
  # 模型训练时使用 224x224、范围 [-1, 1] 的图像输入;双线性和抗锯齿缩放有助于提升质量。
  image = np.asarray(image)
  if image.ndim == 2:  # 将没有通道维度的图像转换为三通道灰度图。
    image = np.stack((image,)*3, axis=-1)
  image = image[..., :3]  # 移除 alpha 通道。
  assert image.shape[-1] == 3

  image = tf.constant(image)
  image = tf.image.resize(image, (size, size), method='bilinear', antialias=True)
  return image.numpy() / 127.5 - 1.0  # [0, 255] -> [-1, 1]

def preprocess_tokens(prefix, suffix=None, seqlen=None):
  # 模型使用 prefix 全注意力、suffix 因果注意力的文本 token 结构。
  separator = "\n"
  tokens = tokenizer.encode(prefix, add_bos=True) + tokenizer.encode(separator)
  mask_ar = [0] * len(tokens)    # 0 表示 prefix 使用全注意力。
  mask_loss = [0] * len(tokens)  # 0 表示 prefix token 不参与 loss。

  if suffix:
    suffix = tokenizer.encode(suffix, add_eos=True)
    tokens += suffix
    mask_ar += [1] * len(suffix)    # 1 表示 suffix 使用因果注意力。
    mask_loss += [1] * len(suffix)  # 1 表示 suffix token 参与 loss。

  mask_input = [1] * len(tokens)    # token 为 1,padding 为 0。
  if seqlen:
    padding = [0] * max(0, seqlen - len(tokens))
    tokens = tokens[:seqlen] + padding
    mask_ar = mask_ar[:seqlen] + padding
    mask_loss = mask_loss[:seqlen] + padding
    mask_input = mask_input[:seqlen] + padding

  return jax.tree.map(np.array, (tokens, mask_ar, mask_loss, mask_input))

def postprocess_tokens(tokens):
  tokens = tokens.tolist()  # np.array 转 list[int]
  try:  # 如果存在 EOS,则移除 EOS 及其后面的 token。
    eos_pos = tokens.index(tokenizer.eos_id())
    tokens = tokens[:eos_pos]
  except ValueError:
    pass
  return tokenizer.decode(tokens)
SEQLEN = 128

train_dataset = big_vision.datasets.jsonl.DataSource(
    os.path.join(dataset.location, "dataset/_annotations.train.jsonl"),
    fopen_keys={"image": f"{dataset.location}/dataset"})

val_dataset = big_vision.datasets.jsonl.DataSource(
    os.path.join(dataset.location, "dataset/_annotations.valid.jsonl"),
    fopen_keys={"image": f"{dataset.location}/dataset"})


def train_data_iterator():
  """持续生成训练样本的迭代器。"""
  # 打乱并重复样本,支持多轮训练。
  dataset = train_dataset.get_tfdata().shuffle(1_000).repeat()
  for example in dataset.as_numpy_iterator():
    image = Image.open(io.BytesIO(example["image"]))
    image = preprocess_image(image)

    prefix = example["prefix"].decode().lower()
    suffix = example["suffix"].decode().lower()
    tokens, mask_ar, mask_loss, _ = preprocess_tokens(prefix, suffix, SEQLEN)
    label, _, _, _ = preprocess_tokens(suffix, seqlen=SEQLEN)

    yield {
        "image": np.asarray(image),
        "text": np.asarray(tokens),
        "label": np.asarray(label),
        "mask_ar": np.asarray(mask_ar),
        "mask_loss": np.asarray(mask_loss),
    }


def validation_data_iterator():
  """按顺序遍历验证样本的迭代器。"""
  for example in val_dataset.get_tfdata(ordered=True).as_numpy_iterator():
    image = Image.open(io.BytesIO(example["image"]))
    image = preprocess_image(image)

    prefix = example["prefix"].decode().lower()
    suffix = example["suffix"].decode().lower()
    tokens, mask_ar, _, mask_input = preprocess_tokens(prefix, seqlen=SEQLEN)
    label, _, _, _ = preprocess_tokens(suffix, seqlen=SEQLEN)

    yield {
        "image": np.asarray(image),
        "text": np.asarray(tokens),
        "label": np.asarray(label),
        "mask_ar": np.asarray(mask_ar),
        "mask_input": np.asarray(mask_input),
    }
def split_and_keep_second_part(s):
    parts = s.split('\n', 1)
    if len(parts) > 1:
        return parts[1]
    return s

def render_inline(image, resize=(128, 128)):
    """把图像转换成内联 HTML。"""
    image = Image.fromarray(image)
    image.resize(resize)
    with io.BytesIO() as buffer:
        image.save(buffer, format='jpeg')
        image_b64 = str(base64.b64encode(buffer.getvalue()), "utf-8")
        return f"data:image/jpeg;base64,{image_b64}"

def render_example(image, caption):
    image = ((image + 1)/2 * 255).astype(np.uint8)  # [-1,1] -> [0, 255]
    h, w, _ = image.shape
    try:
        detections = sv.Detections.from_lmm(
            lmm='paligemma',
            result=caption,
            resolution_wh=(w, h),
            classes=CLASSES)
        image = sv.BoundingBoxAnnotator().annotate(image, detections)
        image = sv.LabelAnnotator().annotate(image, detections)
    except:
        print(caption)
    return f"""
<div style="display: inline-flex; align-items: center; justify-content: center;">
    <img style="width:128px; height:128px;" src="{render_inline(image, resize=(64,64))}" />
    <p style="width:256px; margin:10px; font-size:small;">{html.escape(caption)}</p>
</div>
"""

html_out = ""
for idx, example in zip(range(4), train_data_iterator()):
    caption = postprocess_tokens(example["text"])  # 将模型输入反 token 化。
    caption = split_and_keep_second_part(caption)
    html_out += render_example(example["image"], caption)

print("Training examples")
display(HTML(html_out))
🏋️ 定义训练与评估循环
这里使用 JAX 定义更新函数和预测函数,输出会被解析回检测框。
# 使用简单 SGD 的主更新函数。
@functools.partial(jax.jit, donate_argnums=(0,))
def update_fn(params, batch, learning_rate):
  imgs, txts, mask_ar = batch["image"], batch["text"], batch["mask_ar"]

  def loss_fn(params):
    text_logits, _ = model.apply({"params": params}, imgs, txts[:, :-1], mask_ar[:, :-1], train=True)
    logp = jax.nn.log_softmax(text_logits, axis=-1)

    # 模型输入为 txts[:, :-1],loss 目标是预测 txts[:, 1:];mask_loss 指示哪些 token 参与 loss。
    mask_loss = batch["mask_loss"][:, 1:]
    targets = jax.nn.one_hot(txts[:, 1:], text_logits.shape[-1])

    # 计算每个样本的 token loss,并按有效 token 数归一化。
    token_pplx = jnp.sum(logp * targets, axis=-1)  # sum across vocab_size.
    example_loss = -jnp.sum(token_pplx * mask_loss, axis=-1)  # sum across seq_len.
    example_loss /= jnp.clip(jnp.sum(mask_loss, -1), 1)  # weight by num of tokens.

    # batch loss 是样本 loss 的平均值。
    return jnp.mean(example_loss)

  loss, grads = jax.value_and_grad(loss_fn)(params)

  # 使用 SGD 将梯度应用到可训练参数。
  def apply_grad(param, gradient, trainable):
    if not trainable: return param
    return param - learning_rate * gradient

  params = jax.tree_util.tree_map(apply_grad, params, grads, trainable_mask)

  return params, loss

# 评估/推理循环。
def make_predictions(data_iterator, *, num_examples=None,
                     batch_size=4, seqlen=SEQLEN, sampler="greedy"):
  outputs = []
  while True:
    # 构造当前 batch 的样本列表。
    examples = []
    try:
      for _ in range(batch_size):
        examples.append(next(data_iterator))
        examples[-1]["_mask"] = np.array(True)  # 表示真实样本。
    except StopIteration:
      if len(examples) == 0:
        return outputs

    # 样本不足一个 batch 时,重复最后一个样本补齐。
    while len(examples) % batch_size:
      examples.append(dict(examples[-1]))
      examples[-1]["_mask"] = np.array(False)  # 表示 padding 样本。

    # 将样本列表转为 np.array 字典并加载到设备。
    batch = jax.tree.map(lambda *x: np.stack(x), *examples)
    batch = big_vision.utils.reshard(batch, data_sharding)

    # 执行模型预测
    tokens = decode({"params": params}, batch=batch,
                    max_decode_len=seqlen, sampler=sampler)

    # 取回模型预测并反 token 化。
    tokens, mask = jax.device_get((tokens, batch["_mask"]))
    tokens = tokens[mask]  # 移除 padding 样本。
    labels = [postprocess_tokens(e["label"]) for e in examples]
    responses = [postprocess_tokens(t) for t in tokens]

    # 添加到 HTML 输出。
    for example, label, response in zip(examples, labels, responses):
      outputs.append((example["image"], label, response))
      if num_examples and len(outputs) >= num_examples:
        return outputs
html_out = ""
for image, _, caption in make_predictions(validation_data_iterator(), num_examples=4, batch_size=4):
  html_out += render_example(image, caption)
display(HTML(html_out))
🚀 开始微调
短轮次训练适合验证流程,正式训练时需要按数据规模调整步数和学习率。
# 使用余弦学习率调度运行一个短训练循环。
#
# 注意:由于 XLA 编译,第一步在部分机器上可能很慢。
#
%%time

BATCH_SIZE = 8
TRAIN_EXAMPLES = 512
LEARNING_RATE = 0.005

TRAIN_STEPS = TRAIN_EXAMPLES // BATCH_SIZE
EVAL_STEPS = TRAIN_STEPS // 8

train_data_it = train_data_iterator()

sched_fn = big_vision.utils.create_learning_rate_schedule(
    total_steps=TRAIN_STEPS+1, base=LEARNING_RATE,
    decay_type="cosine", warmup_percent=0.10)

for step in range(1, TRAIN_STEPS+1):
  # 构造 N 个训练样本。
  examples = [next(train_data_it) for _ in range(BATCH_SIZE)]

  # 将样本列表转换为 np.array 字典并加载到设备。
  batch = jax.tree.map(lambda *x: np.stack(x), *examples)
  batch = big_vision.utils.reshard(batch, data_sharding)

  # 执行训练步并打印 loss
  learning_rate = sched_fn(step)
  params, loss = update_fn(params, batch, learning_rate)

  loss = jax.device_get(loss)
  print(f"step: {step:2d}/{TRAIN_STEPS:2d}   lr: {learning_rate:.5f}   loss: {loss:.4f}")

  if (step % EVAL_STEPS) == 0:
    print(f"Model predictions at step {step}")
    html_out = ""
    for image, _, caption in make_predictions(
        validation_data_iterator(), num_examples=4, batch_size=4):
      html_out += render_example(image, caption)
    display(HTML(html_out))
📊 评估微调模型
通过验证集预测结果计算 mAP 和混淆矩阵。
# @title Visualize results
html_out = ""
for image, _, caption in make_predictions(validation_data_iterator(), num_examples=16, batch_size=8):
  html_out += render_example(image, caption)
display(HTML(html_out))
# @title Collect predictions
targets = []
predictions = []

for image, label, prediction in make_predictions(validation_data_iterator(), num_examples=512, batch_size=8):
    h, w, _ = image.shape
    target = sv.Detections.from_lmm(
        lmm='paligemma',
        result=label,
        resolution_wh=(w, h),
        classes=CLASSES)
    targets.append(target)
    prediction = sv.Detections.from_lmm(
        lmm='paligemma',
        result=prediction,
        resolution_wh=(w, h),
        classes=CLASSES)
    prediction.confidence = np.ones(len(prediction))
    predictions.append(prediction)
# @title Calculate mAP
mean_average_precision = sv.MeanAveragePrecision.from_detections(
    predictions=predictions,
    targets=targets,
)

print(f"map50_95: {mean_average_precision.map50_95:.2f}")
print(f"map50: {mean_average_precision.map50:.2f}")
print(f"map75: {mean_average_precision.map75:.2f}")
# @title Calculate Confusion Matrix
confusion_matrix = sv.ConfusionMatrix.from_detections(
    predictions=predictions,
    targets=targets,
    classes=CLASSES
)

_ = confusion_matrix.plot()
💾 保存模型
把微调后的模型和 processor 保存到本地目录,方便后续推理或部署。
import os

TARGET_MODEL_DIR = f"{dataset.location}/model"
TARGET_MODEL_PATH = f"{TARGET_MODEL_DIR}/paligemma-3b-pt-224.f16.npz"

os.makedirs(TARGET_MODEL_DIR, exist_ok=True)
flat, _ = big_vision.utils.tree_flatten_with_names(params)
with open(TARGET_MODEL_PATH, "wb") as f:
  np.savez(f, **{k: v for k, v in flat})
📤 部署说明
Notebook 原流程包含在线部署演示。这里保留本地模型路径,方便接入自己的部署流程。
# 可选:将训练得到的模型目录接入自己的部署流程。
MODEL_DIR = TARGET_MODEL_DIR
MODEL_DIR
📌 小结
PaliGemma 微调更像是在训练视觉语言输出格式。复现时要重点检查 prefix、suffix、类别列表、序列长度和 tokenizer 是否匹配。
这一类 notebook 建议按“先环境、再数据、再单样例、最后批量推理”的顺序复现。遇到报错时,优先检查 GPU、依赖版本、数据集目录和模型权重路径。
后续我会继续按源项目顺序整理同系列中的目标检测、实例分割、OCR、多目标跟踪和视觉大模型教程。
📚 同系列教程汇总
-
PaliGemma 目标检测微调实战:JAX 训练、JSONL 数据与检测评估-本文






 扫一扫
扫一扫


 677
677

 被折叠的 条评论
为什么被折叠?
被折叠的 条评论
为什么被折叠?
 到【灌水乐园】发言





