



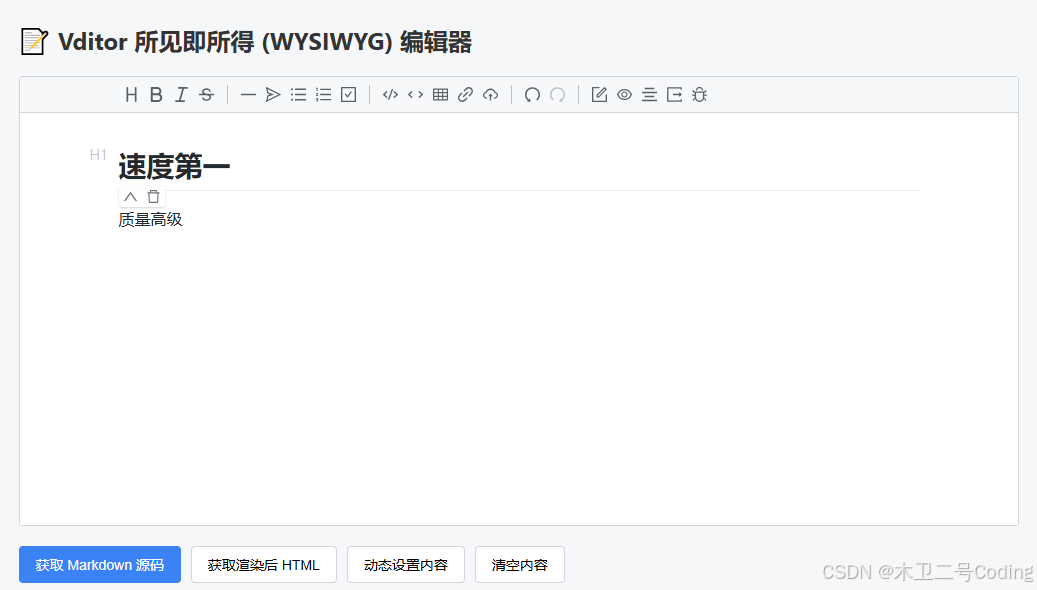
一个完整的 HTML 案例,使用 **Vditor** 实现**所见即所得(WYSIWYG)** 模式的 Markdown 编辑器。
<!DOCTYPE html>
<html lang="zh-CN">
<head>
    <meta charset="UTF-8">
    <meta name="viewport" content="width=device-width, initial-scale=1.0">
    <title>Vditor 所见即所得编辑器示例</title>

    <!-- 1. 引入 Vditor 的 CSS 样式 -->
    <link rel="stylesheet" href="https://cdn.jsdelivr.net/npm/vditor@3.10.5/dist/index.css" />

    <style>
        body {
            font-family: -apple-system, BlinkMacSystemFont, "Segoe UI", Roboto, "Helvetica Neue", Arial, sans-serif;
            max-width: 1000px;
            margin: 0 auto;
            padding: 20px;
            background-color: #f5f7f9;
        }
        h2 { color: #333; }

        /* 按钮样式 */
        .btn-group {
            margin-top: 20px;
            display: flex;
            gap: 10px;
        }
        button {
            padding: 8px 16px;
            border: 1px solid #d1d5db;
            border-radius: 4px;
            background-color: #fff;
            cursor: pointer;
            font-size: 14px;
            transition: all 0.2s;
        }
        button:hover {
            background-color: #f3f4f6;
            border-color: #9ca3af;
        }
        button.primary {
            background-color: #3b82f6;
            color: white;
            border-color: #3b82f6;
        }
        button.primary:hover {
            background-color: #2563eb;
        }

        /* 输出结果展示区 */
        #output-container {
            margin-top: 20px;
        }
        #output {
            margin-top: 10px;
            padding: 15px;
            border: 1px dashed #cbd5e1;
            border-radius: 6px;
            background-color: #ffffff;
            min-height: 100px;
            white-space: pre-wrap;
            word-wrap: break-word;
            font-family: monospace;
            font-size: 13px;
            color: #475569;
        }
    </style>
</head>
<body>

    <h2>📝 Vditor 所见即所得 (WYSIWYG) 编辑器</h2>

    <!-- 2. 编辑器挂载的 DOM 容器 -->
    <div id="vditor"></div>

    <!-- 3. 操作按钮 -->
    <div class="btn-group">
        <button class="primary" onclick="getMarkdown()">获取 Markdown 源码</button>
        <button onclick="getHTML()">获取渲染后 HTML</button>
        <button onclick="setContent()">动态设置内容</button>
        <button onclick="clearContent()">清空内容</button>
    </div>

    <!-- 4. 结果展示区 -->
    <div id="output-container">
        <h3>📤 输出结果:</h3>
        <div id="output">点击上方按钮查看结果...</div>
    </div>

    <!-- 5. 引入 Vditor 的 JS 核心文件 -->
    <script src="https://cdn.jsdelivr.net/npm/vditor@3.10.5/dist/index.min.js"></script>

    <script>
        // 6. 初始化 Vditor 实例
        const vditor = new Vditor('vditor', {
            // 核心配置:指定为所见即所得模式
            mode: 'wysiwyg',

            // 编辑器高度
            height: 450,

            // 自定义工具栏 (可根据需要增删)
            toolbar: [
                'headings', 'bold', 'italic', 'strike', '|',
                'line', 'quote', 'list', 'ordered-list', 'check', '|',
                'code', 'inline-code', 'table', 'link', 'upload', '|',
                'undo', 'redo', '|',
                'edit-mode', 'both', 'preview', 'outline', 'export', 'devtools'
            ],

            // 开启本地缓存,防止意外刷新丢失内容
            cache: {
                enable: true,
                id: 'vditor-wysiwyg-demo-cache'
            },

            // 占位符
            placeholder: '请输入 Markdown 内容,支持所见即所得编辑...',

            // 编辑器初始化完成后的回调函数
            after: () => {
                console.log('Vditor 初始化完成!');
                // 可以在这里设置初始默认内容
                // vditor.setValue('## 欢迎使用 Vditor\n\n这是一个**所见即所得**的 Markdown 编辑器。');
            },

            // 图片上传配置 (示例:本地预览,实际项目中需配置服务器接口)
            upload: {
                url: '/api/upload', // 替换为你的实际上传接口
                max: 10 * 1024 * 1024, // 最大 10MB
                accept: 'image/*',
                // 如果不想配置后端,可以使用本地 base64 预览
                // linkToImgUrl: '/api/fetch-image'
            }
        });

        // ================= 交互逻辑 =================

        // 获取 Markdown 源码
        function getMarkdown() {
            const mdContent = vditor.getValue();
            document.getElementById('output').innerText = mdContent || '(编辑器为空)';
        }

        // 获取渲染后的 HTML
        function getHTML() {
            const htmlContent = vditor.getHTML();
            document.getElementById('output').innerText = htmlContent || '(编辑器为空)';
        }

        // 动态设置内容
        function setContent() {
            const newContent = `## 动态注入的内容\n\n这是通过 JavaScript 动态设置的内容。\n\n- 支持列表\n- **支持加粗**\n- \`支持代码\`\n\n> 这是一个引用块\n\n\`\`\`javascript\nconsole.log("Hello Vditor!");\n\`\`\``;
            vditor.setValue(newContent);
            document.getElementById('output').innerText = '✅ 内容已成功设置到编辑器中!';
        }

        // 清空内容
        function clearContent() {
            vditor.setValue('');
            document.getElementById('output').innerText = '🗑️ 内容已清空。';
        }
    </script>
</body>
</html>





 扫一扫
扫一扫


 214
214

 被折叠的 条评论
为什么被折叠?
被折叠的 条评论
为什么被折叠?
 到【灌水乐园】发言





