



文章目录
1. 各版本平台支持情况
1.1 Server 版本
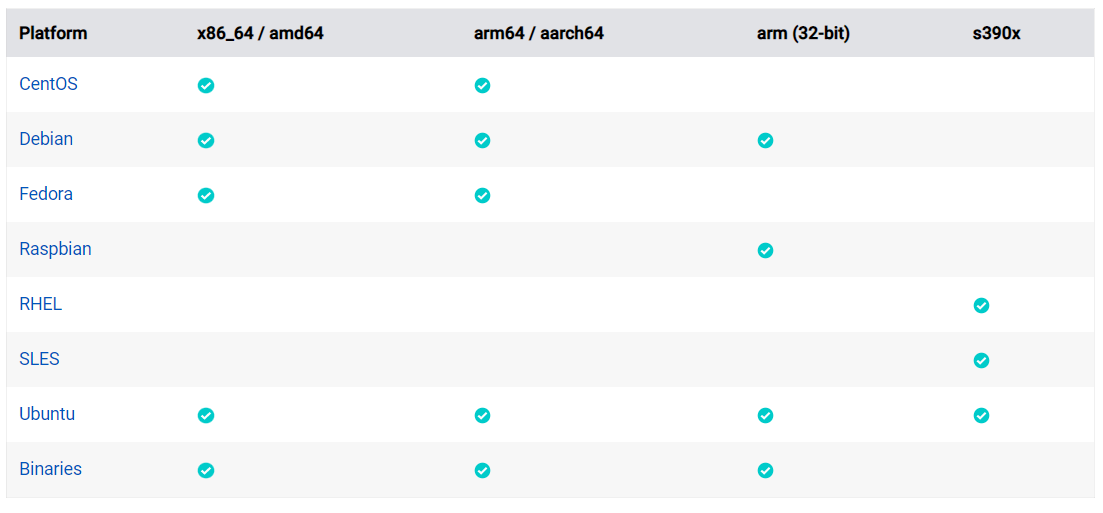
1.2 桌面版本
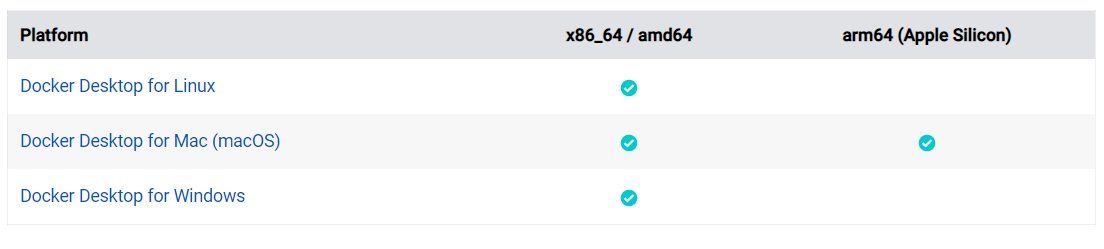
2. Server 版本安装
2.1 Ubuntu 安装
2.1.1 安装依赖
操作系统版本
Ubuntu Kinetic 22.10
Ubuntu Jammy 22.04 (LTS)
Ubuntu Focal 20.04 (LTS)
Ubuntu Bionic 18.04 (LTS)
CPU 支持
ARM 和 X86_64
2.1.2 安装 docker
确定 CPU,可以看到我们的是 X86_64,是支持的,如果是 arm 一般会显示aarch64
root@yudukai:/# uname -a
Linux yudukai 5.15.0-60-generic #66-Ubuntu SMP Fri Jan 20 14:29:49 UTC 2023 x86_64 x86_64 x86_64 GNU/Linux
root@yudukai:/#
确定操作系统版本,本次我们使用的是 Ubuntu 22.04
root@yudukai:/# cat /etc/*release*
DISTRIB_ID=Ubuntu
DISTRIB_RELEASE=22.04
DISTRIB_CODENAME=jammy
DISTRIB_DESCRIPTION="Ubuntu 22.04.3 LTS"
PRETTY_NAME="Ubuntu 22.04.3 LTS"
NAME="Ubuntu"
VERSION_ID="22.04"
VERSION="22.04.3 LTS (Jammy Jellyfish)"
VERSION_CODENAME=jammy
ID=ubuntu
ID_LIKE=debian
HOME_URL="https://www.ubuntu.com/"
SUPPORT_URL="https://help.ubuntu.com/"
BUG_REPORT_URL="https://bugs.launchpad.net/ubuntu/"
PRIVACY_POLICY_URL="https://www.ubuntu.com/legal/terms-and-policies/privacy-policy"
UBUNTU_CODENAME=jammy
root@yudukai:/#
卸载旧版本,如果是新购买的云服务器是没有的,比如输入 docker 并没有这个命令,就不需要卸载
我刚好之前装了,就删了重下:
root@yudukai:/# sudo apt-get remove docker docker-engine docker.io containerd runc
Reading package lists... Done
Building dependency tree... Done
Reading state information... Done
Package 'docker-engine' is not installed, so not removed
Package 'docker' is not installed, so not removed
Package 'containerd' is not installed, so not removed
Package 'runc' is not installed, so not removed
Package 'docker.io' is not installed, so not removed
0 upgraded, 0 newly installed, 0 to remove and 326 not upgraded.
root@yudukai:/#
卸载历史版本:
# 1. 卸载 Docker 软件包及其配置
sudo apt-get purge docker-ce docker-ce-cli containerd.io docker-buildx-plugin docker-compose-plugin docker-ce-rootless-extras -y

# 2. 删除 Docker 数据目录(会清除所有镜像、容器和卷,请谨慎操作)
sudo rm -rf /var/lib/docker
sudo rm -rf /var/lib/containerd

# 3. 删除自定义数据目录(根据注释,这是老师环境特有的,如果您的系统没有这个目录,执行也不会报错)
sudo rm -rf /data/var/lib/docker

# 4. 删除 Docker 配置文件
sudo rm -rf /etc/docker/daemon.json
验证删除干净:
root@yudukai:/# docker --version
-bash: /usr/bin/docker: No such file or directory
root@yudukai:/# systemctl status docker
Unit docker.service could not be found.
root@yudukai:/# ls /var/lib/docker
ls: cannot access '/var/lib/docker': No such file or directory
root@yudukai:/# ls /var/lib/containerd
ls: cannot access '/var/lib/containerd': No such file or directory
root@yudukai:/# ip addr show docker0
3: docker0: <NO-CARRIER,BROADCAST,MULTICAST,UP> mtu 1500 qdisc noqueue state DOWN group default
    link/ether 4a:0f:be:09:8e:ac brd ff:ff:ff:ff:ff:ff
    inet 172.17.0.1/16 brd 172.17.255.255 scope global docker0
       valid_lft forever preferred_lft forever
    inet6 fe80::480f:beff:fe09:8eac/64 scope link
       valid_lft forever preferred_lft forever
root@yudukai:/#
可以看到网卡没删干净
# 1. 停止并删除网卡
sudo ip link delete docker0

# 2. 再次验证
ip addr show docker0
root@yudukai:/# sudo ip link delete docker0
root@yudukai:/# ip addr show docker0
Device "docker0" does not exist.
root@yudukai:/#
配置 docker 下载源
# 1. 安装 curl 工具
sudo apt install curl -y

# 2. 创建 GPG 密钥目录并设置权限
sudo mkdir -m 0755 -p /etc/apt/keyrings

# 3. 下载并添加 Docker 的官方 GPG 密钥
curl -fsSL https://download.docker.com/linux/ubuntu/gpg | sudo gpg --dearmor --yes -o /etc/apt/keyrings/docker.gpg

# 4. 添加 Docker APT 仓库
echo \
  "deb [arch=$(dpkg --print-architecture) signed-by=/etc/apt/keyrings/docker.gpg] https://download.docker.com/linux/ubuntu \
  $(lsb_release -cs) stable" | \
  sudo tee /etc/apt/sources.list.d/docker.list > /dev/null
安装
# 更新软件包列表
# 执行此命令会从刚刚配置好的 Docker 官方源下载最新的软件包索引
# 这一步是必须的,否则系统找不到 docker-ce 等软件包
sudo apt-get update

# 安装 Docker 核心组件及插件
# docker-ce: Docker 社区版引擎(核心服务端)
# docker-ce-cli: Docker 命令行工具(客户端,让我们能执行 docker 命令)
# containerd.io: 容器运行时,负责管理容器的生命周期
# docker-buildx-plugin: Docker 构建扩展,支持更强大的构建功能(如多平台构建)
# docker-compose-plugin: Docker Compose v2 插件,支持使用 "docker compose" 命令
# -y: 自动确认安装,无需手动输入 "y"
sudo apt-get install docker-ce docker-ce-cli containerd.io docker-buildx-plugin docker-compose-plugin -y
自动启动配置:
#配置加载
sudo systemctl daemon-reload
#启动服务
sudo systemctl start docker
#开启启动
sudo systemctl enable docker
#查看服务状态
sudo systemctl status docker
检查安装结果查看版本
root@yudukai:/# docker version
Client: Docker Engine - Community
 Version:           29.6.2
 API version:       1.55
 Go version:        go1.26.5
 Git commit:        dfc4efb
 Built:             Thu Jul 16 16:12:23 2026
 OS/Arch:           linux/amd64
 Context:           default

Server: Docker Engine - Community
 Engine:
  Version:          29.6.2
  API version:      1.55 (minimum version 1.40)
  Go version:       go1.26.5
  Git commit:       3d80467
  Built:            Thu Jul 16 16:12:23 2026
  OS/Arch:          linux/amd64
  Experimental:     false
 containerd:
  Version:          v2.2.6
  GitCommit:        11ce9d5f3c68c941867e82890e93e815c1304f1b
 runc:
  Version:          1.3.6
  GitCommit:        v1.3.6-0-g491b69ba
 docker-init:
  Version:          0.19.0
  GitCommit:        de40ad0
root@yudukai:/#
更详细查看 docker 信息:
root@yudukai:/# docker info
Client: Docker Engine - Community
 Version:    29.6.2
 Context:    default
 Debug Mode: false
 Plugins:
  buildx: Docker Buildx (Docker Inc.)
    Version:  v0.36.0
    Path:     /usr/libexec/docker/cli-plugins/docker-buildx
  compose: Docker Compose (Docker Inc.)
    Version:  v5.3.1
    Path:     /usr/libexec/docker/cli-plugins/docker-compose

Server:
 Containers: 0
  Running: 0
  Paused: 0
  Stopped: 0
 Images: 0
 Server Version: 29.6.2
 Storage Driver: overlayfs
  driver-type: io.containerd.snapshotter.v1
 Logging Driver: json-file
 Cgroup Driver: systemd
 Cgroup Version: 2
 Plugins:
  Volume: local
  Network: bridge host ipvlan macvlan null overlay
  Log: awslogs fluentd gcplogs gelf journald json-file local splunk syslog
 CDI spec directories:
  /etc/cdi
  /var/run/cdi
 Swarm: inactive
 Runtimes: io.containerd.runc.v2 runc
 Default Runtime: runc
 Init Binary: docker-init
 containerd version: 11ce9d5f3c68c941867e82890e93e815c1304f1b
 runc version: v1.3.6-0-g491b69ba
 init version: de40ad0
 Security Options:
  apparmor
  seccomp
   Profile: builtin
  cgroupns
 Kernel Version: 5.15.0-60-generic
 Operating System: Ubuntu 22.04.3 LTS
 OSType: linux
 Architecture: x86_64
 CPUs: 4
 Total Memory: 7.763GiB
 Name: yudukai
 ID: 6874442b-fe2d-4a41-b0c4-4e943e19294e
 Docker Root Dir: /var/lib/docker
 Debug Mode: false
 Experimental: false
 Insecure Registries:
  ::1/128
  127.0.0.0/8
 Live Restore Enabled: false
 Firewall Backend: iptables
  EnableUserlandProxy: true
  UserlandProxyPath: /usr/bin/docker-proxy

root@yudukai:/#
执行 hello-world 可以看到 Hello from Docker,表面 docker 服务正常
sudo docker run hello-world
root@yudukai:/# sudo docker run hello-world
Unable to find image 'hello-world:latest' locally
docker: Error response from daemon: failed to resolve reference "docker.io/library/hello-world:latest": failed to do request: Head "https://registry-1.docker.io/v2/library/hello-world/manifests/latest": dial tcp 199.16.156.75:443: i/o timeout

Run 'docker run --help' for more information
root@yudukai:/#
上面这个,就是一个典型的**Docker镜像拉取超时问题**,主要原因是国内访问Docker Hub官方仓库网络不稳定。
2.1.3 Docker 镜像源修改
对于使用 systemd 的系统(Ubuntu 16.04+、Debian 8+、CentOS 7), 如果是腾讯云在配置文件 /etc/docker/daemon.json 中加入
{
 "registry-mirrors": ["https://mirror.ccs.tencentyun.com"]
}
如果是阿里云,因为只对企业开放海外代理,只能找私人的一些开放的源,目前可以使用的源如下:
{
 "registry-mirrors": [
 "https://docker.m.daocloud.io",
 "https://dockerhub.timeweb.cloud",
 "https://huecker.io"
 ]
}
如果这样没有文件,就创建一下:
root@yudukai:/# cd /etc/docker/
root@yudukai:/etc/docker# cat daemon.json
cat: daemon.json: No such file or directory
root@yudukai:/etc/docker#
sudo tee /etc/docker/daemon.json > /dev/null <<EOF
{
 "registry-mirrors": [
 "https://docker.m.daocloud.io",
 "https://dockerhub.timeweb.cloud",
 "https://huecker.io"
 ]
}
EOF
重新启动 dockerd:
sudo systemctl daemon-reload
sudo systemctl restart docker
继续实验:sudo docker run hello-world
root@yudukai:/etc/docker# sudo docker run hello-world
Unable to find image 'hello-world:latest' locally
latest: Pulling from library/hello-world
d5e71e642bf5: Download complete
4f55086f7dd0: Pull complete
Digest: sha256:c3cbe1cc1aa588a64951ac6286e0df7b27fe2e6324b1001c619bb358770c0178
Status: Downloaded newer image for hello-world:latest

Hello from Docker!
This message shows that your installation appears to be working correctly.

To generate this message, Docker took the following steps:
 1. The Docker client contacted the Docker daemon.
 2. The Docker daemon pulled the "hello-world" image from the Docker Hub.
    (amd64)
 3. The Docker daemon created a new container from that image which runs the
    executable that produces the output you are currently reading.
 4. The Docker daemon streamed that output to the Docker client, which sent it
    to your terminal.

To try something more ambitious, you can run an Ubuntu container with:
 $ docker run -it ubuntu bash

Share images, automate workflows, and more with a free Docker ID:
 https://hub.docker.com/

For more examples and ideas, visit:
 https://docs.docker.com/get-started/

root@yudukai:/etc/docker#
2.1.4 Docker 目录修改
Docker默认的安装目录为/var/lib/docker,这里面会存放很多很多镜像,所以我们在安装的时候需要考虑这个目录的空间,有三种解决方案。
- 将
/var/lib/docker挂载到一个大的磁盘,这种一般我们能控制挂载目录,像腾讯云这种云厂商在安装K8s的节点的时候提供了挂载选项,可以直接挂载这个目录过去- 安装之前挂载一个大的磁盘,然后创建一个软链接到
/var/lib/docker,这样就自动安装到我们空间比较大的磁盘了- 安装了
docker,然后发现忘了配置这个目录,我们需要修改docker的配置文件
#假定我们磁盘的大的目录为 /data
mkdir -p /data/var/lib/docker
# 编辑配置文件
vi /etc/docker/daemon.json
# 输入下面的 json
{
"data-root": "/data/var/lib/docker"
}

# 加载配置
sudo systemctl daemon-reload
# 重启 docker
sudo systemctl restart docker
#查看 docker 状态
sudo systemctl status docker
不确定自己要挂载的目录可以先用命令看一下:
root@yudukai:/var/lib/docker# df -h
Filesystem      Size  Used Avail Use% Mounted on
tmpfs           795M   78M  718M  10% /run
/dev/vda1       177G   23G  148G  14% /
tmpfs           3.9G     0  3.9G   0% /dev/shm
tmpfs           5.0M     0  5.0M   0% /run/lock
tmpfs           795M     0  795M   0% /run/user/0
/dev/loop0      3.5M  192K  2.8M   7% /data/testmymount
root@yudukai:/var/lib/docker#
因为我的这个磁盘空间足够,我就不更改了。
如果要更改的话,更改的时候记得把docker服务先停掉,改完了再开启。
2.2 CentOS 安装
2.2.1 安装依赖
支持的操作系统
CentOS 7 -- 停止更新已经不再支持
CentOS 8 (stream)
CentOS 9 (stream)
支持的 CPU
ARM/X86_64
2.2.2 安装 Docker
确认操作系统
cat /etc/*release*
确认 CPU 架构
uname -a
卸载旧版本
sudo yum remove docker \
 docker-client \
 docker-client-latest \
 docker-common \
 docker-latest \
 docker-latest-logrotate \
 docker-logrotate \
 docker-engine
卸载历史版本
#删除机器上的包
sudo yum remove docker-ce docker-ce-cli containerd.io docker-buildx-plugin docker-compose-plugin docker-ce-rootless-extras

#执行卸载
sudo rm -rf /var/lib/docker
sudo rm -rf /var/lib/containerd

#这个是修改后的目录,根据实际情况设置
sudo rm -rf /data/var/lib/docker
sudo rm -rf /etc/docker/daemon.json
配置仓库
[root@centos1 ~]# ll /etc/yum.repos.d/
total 40
-rw-r--r--. 1 root root 1664 Nov 23 2020 CentOS-Base.repo
-rw-r--r--. 1 root root 1309 Nov 23 2020 CentOS-CR.repo
-rw-r--r--. 1 root root 649 Nov 23 2020 CentOS-Debuginfo.repo
-rw-r--r--. 1 root root 314 Nov 23 2020 CentOS-fasttrack.repo
-rw-r--r--. 1 root root 630 Nov 23 2020 CentOS-Media.repo
-rw-r--r--. 1 root root 1331 Nov 23 2020 CentOS-Sources.repo
-rw-r--r--. 1 root root 8515 Nov 23 2020 CentOS-Vault.repo
-rw-r--r--. 1 root root 616 Nov 23 2020 CentOS-x86_64-kernel.repo

[root@centos1 ~]# sudo yum install -y yum-utils

[root@centos1 ~]# sudo yum-config-manager --add-repo
https://mirrors.aliyun.com/docker-ce/linux/centos/docker-ce.repo
[root@centos1 ~]# ll /etc/yum.repos.d/
total 44
-rw-r--r--. 1 root root 1664 Nov 23 2020 CentOS-Base.repo
-rw-r--r--. 1 root root 1309 Nov 23 2020 CentOS-CR.repo
-rw-r--r--. 1 root root 649 Nov 23 2020 CentOS-Debuginfo.repo
-rw-r--r--. 1 root root 314 Nov 23 2020 CentOS-fasttrack.repo
-rw-r--r--. 1 root root 630 Nov 23 2020 CentOS-Media.repo
-rw-r--r--. 1 root root 1331 Nov 23 2020 CentOS-Sources.repo
-rw-r--r--. 1 root root 8515 Nov 23 2020 CentOS-Vault.repo
-rw-r--r--. 1 root root 616 Nov 23 2020 CentOS-x86_64-kernel.repo
-rw-r--r--. 1 root root 1919 Apr 5 07:45 docker-ce.repo
安装最新版本
sudo yum install -y docker-ce
启动 docker
#配置加载
sudo systemctl daemon-reload
#启动服务
sudo systemctl start docker
#开启启动
sudo systemctl enable docker
#查看服务状态
sudo systemctl status docker
检查安装结果查看版本
[root@centos1 ~]# docker version
Client: Docker Engine - Community
 Version: 23.0.3
 API version: 1.42
 Go version: go1.19.7
 Git commit: 3e7cbfd
 Built: Tue Apr 4 22:04:18 2023
 OS/Arch: linux/amd64
 Context: default

Server: Docker Engine - Community
 Engine:
 Version: 23.0.3
 API version: 1.42 (minimum version 1.12)
 Go version: go1.19.7
 Git commit: 59118bf
 Built: Tue Apr 4 22:02:01 2023
 OS/Arch: linux/amd64
 Experimental: false
 containerd:
 Version: 1.6.20
 GitCommit: 2806fc1057397dbaeefbea0e4e17bddfbd388f38
 runc:
 Version: 1.1.5
 GitCommit: v1.1.5-0-gf19387a
 docker-init:
 Version: 0.19.0
 GitCommit: de40ad0
更详细查看 docker 信息
[root@centos1 ~]# docker info
Client:
 Context: default
 Debug Mode: false
 Plugins:
 buildx: Docker Buildx (Docker Inc.)
 Version: v0.10.4
 Path: /usr/libexec/docker/cli-plugins/docker-buildx
 compose: Docker Compose (Docker Inc.)
 Version: v2.17.2
 Path: /usr/libexec/docker/cli-plugins/docker-compose

Server:
 Containers: 0
 Running: 0
 Paused: 0
 Stopped: 0
 Images: 0
 Server Version: 23.0.3
 Storage Driver: overlay2
 Backing Filesystem: xfs
 Supports d_type: true
 Using metacopy: false
 Native Overlay Diff: true
 userxattr: false
 Logging Driver: json-file
 Cgroup Driver: cgroupfs
 Cgroup Version: 1
 Plugins:
 Volume: local
 Network: bridge host ipvlan macvlan null overlay
 Log: awslogs fluentd gcplogs gelf journald json-file local
logentries splunk syslog
 Swarm: inactive
 Runtimes: io.containerd.runc.v2 runc
 Default Runtime: runc
 Init Binary: docker-init
 containerd version: 2806fc1057397dbaeefbea0e4e17bddfbd388f38
 runc version: v1.1.5-0-gf19387a
 init version: de40ad0
 Security Options:
 seccomp
 Profile: builtin
 Kernel Version: 3.10.0-1160.71.1.el7.x86_64
 Operating System: CentOS Linux 7 (Core)
 OSType: linux
 Architecture: x86_64
 CPUs: 2
 Total Memory: 1.795GiB
 Name: centos1
 ID: 0b3c79d5-957d-4d04-a856-ac15a2a09db2
 Docker Root Dir: /var/lib/docker
 Debug Mode: false
 Registry: https://index.docker.io/v1/
 Experimental: false
 Insecure Registries:
 127.0.0.0/8
 Live Restore Enabled: false
执行 hello-world 可以看到 Hello from Docker,表面 docker 服务正常
[root@centos1 ~]# sudo docker run hello-world
Unable to find image 'hello-world:latest' locally
latest: Pulling from library/hello-world
2db29710123e: Pull complete
Digest: sha256:ffb13da98453e0f04d33a6eee5bb8e46ee50d08ebe17735fc0779d0349e889e9
Status: Downloaded newer image for hello-world:latest

Hello from Docker!
This message shows that your installation appears to be working correctly.

To generate this message, Docker took the following steps:
 1. The Docker client contacted the Docker daemon.
 2. The Docker daemon pulled the 'hello-world' image from the Docker Hub. (amd64)
 3. The Docker daemon created a new container from that image which runs the executable that produces the output you are currently reading.
 4. The Docker daemon streamed that output to the Docker client, which sent it to your terminal.

To try something more ambitious, you can run an Ubuntu container with:
 $ docker run -it ubuntu bash

Share images, automate workflows, and more with a free Docker ID:
 https://hub.docker.com/

For more examples and ideas, visit:
 https://docs.docker.com/get-started/
2.2.3 Docker 镜像源修改
对于使用
systemd的系统(Ubuntu 16.04+、Debian 8+、CentOS 7), 如果是腾讯云在配置文件/etc/docker/daemon.json中加入
{
 "registry-mirrors": ["https://mirror.ccs.tencentyun.com"]
}
如果是阿里云,因为只对企业开放海外代理,只能找私人的一些开放的源,目前可以使用的源如下,可能会失效
{
 "registry-mirrors": [
 "https://docker.m.daocloud.io",
 "https://dockerhub.timeweb.cloud",
 "https://huecker.io"
 ]
}
2.2.4 Docker 目录修改
Docker默认的安装目录为/var/lib/docker,这里面会存放很多很多镜像,所以我们在安装的时候需要考虑这个目录的空间,有三种解决方案。
- 将
/var/lib/docker挂载到一个大的磁盘,这种一般我们能控制挂载目录,像腾讯云这种云厂商在安装 K8s 的节点的时候提供了挂载选项,可以直接挂载这个目录过去- 安装之前挂载一个大的磁盘,然后创建一个软链接到
/var/lib/docker,这样就自动安装到我们空间比较大的磁盘了- 安装了
docker,然后发现忘了配置这个目录,我们需要修改docker的配置文件
#假定我们磁盘的大的目录为 /data
mkdir -p /data/var/lib/docker
# 编辑配置文件
vi /etc/docker/daemon.json
# 输入下面的 json
{
"data-root": "/data/var/lib/docker"
}

# 加载配置
sudo systemctl daemon-reload
# 重启 docker
sudo systemctl restart docker
#查看 docker 状态
sudo systemctl status docker






 扫一扫
扫一扫


 3万+
3万+

 被折叠的 条评论
为什么被折叠?
被折叠的 条评论
为什么被折叠?
 到【灌水乐园】发言





