


 约束布局ConstraintLayout旨在解决Android布局嵌套问题,提供更灵活的定位方式,适用于复杂UI设计。相比线性布局和RelativeLayout,它能提高性能并减少层次结构。本文将介绍ConstraintLayout的使用背景、与RelativeLayout的区别及如何使用,包括添加依赖、相对定位、角度定位、尺寸约束和链等概念。
一、介绍
约束布局ConstraintLayout 是一个ViewGroup,可以在Api9以上的Android系统使用它,它的出现主要是为了解决布局嵌套过多的问题,以灵活的方式定位和调整小部件。从 Android Studio 2.3 起,官方的模板默认使用 ConstraintLayout。
二、使用背景
在开发中经常会遇到复杂的UI,会出现嵌套过多的问题,嵌套越多,设备绘制视图所需的时间和计算功耗也越多。但是ConstraintLayout可以按照比例约束空间位置和尺寸,能更好的适配屏幕大小不同的机型。
三、约束布局(ConstraintLayout)与线性布局(RelativeLayout)的区别
1.ConstraintLayout是通过对每个视图应用一些规则来优化和展平布局的视图层次结构,避免嵌套
2.RelativeLayout是一种双向布局,它必须至少测量/布局两次。
ConstraintLayout不会遭受次性能损失。
四、如何使用ConstraintLayout
-
添加依赖
在app/build.gradle文件中添加ConstraintLayout的依赖
implementation 'com.android.support.constraint:constraint-layout:1.1.3'
-
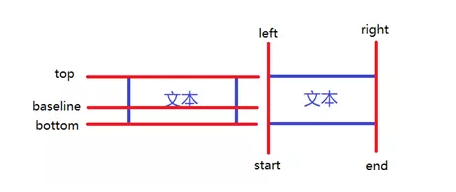
相对定位
layout_constraintLeft_toLeftOf = “@+id/B”  控件A的左边边界对齐B的左边边界
layout_constraintLeft_toRightOf                  控件A的左边边界对齐B的右边边界
layout_constraintRight_toLeftOf                  控件A的右边边界对齐B的做边边界
layout_constraintRight_toRightOf                控件A的右边边界对齐B的右边边界
layout_constraintTop_toTopOf                     控件A的顶部边界对齐B的顶部边界
layout_constraintTop_toBottomOf                控件A的顶部边界对齐B的下边边界
layout_constraintBottom_toTopOf                控件A的底部边界对齐B的顶部边界
layout_constraintBottom_toBottomOf          控件A的底部边界对齐B的底部边界
layout_constraintBaseline_toBaselineOf     控件A的中间边界对齐B的中间边界
layout_constraintStart_toEndOf                   控件A的左边边界对齐B的右边边界
layout_constraintStart_toStartOf                  控件A的左边边界对齐B的左边边界
layout_constraintEnd_toStartOf                   控件A的右边边界对齐B的左边边界
layout_constraintEnd_toEndOf                    控件A的右边边界对齐B的右边边界
-
角度定位
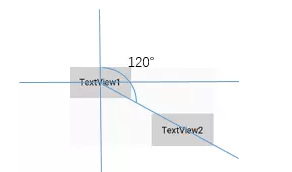
角度定位指的是可以用一个角度和一个距离来约束两个空间的中心
layout_constraintCircle="@+id/TextView1"
layout_constraintCircleAngle="120"(角度)
layout_constraintCircleRadius="150dp"(距离)
-
边距
常用margin
android:layout_marginStart
android:layout_marginEnd
android:layout_marginLeft
android:layout_marginTop
android:layout_marginRight
android:layout_marginBottom
goneMargin
goneMargin主要用于约束的控件可见性被设置为gone的时候使用的margin值,属性如下:
layout_goneMarginStart
layout_goneMarginEnd
layout_goneMarginLeft
layout_goneMarginTop
layout_goneMarginRight
layout_goneMarginBottom
-
居中和偏移
app:layout_constraintBottom_toBottomOf="parent"
app:layout_constraintLeft_toLeftOf="parent"
app:layout_constraintRight_toRightOf="parent"
app:layout_constraintTop_toTopOf="parent"
layout_constraintHorizontal_bias 水平偏移
layout_constraintVertical_bias 垂直偏移
-
尺寸约束
1. 使用指定的尺寸
2. 使用wrap_content,控制自己计算大小
当控件的高度或宽度为wrap_content时,可以使用下列属性来控制最大、最小的高度或宽度:
android:minWidth 最小的宽度
android:minHeight 最小的高度
android:maxWidth 最大的宽度
android:maxHeight 最大的高度
注意!当ConstraintLayout为1.1版本以下时,使用这些属性需要加上强制约束,如下所示:
app:constrainedWidth=”true”
app:constrainedHeight=”true”
3. 使用0dp(match_constraint)
4. 宽高比
app:layout_constraintDimensionRatio="1:1"    宽设置为0dp,宽高比设置为1:1
除此之外,在设置宽高比的值的时候,还可以在前面加W或H,分别指定宽度或高度限制。 例如:
app:layout_constraintDimensionRatio="H,2:3"指的是  高:宽=2:3
app:layout_constraintDimensionRatio="W,2:3"指的是  宽:高=2:3
-
链
如果两个或以上控件通过下图的方式约束在一起,就可以认为是他们是一条链(图为横向的链,纵向同理)。 如图:
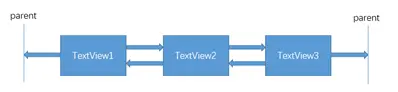
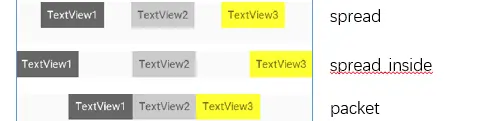
layout_constraintHorizontal_chainStyle来改变整条链的样式。chains提供了3种样式,分别是:
CHAIN_SPREAD —— 展开元素 (默认);
CHAIN_SPREAD_INSIDE —— 展开元素,但链的两端贴近parent;
CHAIN_PACKED —— 链的元素将被打包在一起。





 扫一扫
扫一扫


 7046
7046

 被折叠的 条评论
为什么被折叠?
被折叠的 条评论
为什么被折叠?
 到【灌水乐园】发言





