


YOLOv5源码(使用的是YOLOv5 6.1版本)地址:GitHub - ultralytics/yolov5: YOLOv5 🚀 in PyTorch > ONNX > CoreML > TFLite
参考笔记:
【魔改YOLOv5-6.x(上)】结合轻量化网络Shufflenetv2、Mobilenetv3和Ghostnet_yolov5 shufflenet-CSDN博客
目录
1.GhostNet
GhostNet出自华为诺亚方舟实验室,作者发现在传统的深度学习网络中存在着大量冗余,但是又对模型的精度至关重要的特征图。这些特征图是由卷积操作得到,又输入到下一个卷积层进行运算,这个过程包含大量的网络参数,消耗了大量的计算资源
作者考虑到这些feature map中的冗余信息可能是一个成功模型的重要组成部分,正是因为这些冗余信息才能保证输入数据的全面理解,所以作者在设计轻量化模型的时候并没有试图去除这些冗余feature map,而是尝试使用更低成本的计算量来获取这些冗余feature map
注意:此文的Ghost Module、Ghost Bottleneck主要针对官方提供的YOLOv5源码中的实现作讲解,与原生的华为官方提供的源码简化了很多。关于GhostNet的更多细节可以看我的另一篇博客:
1.1 Ghost Module(Ghost Conv)
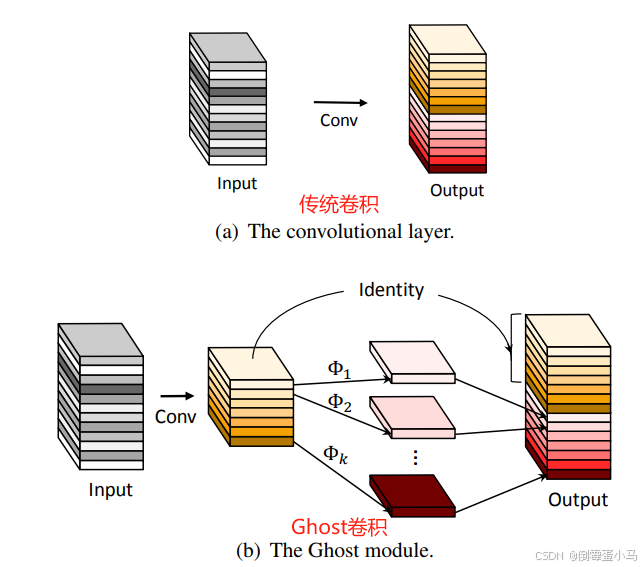
Ghost Module
Ghost Module将传统卷积操作分为两部分实现,从而实现轻量化:
(1)使用少量卷积核进行卷积操作(比如正常用64个,这里就用32个,从而减少一半计算量)
(2)使用 3×3 或 5×5 的卷积核进行逐通道卷积操作(Cheap operations)
最终将第一步的结果作为一份恒等映射(Identity),与第二步的结果进行Concat操作
1.2 Ghost Bottleneck
Ghost Bottleneck是GhostNet中的瓶颈结构,由Ghost Module组成。其结构有点类似ResNet的残差块,同样使用到残差连接

Ghost Bottleneck
Ghost Bottleneck有两种结构:
- stride=1:不对特征图的尺寸作下采样,特征图的(H,W)不发生改变
- stride=2,对特征图的尺寸作下采样,多出来一个步长为2的DWConv逐通道卷积操作,特征图的(H,W)减半。在残差边部分会添加逐通道卷积、1x1 传统卷积作用于原始输入 x 后再作残差连接
1.3 YOLOv5源码中的实现
YOLOv5中提供了Ghost Module、Ghost Bottlenck的源码实现,不过需要注意的是相比于华为的源码是简化版本
代码实现在models/common.py下
#GhostConv即GhostNet中的Ghost Module
class GhostConv(nn.Module):
    #Ghost Convolution https://github.com/huawei-noah/ghostnet
    def __init__(self, c1, c2, k=1, s=1, g=1, act=True):  # ch_in, ch_out, kernel, stride, groups
        super().__init__()
        '''
        c1: in_channel
        c2: out_channel
        k: kernel_size
        s: stride
        g: groups
        '''

        #中间通道数c_
        c_ = c2 // 2

        #先作通道数减半卷积,减少计算量
        self.cv1 = Conv(c1, c_, k, s, None, g, act)

        #逐通道卷积
        self.cv2 = Conv(c_, c_, 5, 1, None, c_, act)

    #前向传播
    def forward(self, x):
        #先作通道数减半卷积
        y1 = self.cv1(x)
        #再作逐通道卷积
        y2 = self.cv2(y1)
        #将两部分在通道在通道维度上作concat
        return torch.cat([y1,y2], 1)

#Ghost Bottleneck
class GhostBottleneck(nn.Module):
    # Ghost Bottleneck https://github.com/huawei-noah/ghostnet
    def __init__(self, c1, c2, k=3, s=1):
        super().__init__()
        '''
        c1: in_channel
        c2: out_channel
        k: 逐通道卷积层的卷积核大小
        s: stride,若s=2,则在Ghost Bottleneck的主干部分增加一个逐通道卷积,残差部分添加逐通道卷积、普通1x1卷积
        '''

        #中间通道数c_
        c_ = c2 // 2

        #Ghost Bottleneck的主干部分,如果s=2,主干部分添加逐通道卷积
        self.conv = nn.Sequential(GhostConv(c1, c_, 1, 1),#第1个Ghost Module
                                  DWConv(c_, c_, k, s, act=False) if s == 2 else nn.Identity(),#逐通道卷积
                                  GhostConv(c_, c2, 1, 1, act=False))#第2个Ghost Module

        #Ghost Bottleneck的残差部分,如果s=2,残差部分添加逐通道卷积、普通1x1卷积
        self.shortcut = nn.Sequential(DWConv(c1, c1, k, s, act=False),
                                      Conv(c1, c2, 1, 1, act=False)) if s == 2 else nn.Identity()

    #前向传播
    def forward(self, x):
        return self.conv(x) + self.shortcut(x)
2.YOLOv5结合Ghost
YOLOv5中提供了结合Ghost的一种方式:将YOLOv5中的一些普通卷积层替换为Ghost Module(Ghost Conv)、C3模块中原先的瓶颈结构替换为Ghost Bottlenck,以此减少计算量和参数量
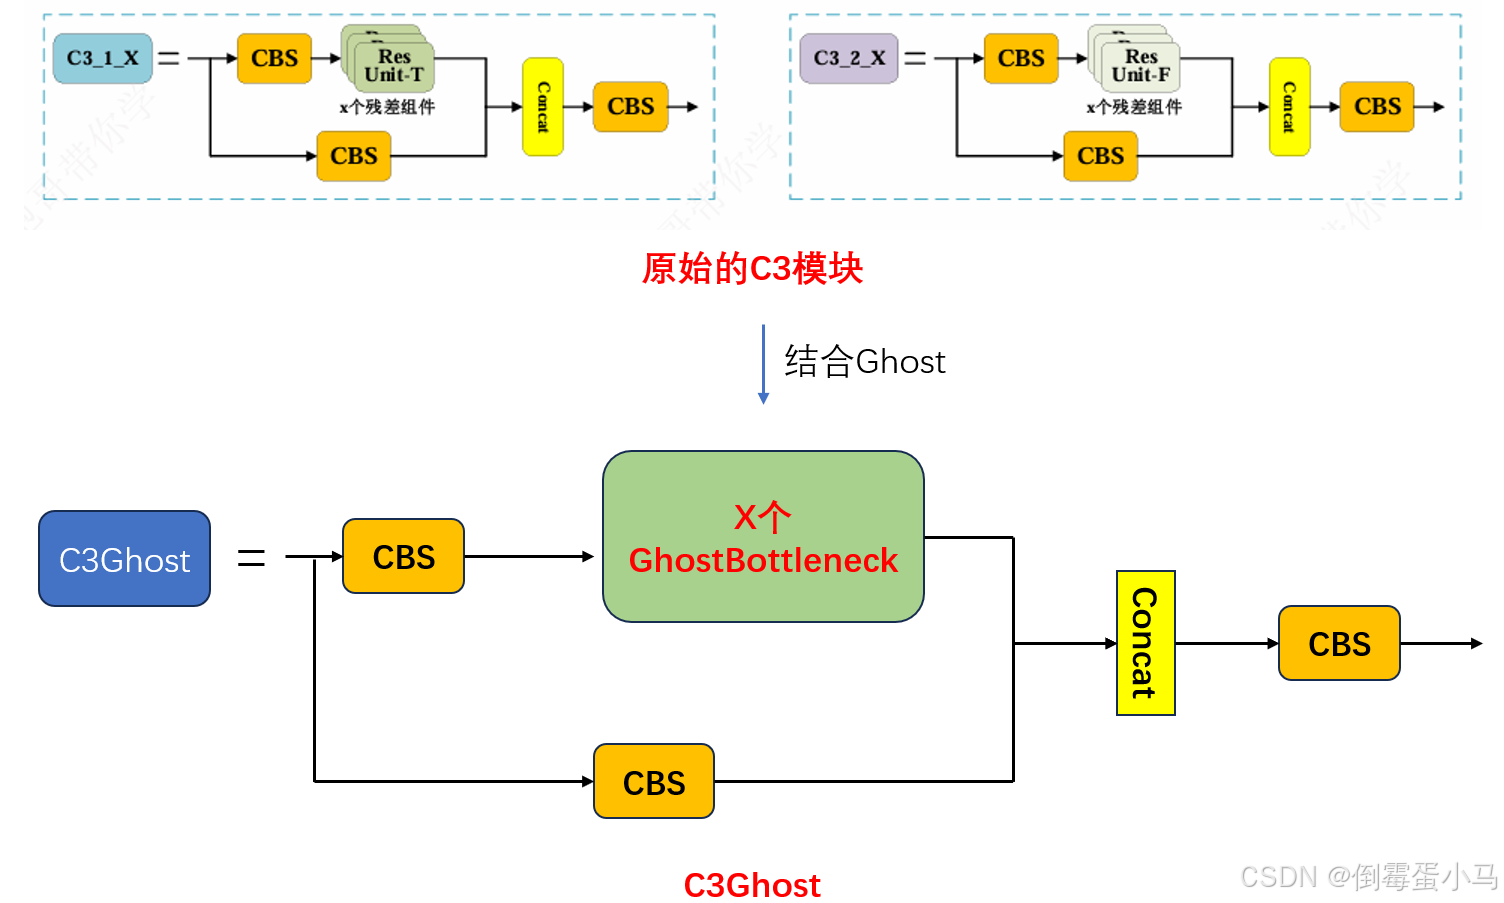
YOLOv5源码中C3Ghost的实现代码在models/common.py:
#继承C3类,C3Ghost是将原始C3模块中的瓶颈结构Bottleneck换成GhostBottleneck,其他部分没有改变
class C3Ghost(C3):
    # C3 module with GhostBottleneck()
    def __init__(self, c1, c2, n=1, shortcut=True, g=1, e=0.5):
        super().__init__(c1, c2, n, shortcut, g, e)
        #中间通道数
        c_ = int(c2 * e)
        #替换瓶颈结构为GhostBottleneck
        self.m = nn.Sequential(*[GhostBottleneck(c_, c_) for _ in range(n)])
结合步骤
- 第1步:创建yolov5n_ghost.yaml存放于models目录下,并将原始yolov5n.yaml的内容拷贝
- 第2步:修改yolov5n_ghost.yaml,将yolov5n_ghost.yaml中backbone和head的Conv、C3模块全部替换为GhostConv、C3Ghost,参数部分只有第0层需要作修改,其他层不用作任何修改
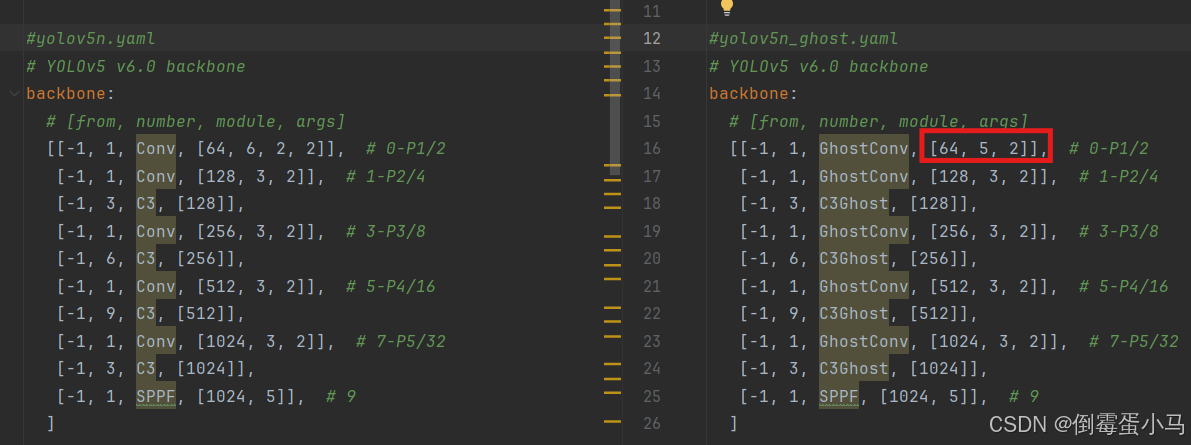
yolov5n_ghost.yaml
完整的yolov5_ghost.yaml如下:
# YOLOv5 🚀 by Ultralytics, GPL-3.0 license

# Parameters
nc: 3  # number of classes
depth_multiple: 0.33  # model depth multiple
width_multiple: 0.25  # layer channel multiple
anchors:
  - [10,13, 16,30, 33,23]  # P3/8
  - [30,61, 62,45, 59,119]  # P4/16
  - [116,90, 156,198, 373,326]  # P5/32

# YOLOv5 v6.0 backbone
backbone:
  # [from, number, module, args]
  [[-1, 1, GhostConv, [64, 5, 2]],  # 0-P1/2
   [-1, 1, GhostConv, [128, 3, 2]],  # 1-P2/4
   [-1, 3, C3Ghost, [128]],
   [-1, 1, GhostConv, [256, 3, 2]],  # 3-P3/8
   [-1, 6, C3Ghost, [256]],
   [-1, 1, GhostConv, [512, 3, 2]],  # 5-P4/16
   [-1, 9, C3Ghost, [512]],
   [-1, 1, GhostConv, [1024, 3, 2]],  # 7-P5/32
   [-1, 3, C3Ghost, [1024]],
   [-1, 1, SPPF, [1024, 5]],  # 9
  ]

# YOLOv5 v6.0 head
head:
  [[-1, 1, GhostConv, [512, 1, 1]],
   [-1, 1, nn.Upsample, [None, 2, 'nearest']],
   [[-1, 6], 1, Concat, [1]],  # cat backbone P4
   [-1, 3, C3Ghost, [512, False]],  # 13

   [-1, 1, GhostConv, [256, 1, 1]],
   [-1, 1, nn.Upsample, [None, 2, 'nearest']],
   [[-1, 4], 1, Concat, [1]],  # cat backbone P3
   [-1, 3, C3Ghost, [256, False]],  # 17 (P3/8-small)

   [-1, 1, GhostConv, [256, 3, 2]],
   [[-1, 14], 1, Concat, [1]],  # cat head P4
   [-1, 3, C3Ghost, [512, False]],  # 20 (P4/16-medium)

   [-1, 1, GhostConv, [512, 3, 2]],
   [[-1, 10], 1, Concat, [1]],  # cat head P5
   [-1, 3, C3Ghost, [1024, False]],  # 23 (P5/32-large)

   [[17, 20, 23], 1, Detect, [nc, anchors]],  # Detect(P3, P4, P5)
  ]
- 第3步:在models/yolo.py脚本测试是否能够利用yolov5n_ghost.yaml搭建网络结构

查看控制台打印的模型结构

- 第4步:参数量、计算量的对比

参数量对比
- 第5步:精度对比
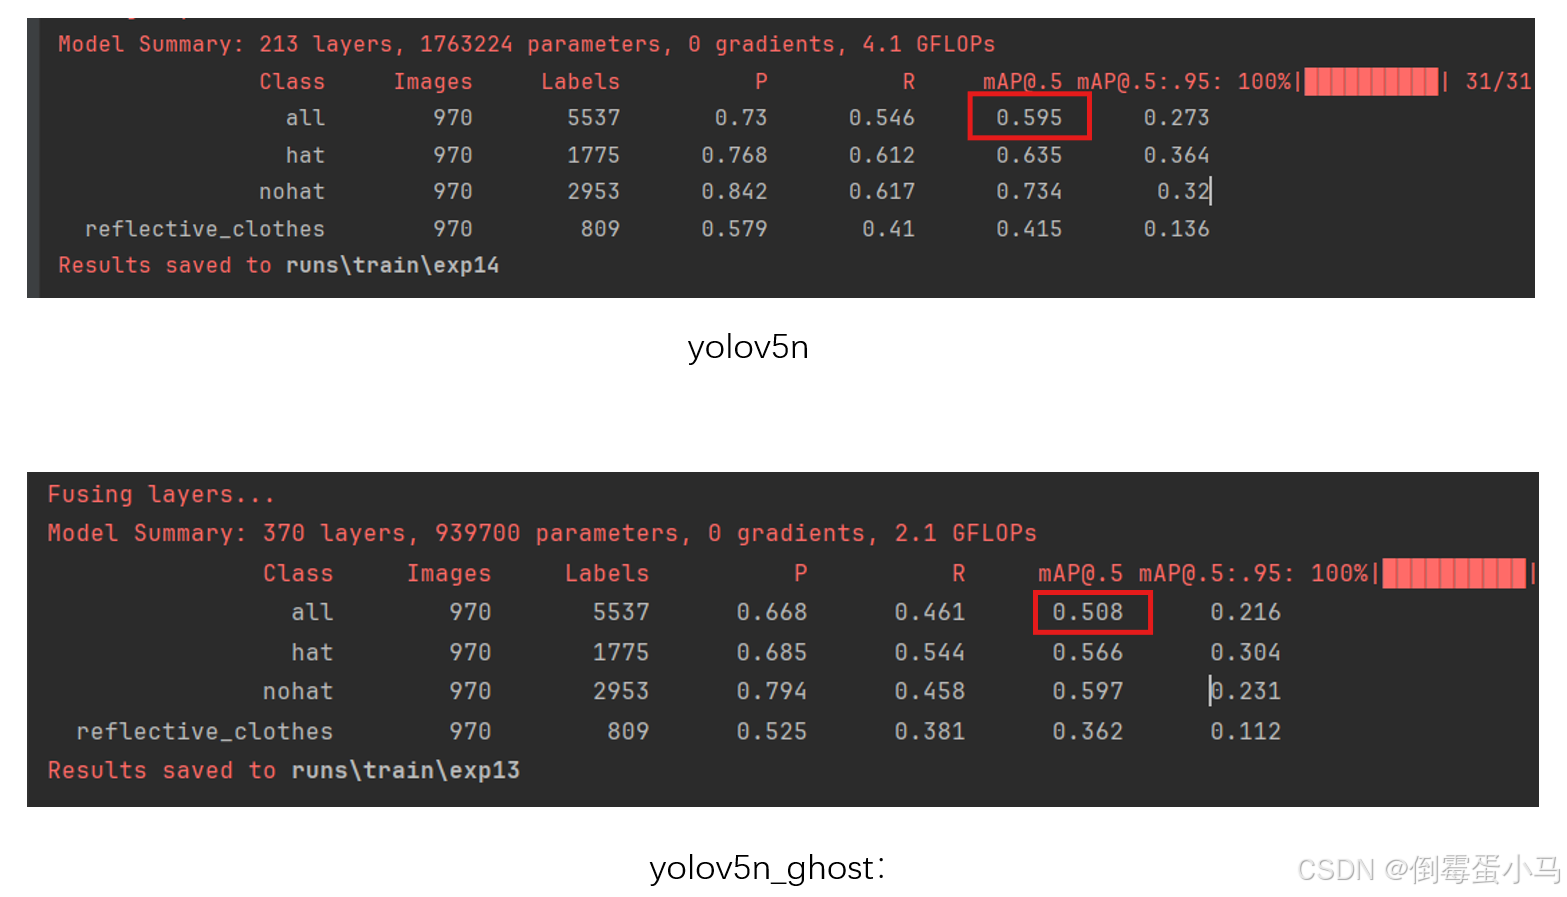
上面是我用原始的yolov5n和结合GhostNet之后的yolov5n_ghost在我的数据集上跑10个epoch的结果(没有使用预训练权重),可以看到虽然计算量和参数量降低了很多,但是精度也掉了很多。精度掉了很多的原因是因为在轻量化方面“用力过猛”,下面是只在backbone部分结合GhostNet,而head部分用回原始的yolov5n中的结构的模型训练结果


 3万+


 扫一扫


 被折叠的 条评论
为什么被折叠?
 到【灌水乐园】发言


