


零. Reactor模型
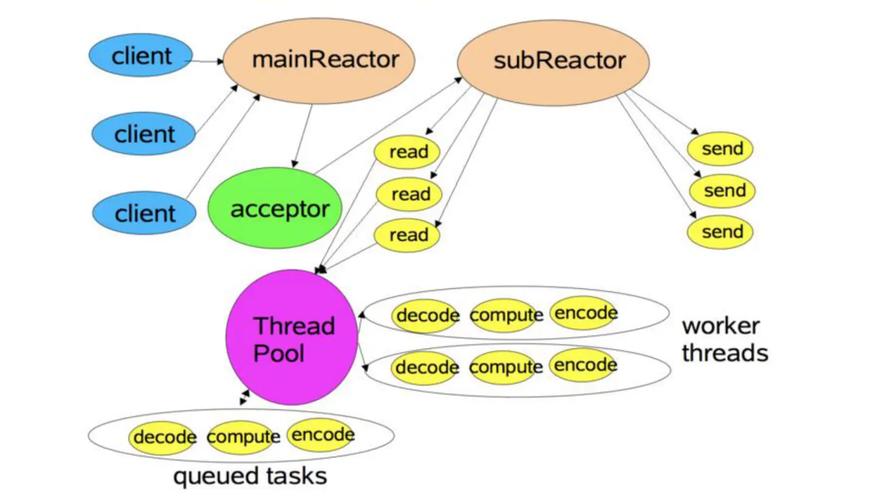
Netty中所使用的Reactor模型如上图所示,本节索要讲到的部分与mainReactor与subReactor息息相关。
一. NioEventLoopGroup与NioEventLoop之间的关系
1. NioEventLoopGroup
首先来看一下NioEventLoopGroup的继承关系:
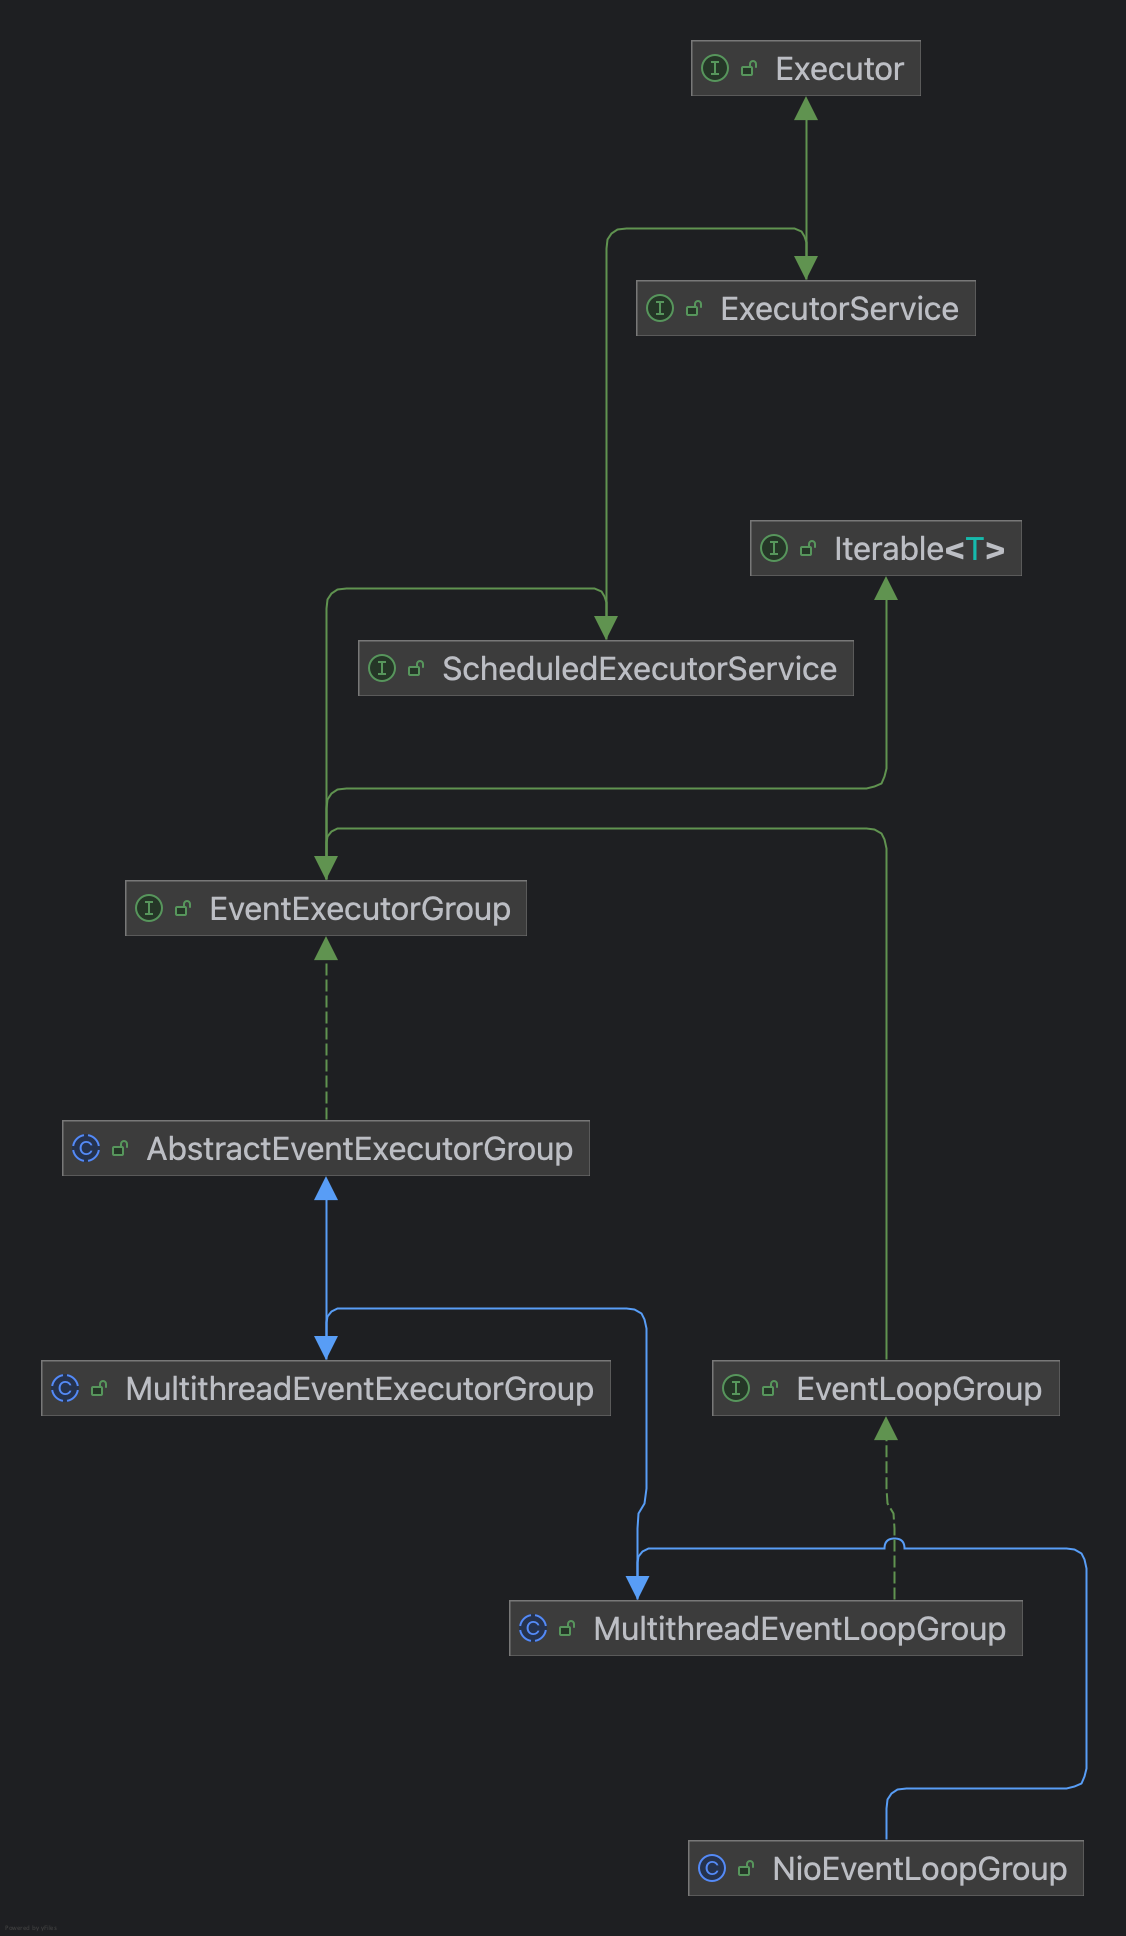
我们来挨个梳理一下:
1. Executor接口
- 核心能力: 提供最基础的任务执行抽象
- 关键方法: execute(Runnable command)
- 具体作用:
- 将任务提交与执行策略分离
- 屏蔽线程创建和管理的细节
- 为上层提供统一的任务提交入口
2. ExecutorService接口
- 增加能力:
- 生命周期管理:
- shutdown(): 平滑关闭,拒绝新任务但完成已提交任务
- shutdownNow(): 尝试中断正在执行的任务并返回等待执行的任务列表
- isShutdown()/isTerminated(): 检查服务状态
- 任务提交增强:
- submit(Runnable): 提交任务并返回Future
- submit(Callable): 提交可返回结果的任务
- 批量操作:
- invokeAll(): 执行所有任务并等待全部完成
- invokeAny(): 执行任务集合中任意一个完成即可返回
- 生命周期管理:
3. ScheduledExecutorService接口
- 增加能力:
- 延迟执行:
- schedule(Runnable, delay, unit): 延迟指定时间后执行一次
- schedule(Callable, delay, unit): 延迟执行并返回结果
- 周期性执行:
- scheduleAtFixedRate(): 固定速率执行,不考虑任务执行时间
- scheduleWithFixedDelay(): 固定延迟执行,考虑任务执行时间
- 返回特殊Future:
- ScheduledFuture: 可获取剩余延迟等信息
- 延迟执行:
4. EventExecutorGroup接口
- 增加能力:
- EventExecutor管理:
- next(): 返回下一个可用的EventExecutor,实现负载均衡
- iterator(): 遍历所有管理的EventExecutor
- 增强的生命周期管理:
- shutdownGracefully(): 带静默期的优雅关闭
- isShuttingDown(): 检查是否正在关闭
- terminationFuture(): 获取终止完成的Future
- Netty特有的Future支持:
- 返回Netty的Promise和Future,而非JDK标准Future
- EventExecutor管理:
5. AbstractEventExecutorGroup抽象类
- 增加能力:
- 方法委托模式:
- 将大部分ExecutorService方法委托给next()返回的EventExecutor
- 简化了实现,只需专注于next()方法和生命周期管理
- 方法委托模式:
6. MultithreadEventExecutorGroup抽象类
- 增加能力:
- 多线程管理:
- 创建和管理多个EventExecutor实例
- 通过数组children存储所有EventExecutor
- 线程工厂
- EventExecutor选择策略:
- 任务拒绝处理:
- 统一终止管理:
- 实现terminationFuture()返回所有EventExecutor终止的聚合Future
- 多线程管理:
7. MultithreadEventLoopGroup抽象类
- 实现: EventLoopGroup接口,该接口定义了一个EventLoop该具备的能力
- 增加能力:
- Channel注册:
- register(Channel): 将Channel注册到EventLoop
- register(ChannelPromise): 带Promise的注册
- Channel注册:
8. NioEventLoopGroup具体类
- 增加能力:
- NIO特定功能:
- 使用SelectorProvider创建Java NIO Selector
- 默认使用SelectorProvider.provider()获取系统默认提供者
- IO操作比例控制:
- setIoRatio(int): 控制IO任务与非IO任务的执行比例
- Selector优化:
- rebuildSelectors(): 解决JDK NIO的epoll bug
- SelectStrategy:
- 控制select操作的策略(立即/阻塞/选择性阻塞)
- NioEventLoop创建:
- 创建特定于NIO的EventLoop实现
- NIO特定功能:
EventExecutorGroup是一个通用化的执行器容器,管理了一堆形如EventExecutor的通用执行器。EventExecutorGroup它本身并没有相关能力,相关能力的实现都是通过调用自身管理的通用执行器进行实现的,例如AbstractEventExecutorGroup与MultithreadEventExecutorGroup抽象类实现相应方法时,都是通过next()方法找到下一个可用的通用执行器EventExecutor,调用通用执行器的相关能力完成操作。
将EventExecutorGroup继续特化,特化为类似XXXEventLoopGroup时,相当于将通用执行器组特化为专门管理网络处理的执行器组。例如MultithreadEventLoopGroup实现EventLoopGroup接口后,执行器组就拥有了管理网络相关组建的能力(其实是所管理的执行器提供的能力)。
总结:EventExecutorGroup是通用执行器容器,EventLoopGroup是其网络处理特化版本,大部分能力都是通过委托给内部管理的执行器实现的。
2. NioEventLoop
看一下NioEventLoopGroup的继承关系:
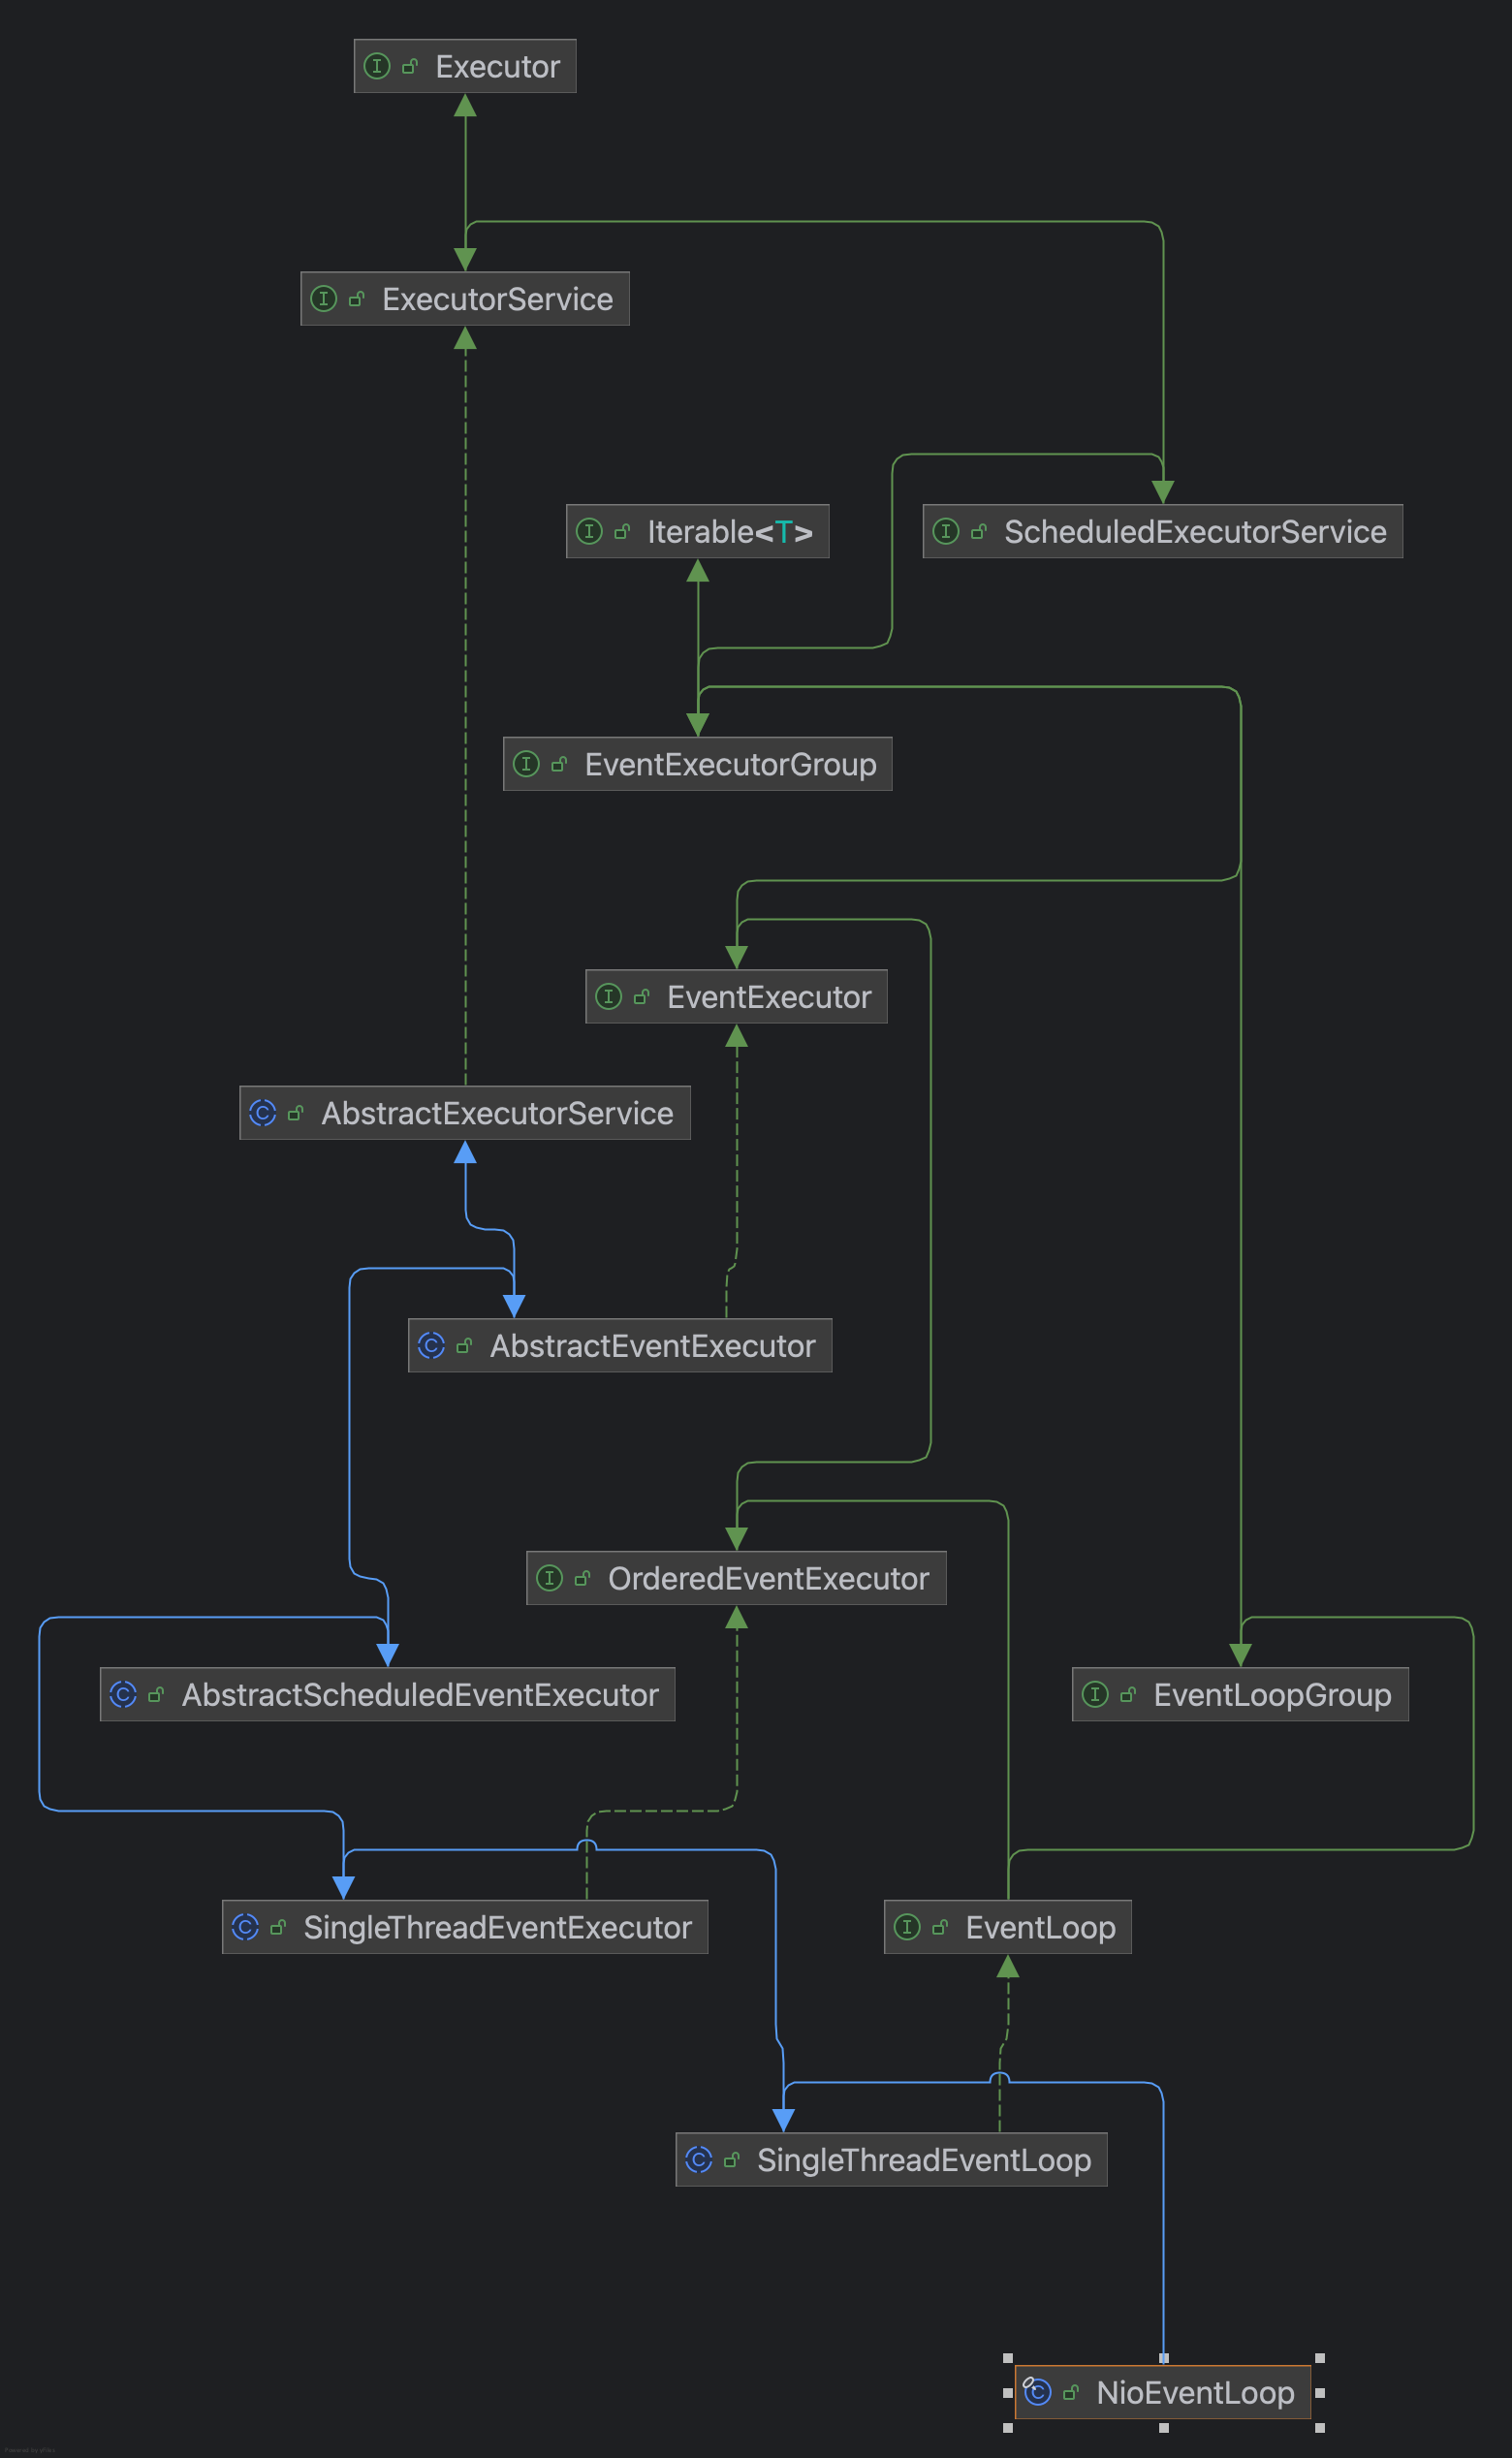
Executor,ExecutorService,ScheduledExecutorService与上文类似。我们来讲一下不同的地方:
1. EventExecutor接口
- 增加能力:
- Netty特有的Future支持:
- newPromise(): 创建Promise对象
- newSucceededFuture()/newFailedFuture(): 创建已完成的Future
- 执行器关系:
- parent(): 获取父执行器组EventExecutorGroup
- inEventLoop(): 检查当前线程是否为事件循环线程
- 增强的生命周期管理:
- shutdownGracefully(): 带静默期的优雅关闭
- terminationFuture(): 获取终止完成的Future
- Netty特有的Future支持:
2. OrderedEventExecutor接口
- 增加能力:
- 顺序保证:
- 确保任务按提交顺序执行
- 为Channel处理提供线程安全保证
- 标记接口特性:
- 没有定义新方法,但提供类型标记
- 允许系统识别支持顺序执行的执行器
- 顺序保证:
3. EventLoop接口
- 增加能力:
- 执行器组关系:
- parent(): 返回EventLoopGroup
- 执行器组关系:
4. AbstractEventExecutor抽象类
- 增加能力:
- 基础实现:
- 实现EventExecutor的大部分方法
- 提供inEventLoop(Thread)的默认实现
- Future工厂方法:
- 实现newPromise(), newSucceededFuture()等方法
- 基础实现:
5. AbstractScheduledEventExecutor抽象类
- 增加能力:
- 任务调度队列:
- 维护PriorityQueue<ScheduledFutureTask<?>>调度队列
- 按执行时间排序的优先级队列
- 调度任务管理:
- schedule(): 实现所有ScheduledExecutorService方法
- cancelScheduledTasks(): 取消所有调度任务
- 时间轮算法支持:
- 高效处理大量定时任务
- 优化任务触发时间计算
- 任务调度队列:
6. SingleThreadEventExecutor抽象类
- 增加能力:
- 单线程执行模型:
- 维护一个专用线程处理所有任务
- 实现thread变量跟踪执行线程
- 任务队列管理:
- 维护taskQueue存储待执行任务
- 支持多种队列实现(有界/无界)
- 线程启动与关闭:
- 延迟启动线程直到首次任务提交
- 实现优雅关闭流程
- 任务拒绝策略:
- 队列满或关闭时的拒绝处理
- 线程状态管理:
- ST_NOT_STARTED, ST_STARTED, ST_SHUTTING_DOWN等状态
- 单线程执行模型:
7. SingleThreadEventLoop抽象类
- 实现: EventLoop
- 增加能力:
- Channel管理:
- 维护注册到此EventLoop的所有Channel
- 实现register(Channel)方法
- 任务队列优化:
- 引入tailTasks队列用于收尾工作
- 支持任务优先级区分
- 唤醒机制:
- wakeup(boolean)方法唤醒事件循环
- 解决阻塞在IO操作时的任务调度问题
- Channel管理:
8. NioEventLoop具体类
- 继承自: SingleThreadEventLoop
- 增加能力:
- NIO操作支持:
- 维护Java NIO Selector实例
- 处理SelectionKey的事件分发
- IO比例控制:
- ioRatio控制IO任务与非IO任务的执行比例
- 选择策略:
- 通过SelectStrategy控制select操作行为
- NIO操作支持:
EventExecutor是一个通用化的执行器,其抽象实现类SingleThreadEventExecutor将执行器与一个线程进行绑定,这意味着一个线程对应一个执行器。将SingleThreadEventExecutor继续进行特化,成为SingleThreadEventLoop抽象类,在该类中增加了管理网络相关组建的能力。其中具体实现类例如NioEventLoop,管理了Selecor实例,这意味着将线程与Selecor进行了绑定,即一个线程一个Selecor。
总结:从NioEventLoopGroup与NioEventLoop不难看出,其实NioEventLoopGroup在Reactor模型中所扮演的角色就是mainReactor与subReactor,而NioEventLoop扮演的角色是mainReactor或subReactor中的每一个执行单元。该执行单元将单个线程与一个Selector进行绑定,来执行Selector中绑定的若干个Channel感兴趣的事件。
二. 示例代码
public class NettyServer {

    public static void main(String[] args) throws InterruptedException {
        EventLoopGroup bossGroup = new NioEventLoopGroup(1);
        EventLoopGroup workerGroup = new NioEventLoopGroup(2);

        ServerBootstrap b = new ServerBootstrap();
        b.group(bossGroup, workerGroup)
                .channel(NioServerSocketChannel.class)
                .childHandler(new ChannelInitializer<SocketChannel>() {
                    @Override
                    protected void initChannel(SocketChannel ch) throws Exception {
                        ChannelPipeline p = ch.pipeline();
                        p.addLast(new LoggingHandler(LogLevel.INFO));
                    }
                });
    }
}
三. 源码分析
EventLoopGroup bossGroup = new NioEventLoopGroup(1);
首先看到这一行,点击进入NioEventLoopGroup的构造函数。
    public NioEventLoopGroup(int nThreads) {
        this(nThreads, (Executor) null);
    }
可以看到,传入了一个线程数量的参数,该参数可以为 NioEventLoopGroup定制NioEventLoop的个数。继续往下深入构造函数
    public NioEventLoopGroup(int nThreads, Executor executor) {
        // todo:SelectorProvider按系统生成Selector
        this(nThreads, executor, SelectorProvider.provider());
    }
SelectorProvider.provider(),此处使用了JDK包中的方法,最终生成一个了一个SelectorProvider对象继续传入(这个对象可以理解为一个Selector的构造工厂)
继续深入来到MultithreadEventLoopGroup构造函数
static {
    // todo:配置值或者系统可用核心数两倍
    DEFAULT_EVENT_LOOP_THREADS = Math.max(1, SystemPropertyUtil.getInt(
                "io.netty.eventLoopThreads", NettyRuntime.availableProcessors() * 2));

    if (logger.isDebugEnabled()) {
            logger.debug("-Dio.netty.eventLoopThreads: {}", DEFAULT_EVENT_LOOP_THREADS);
    }
}


protected MultithreadEventLoopGroup(int nThreads, Executor executor, Object... args) {
    // todo:此处生成线程数量
    super(nThreads == 0 ? DEFAULT_EVENT_LOOP_THREADS : nThreads, executor, args);
}
在这里,提供了线程的默认数量(即初始构造NioEventLoopGroup时未传入线程个数)
继续深入来到MultithreadEventExecutorGroup的构造方法
protected MultithreadEventExecutorGroup(int nThreads, Executor executor,
                                        EventExecutorChooserFactory chooserFactory, Object... args) {
    checkPositive(nThreads, "nThreads");

    if (executor == null) {
        // todo:此时线程并未启动,仅仅进行线程工厂初始化
        executor = new ThreadPerTaskExecutor(newDefaultThreadFactory());
    }

    // todo:EventLoopGroup下EventLoop
    children = new EventExecutor[nThreads];

    for (int i = 0; i < nThreads; i ++) {
        boolean success = false;
        try {
            // todo:初始化EventLoop
            children[i] = newChild(executor, args);
            success = true;
        } catch (Exception e) {
            // TODO: Think about if this is a good exception type
            throw new IllegalStateException("failed to create a child event loop", e);
        } finally {
            if (!success) {
                for (int j = 0; j < i; j ++) {
                    children[j].shutdownGracefully();
                }

                for (int j = 0; j < i; j ++) {
                    EventExecutor e = children[j];
                    try {
                        while (!e.isTerminated()) {
                            e.awaitTermination(Integer.MAX_VALUE, TimeUnit.SECONDS);
                        }
                    } catch (InterruptedException interrupted) {
                        // Let the caller handle the interruption.
                        Thread.currentThread().interrupt();
                        break;
                    }
                }
            }
        }
    }

    // todo:选择器,选择下一个EventLoop
    // todo:针对数量是否为2的倍数进行优化,2的次方则位运算,否则模运算
    chooser = chooserFactory.newChooser(children);

    // todo:监听每个EventLoop的终止事件,当所有EventLoop都终止时,设置terminationFuture的状态为成功。
    final FutureListener<Object> terminationListener = new FutureListener<Object>() {
        @Override
        public void operationComplete(Future<Object> future) throws Exception {
            if (terminatedChildren.incrementAndGet() == children.length) {
                terminationFuture.setSuccess(null);
            }
        }
    };

    for (EventExecutor e: children) {
        e.terminationFuture().addListener(terminationListener);
    }

    Set<EventExecutor> childrenSet = new LinkedHashSet<EventExecutor>(children.length);
    Collections.addAll(childrenSet, children);
    readonlyChildren = Collections.unmodifiableSet(childrenSet);
}
这个构造函数主要做了如下几件事情:
1. 创建executor(该参数在之后传给EventLoop进行线程创建)
2. 根据线程数量nThreads创建EventLoop
3. 为EventLoopGroup绑定一个选择器chooser(该选择器之后用来选择EventLoopGroup中下一个可用的EventLoop)
4. 为EventLoopGroup中的每一个EventLoop绑定一个回调函数,该回调函数监听每个EventLoop的终止事件,当所有EventLoop都终止时,设置Group中的参数terminationFuture的状态为成功。
接下来深入细节:
1. 创建executor
咱们将EventLoopGroup中创建出来的executor记为总executor
executor = new ThreadPerTaskExecutor(newDefaultThreadFactory());
点击进入ThreadPerTaskExecutor构造函数,结果发现ThreadPerTaskExecutor结构非常简单
public final class ThreadPerTaskExecutor implements Executor {
    private final ThreadFactory threadFactory;

    public ThreadPerTaskExecutor(ThreadFactory threadFactory) {
        this.threadFactory = ObjectUtil.checkNotNull(threadFactory, "threadFactory");
    }

    @Override
    public void execute(Runnable command) {
        // todo: 总executor执行execute时,直接创建线程并启动
        threadFactory.newThread(command).start();
    }
}
构造函数传入参数是一个线程工厂
着重需要注意的是 execute方法,当总executor调用execute方法时,此时会创建出一个新的线程并且立即启动该线程!!!
newDefaultThreadFactory()这个方法感兴趣的同学可以追下去看看。
它主要的方法是newThread方法,该方法实现了一些给线程命名等功能,最终创建出一个FastThreadLocalThread线程,FastThreadLocalThread继承于系统Thread
public Thread newThread(Runnable r) {
    Thread t = newThread(FastThreadLocalRunnable.wrap(r), prefix + nextId.incrementAndGet());
    try {
        if (t.isDaemon() != daemon) {
            t.setDaemon(daemon);
        }

        if (t.getPriority() != priority) {
            t.setPriority(priority);
        }
    } catch (Exception ignored) {
        // Doesn't matter even if failed to set.
    }
    return t;
}
2. 根据线程数量nThreads创建EventLoop
接下来看看这行代码
children[i] = newChild(executor, args);
点击进入newChild方法,跳转进入NioEventLoopGroup中的newChild方法
@Override
protected EventLoop newChild(Executor executor, Object... args) throws Exception {
    EventLoopTaskQueueFactory queueFactory = args.length == 4 ? (EventLoopTaskQueueFactory) args[3] : null;
    return new NioEventLoop(this, executor, (SelectorProvider) args[0],
        ((SelectStrategyFactory) args[1]).newSelectStrategy(), (RejectedExecutionHandler) args[2], queueFactory);
}
继续点击进入NioEventLoop的构造方法
NioEventLoop(NioEventLoopGroup parent, Executor executor, SelectorProvider selectorProvider,
             SelectStrategy strategy, RejectedExecutionHandler rejectedExecutionHandler,
             EventLoopTaskQueueFactory queueFactory) {
    // todo:此构造方法构造EventLoop executor, queue
    super(parent, executor, false, newTaskQueue(queueFactory), newTaskQueue(queueFactory),
            rejectedExecutionHandler);
    this.provider = ObjectUtil.checkNotNull(selectorProvider, "selectorProvider");
    this.selectStrategy = ObjectUtil.checkNotNull(strategy, "selectStrategy");

    // todo:开启selector
    final SelectorTuple selectorTuple = openSelector();
    this.selector = selectorTuple.selector;
    this.unwrappedSelector = selectorTuple.unwrappedSelector;
}
在该构造方法中,完成了两件非常重要的事情:
1. 通过EventLoopGroup中创建的总executor创建出了属于每个EventLoop的executor,并且创造出属于每个EventLoop的任务队列taskQueue与tailTaskQueue
2. 开启属于每个EventLoop的Selector
不断点击super进入SingleThreadEventExecutor中的构造函数
protected SingleThreadEventExecutor(EventExecutorGroup parent, Executor executor,
                                    boolean addTaskWakesUp, Queue<Runnable> taskQueue,
                                    RejectedExecutionHandler rejectedHandler) {
    super(parent);
    this.addTaskWakesUp = addTaskWakesUp;
    this.maxPendingTasks = DEFAULT_MAX_PENDING_EXECUTOR_TASKS;

    // todo:此处注意,将Group创建的executor进行包装,将executor和EventLoop进行绑定
    this.executor = ThreadExecutorMap.apply(executor, this);
    this.taskQueue = ObjectUtil.checkNotNull(taskQueue, "taskQueue");
    this.rejectedExecutionHandler = ObjectUtil.checkNotNull(rejectedHandler, "rejectedHandler");
}
该构造函数中我要着重讲解的地方在于executor的创建,可以发现此时将EventLoopGroup创建的总exector与EventLoop自身引用传入ThreadExecutorMap.apply,点击看看ThreadExecutorMap.apply方法的原貌
此时大概能捋一捋EventLoop中的executor执行execute方法的原貌了
当EventLoop中的executor执行execute方法时候,首先会执行EventLoopGroup中总executor的execute方法,该方法会创建出一个新的线程,并且启动这个新的线程。
public static Executor apply(final Executor executor, final EventExecutor eventExecutor) {
    ObjectUtil.checkNotNull(executor, "executor");
    ObjectUtil.checkNotNull(eventExecutor, "eventExecutor");
    return new Executor() {
        @Override
        public void execute(final Runnable command) {
            executor.execute(apply(command, eventExecutor));
        }
    };
}
传入的可执行Runnable会将EventLoop的引用保存在一个ThreadLocal中,并且在comannd执行结束后将EventLoop的引用从ThreadLocal中删除
public static Runnable apply(final Runnable command, final EventExecutor eventExecutor) {
    ObjectUtil.checkNotNull(command, "command");
    ObjectUtil.checkNotNull(eventExecutor, "eventExecutor");
    // todo:装饰器模式应用,线程运行如下代码,在该代码中,将线程关联的EventLoop放入ThreadLocal中
    // todo:此时,线程中随时可以通过ThreadExecutorMap.currentExecutor获取线程关联EventLoop
    return new Runnable() {
        @Override
        public void run() {
            setCurrentEventExecutor(eventExecutor);
            try {
                command.run();
            } finally {
                setCurrentEventExecutor(null);
            }
        }
    };
}

public final class ThreadExecutorMap {

    private static final FastThreadLocal<EventExecutor> mappings = new FastThreadLocal<EventExecutor>();

    private ThreadExecutorMap() { }

    /**
     * Returns the current {@link EventExecutor} that uses the {@link Thread}, or {@code null} if none / unknown.
     */
    public static EventExecutor currentExecutor() {
        return mappings.get();
    }

    /**
     * Set the current {@link EventExecutor} that is used by the {@link Thread}.
     */
    private static void setCurrentEventExecutor(EventExecutor executor) {
        mappings.set(executor);
    }
|
通过上述方法,线程与EventLoop进行了绑定,在线程中可以通过ThreadLocal随时获取到线程对应 EventLoop的引用。
继续回到NioEventLoop的构造方法
NioEventLoop(NioEventLoopGroup parent, Executor executor, SelectorProvider selectorProvider,
             SelectStrategy strategy, RejectedExecutionHandler rejectedExecutionHandler,
             EventLoopTaskQueueFactory queueFactory) {
    // todo:此构造方法构造EventLoop executor, queue
    super(parent, executor, false, newTaskQueue(queueFactory), newTaskQueue(queueFactory),
            rejectedExecutionHandler);
    this.provider = ObjectUtil.checkNotNull(selectorProvider, "selectorProvider");
    this.selectStrategy = ObjectUtil.checkNotNull(strategy, "selectStrategy");

    // todo:开启selector
    final SelectorTuple selectorTuple = openSelector();
    this.selector = selectorTuple.selector;
    this.unwrappedSelector = selectorTuple.unwrappedSelector;
}
关注一下 openSelector方法
private SelectorTuple openSelector() {
    final Selector unwrappedSelector;
    try {
        // todo:原始selector
        unwrappedSelector = provider.openSelector();
    } catch (IOException e) {
        throw new ChannelException("failed to open a new selector", e);
    }

    // todo:未优化,直接返回
    if (DISABLE_KEY_SET_OPTIMIZATION) {
        return new SelectorTuple(unwrappedSelector);
    }

    // todo:反射获取Selector实现类
    Object maybeSelectorImplClass = AccessController.doPrivileged(new PrivilegedAction<Object>() {
        @Override
        public Object run() {
            try {
                return Class.forName(
                        "sun.nio.ch.SelectorImpl",
                        false,
                        PlatformDependent.getSystemClassLoader());
            } catch (Throwable cause) {
                return cause;
            }
        }
    });

    // todo:检查Selector优化实现类是否有效,需要为原始类的子类或者同类
    if (!(maybeSelectorImplClass instanceof Class) ||
        // ensure the current selector implementation is what we can instrument.
        !((Class<?>) maybeSelectorImplClass).isAssignableFrom(unwrappedSelector.getClass())) {
        if (maybeSelectorImplClass instanceof Throwable) {
            Throwable t = (Throwable) maybeSelectorImplClass;
            logger.trace("failed to instrument a special java.util.Set into: {}", unwrappedSelector, t);
        }
        return new SelectorTuple(unwrappedSelector);
    }

    final Class<?> selectorImplClass = (Class<?>) maybeSelectorImplClass;

    // todo:优化过后的SelectorKey容器,替换Set<SelectionKey>类
    // todo:为什么替换?原来为Set类,现在虽继承Set,但实际为List,遍历更加方便
    final SelectedSelectionKeySet selectedKeySet = new SelectedSelectionKeySet();

    Object maybeException = AccessController.doPrivileged(new PrivilegedAction<Object>() {
        @Override
        public Object run() {
            try {
                Field selectedKeysField = selectorImplClass.getDeclaredField("selectedKeys");
                Field publicSelectedKeysField = selectorImplClass.getDeclaredField("publicSelectedKeys");

                if (PlatformDependent.javaVersion() >= 9 && PlatformDependent.hasUnsafe()) {
                    // Let us try to use sun.misc.Unsafe to replace the SelectionKeySet.
                    // This allows us to also do this in Java9+ without any extra flags.
                    long selectedKeysFieldOffset = PlatformDependent.objectFieldOffset(selectedKeysField);
                    long publicSelectedKeysFieldOffset =
                            PlatformDependent.objectFieldOffset(publicSelectedKeysField);

                    if (selectedKeysFieldOffset != -1 && publicSelectedKeysFieldOffset != -1) {
                        PlatformDependent.putObject(
                                unwrappedSelector, selectedKeysFieldOffset, selectedKeySet);
                        PlatformDependent.putObject(
                                unwrappedSelector, publicSelectedKeysFieldOffset, selectedKeySet);
                        return null;
                    }
                    // We could not retrieve the offset, lets try reflection as last-resort.
                }

                Throwable cause = ReflectionUtil.trySetAccessible(selectedKeysField, true);
                if (cause != null) {
                    return cause;
                }
                cause = ReflectionUtil.trySetAccessible(publicSelectedKeysField, true);
                if (cause != null) {
                    return cause;
                }

                selectedKeysField.set(unwrappedSelector, selectedKeySet);
                publicSelectedKeysField.set(unwrappedSelector, selectedKeySet);
                return null;
            } catch (NoSuchFieldException e) {
                return e;
            } catch (IllegalAccessException e) {
                return e;
            }
        }
    });

    if (maybeException instanceof Exception) {
        selectedKeys = null;
        Exception e = (Exception) maybeException;
        logger.trace("failed to instrument a special java.util.Set into: {}", unwrappedSelector, e);
        return new SelectorTuple(unwrappedSelector);
    }
    selectedKeys = selectedKeySet;
    logger.trace("instrumented a special java.util.Set into: {}", unwrappedSelector);
    return new SelectorTuple(unwrappedSelector,
                             new SelectedSelectionKeySetSelector(unwrappedSelector, selectedKeySet));
}
该方法首先通过provider.openSelector()创建出一个selector。
然后进入了最关键的部分,Netty对于原始selector进行的优化
这段代码通过反射获取到了Selector中的具体实现类(系统不同,实现类会有所不同)
// todo:反射获取Selector实现类
Object maybeSelectorImplClass = AccessController.doPrivileged(new PrivilegedAction<Object>() {
    @Override
    public Object run() {
        try {
            return Class.forName(
                    "sun.nio.ch.SelectorImpl",
                    false,
                    PlatformDependent.getSystemClassLoader());
        } catch (Throwable cause) {
            return cause;
        }
    }
});

// todo:检查Selector优化实现类是否有效,需要为原始类的子类或者同类
if (!(maybeSelectorImplClass instanceof Class) ||
    // ensure the current selector implementation is what we can instrument.
    !((Class<?>) maybeSelectorImplClass).isAssignableFrom(unwrappedSelector.getClass())) {
    if (maybeSelectorImplClass instanceof Throwable) {
        Throwable t = (Throwable) maybeSelectorImplClass;
        logger.trace("failed to instrument a special java.util.Set into: {}", unwrappedSelector, t);
    }
    return new SelectorTuple(unwrappedSelector);
}

final Class<?> selectorImplClass = (Class<?>) maybeSelectorImplClass;
继续往下看,Netty中自己实现了一个类SelectedSelectionKeySet,该类继承自AbstractSet<SelectionKey>,但实际的实现是一个类似于数组的实现。通过反射将SelectedSelectionKeySet替换Selector中selectedKeys字段(该字段类型为Set<SelectionKey>)。
为什么要进行这种替换呢?
因为后续需要对Selector中的selectedKeys进行大量遍历,而原始的selectedKeys实现为HashMap,这将会导致遍历效率不高,并且额外还需要创建一个迭代器。
// todo:优化过后的SelectorKey容器,替换Set<SelectionKey>类
// todo:为什么替换?原来为Set类,现在虽继承Set,但实际为List,遍历更加方便
final SelectedSelectionKeySet selectedKeySet = new SelectedSelectionKeySet();

Object maybeException = AccessController.doPrivileged(new PrivilegedAction<Object>() {
    @Override
    public Object run() {
        try {
            Field selectedKeysField = selectorImplClass.getDeclaredField("selectedKeys");
            Field publicSelectedKeysField = selectorImplClass.getDeclaredField("publicSelectedKeys");

            if (PlatformDependent.javaVersion() >= 9 && PlatformDependent.hasUnsafe()) {
                // Let us try to use sun.misc.Unsafe to replace the SelectionKeySet.
                // This allows us to also do this in Java9+ without any extra flags.
                long selectedKeysFieldOffset = PlatformDependent.objectFieldOffset(selectedKeysField);
                long publicSelectedKeysFieldOffset =
                        PlatformDependent.objectFieldOffset(publicSelectedKeysField);

                if (selectedKeysFieldOffset != -1 && publicSelectedKeysFieldOffset != -1) {
                    PlatformDependent.putObject(
                            unwrappedSelector, selectedKeysFieldOffset, selectedKeySet);
                    PlatformDependent.putObject(
                            unwrappedSelector, publicSelectedKeysFieldOffset, selectedKeySet);
                    return null;
                }
                // We could not retrieve the offset, lets try reflection as last-resort.
            }

            Throwable cause = ReflectionUtil.trySetAccessible(selectedKeysField, true);
            if (cause != null) {
                return cause;
            }
            cause = ReflectionUtil.trySetAccessible(publicSelectedKeysField, true);
            if (cause != null) {
                return cause;
            }

            selectedKeysField.set(unwrappedSelector, selectedKeySet);
            publicSelectedKeysField.set(unwrappedSelector, selectedKeySet);
            return null;
        } catch (NoSuchFieldException e) {
            return e;
        } catch (IllegalAccessException e) {
            return e;
        }
    }
});
3. 为EventLoopGroup绑定一个选择器chooser
下面来看看选择器代码
chooser = chooserFactory.newChooser(children);

@Override
public EventExecutorChooser newChooser(EventExecutor[] executors) {
    if (isPowerOfTwo(executors.length)) {
        return new PowerOfTwoEventExecutorChooser(executors);
    } else {
        return new GenericEventExecutorChooser(executors);
    }
}

private static final class PowerOfTwoEventExecutorChooser implements EventExecutorChooser {
    private final AtomicInteger idx = new AtomicInteger();
    private final EventExecutor[] executors;

    PowerOfTwoEventExecutorChooser(EventExecutor[] executors) {
        this.executors = executors;
    }

    @Override
    public EventExecutor next() {
        return executors[idx.getAndIncrement() & executors.length - 1];
    }
}

private static final class GenericEventExecutorChooser implements EventExecutorChooser {
    // Use a 'long' counter to avoid non-round-robin behaviour at the 32-bit overflow boundary.
    // The 64-bit long solves this by placing the overflow so far into the future, that no system
    // will encounter this in practice.
    private final AtomicLong idx = new AtomicLong();
    private final EventExecutor[] executors;

    GenericEventExecutorChooser(EventExecutor[] executors) {
        this.executors = executors;
    }

    @Override
    public EventExecutor next() {
        return executors[(int) Math.abs(idx.getAndIncrement() % executors.length)];
    }
}
创建选择器时Netty进行了一个小优化,对于2的次方数量的EventLoop,进行位运算选择。其他使用模运算。
通过以上几大步骤,Netty中EventLoopGroup的创建大致完成

 3028
3028


 扫一扫
扫一扫


&spm=1001.2101.3001.11974&articleId=148075277&d=1&t=3&u=f8a505bbd08345b785d3bcdf58106b2b)

 被折叠的 条评论
为什么被折叠?
被折叠的 条评论
为什么被折叠?
 到【灌水乐园】发言


