



 本项目采用Spring MVC框架,整合MyBatis实现商品信息管理。包括商品的增删查改等功能,并详细介绍了项目结构、配置文件及核心代码。
项目结构
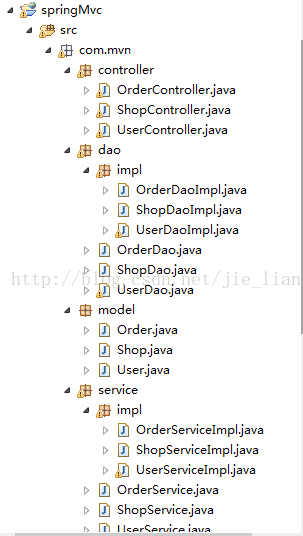
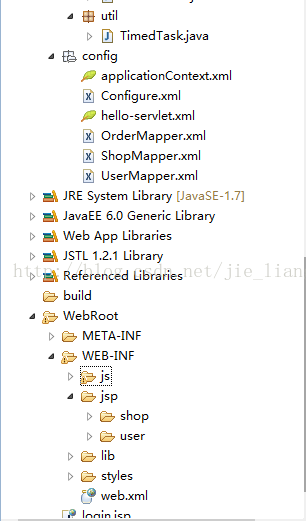
1、导入相关的jar包
ant-1.9.6.jar
ant-launcher-1.9.6.jar
asm-5.2.jar
aspectjweaver-1.8.11.jar
cglib-3.2.5.jar
commons-dbcp-1.4.jar
commons-fileupload-1.3.1.jar
commons-io-2.5.jar
commons-logging-1.1.3.jar
commons-logging-1.2.jar
commons-pool-1.6.jar
jackson-core-asl-1.9.2.jar
jackson-mapper-asl-1.9.2.jar
javassist-3.22.0-CR2.jar
json-lib-2.3-jdk15.jar
jstl-1.2.jar
log4j-1.2.17.jar
log4j-api-2.3.jar
log4j-core-2.3.jar
mybatis-3.4.5.jar
mybatis-spring-1.3.1.jar
mysql-connector-java-5.1.10-bin.jar
ognl-3.1.15.jar
pagehelper-5.1.2.jar
quartz-2.3.0.jar
slf4j-api-1.7.25.jar
slf4j-log4j12-1.7.25.jar
spring-aop-4.3.10.RELEASE.jar
spring-aspects-4.3.10.RELEASE.jar
spring-beans-4.3.10.RELEASE.jar
spring-context-4.3.10.RELEASE.jar
spring-context-support-4.3.10.RELEASE.jar
spring-core-4.3.10.RELEASE.jar
spring-expression-4.3.10.RELEASE.jar
spring-instrument-4.3.10.RELEASE.jar
spring-instrument-tomcat-4.3.10.RELEASE.jar
spring-jdbc-4.3.10.RELEASE.jar
spring-jms-4.3.10.RELEASE.jar
spring-messaging-4.3.10.RELEASE.jar
spring-orm-4.3.10.RELEASE.jar
spring-oxm-4.3.10.RELEASE.jar
spring-test-4.3.10.RELEASE.jar
spring-tx-4.3.10.RELEASE.jar
spring-web-4.3.10.RELEASE.jar
spring-webmvc-4.3.10.RELEASE.jar
spring-webmvc-portlet-4.3.10.RELEASE.jar
spring-websocket-4.3.10.RELEASE.jar
2、配置web.xml文件
<?xml version="1.0" encoding="UTF-8"?>
<web-app xmlns:xsi="http://www.w3.org/2001/XMLSchema-instance" xmlns="http://java.sun.com/xml/ns/javaee" xmlns:web="http://java.sun.com/xml/ns/javaee/web-app_2_5.xsd" xsi:schemaLocation="http://java.sun.com/xml/ns/javaee http://java.sun.com/xml/ns/javaee/web-app_3_0.xsd" id="WebApp_ID" version="3.0">
  <listener>
  	<listener-class>org.springframework.web.context.ContextLoaderListener</listener-class>
  </listener>
  <context-param>
  		<param-name>contextConfigLocation</param-name>
		<param-value>
			classpath:config/applicationContext.xml,
		</param-value>
  </context-param>

  <servlet>
  	<servlet-name>hello</servlet-name>
  	<servlet-class>org.springframework.web.servlet.DispatcherServlet</servlet-class>
  	<init-param>
  		<param-name>contextConfigLocation</param-name>
  		<param-value>classpath:config/hello-servlet.xml</param-value>
  	</init-param>
  	<load-on-startup>1</load-on-startup>
  </servlet>
  <servlet-mapping>
  	<servlet-name>hello</servlet-name>
  	<url-pattern>/</url-pattern>
  </servlet-mapping>

  <filter>
        <filter-name>encodingFilter</filter-name>
        <filter-class>org.springframework.web.filter.CharacterEncodingFilter</filter-class>
        <init-param>
            <param-name>encoding</param-name>
            <param-value>UTF-8</param-value>
        </init-param>
    </filter>
    <filter-mapping>
        <filter-name>encodingFilter</filter-name>
        <url-pattern>/*</url-pattern>
    </filter-mapping>
</web-app>
<?xml version="1.0" encoding="UTF-8"?>
<beans xmlns="http://www.springframework.org/schema/beans"
    xmlns:xsi="http://www.w3.org/2001/XMLSchema-instance"
    xmlns:p="http://www.springframework.org/schema/p"
    xmlns:context="http://www.springframework.org/schema/context"
    xmlns:mvc="http://www.springframework.org/schema/mvc"
    xsi:schemaLocation="
        http://www.springframework.org/schema/beans
        http://www.springframework.org/schema/beans/spring-beans.xsd
        http://www.springframework.org/schema/context
        http://www.springframework.org/schema/context/spring-context.xsd
        http://www.springframework.org/schema/mvc
        http://www.springframework.org/schema/mvc/spring-mvc.xsd">

      <context:component-scan base-package="com.mvn.controller">

      </context:component-scan>
      <mvc:annotation-driven/>
      <!-- 将静态文件指定到某个路径 -->
      <mvc:resources location="/resources/" mapping="/resources/**"/>
      <mvc:resources location="/images/" mapping="/images/**"/>
      <bean class="org.springframework.web.servlet.view.InternalResourceViewResolver">
      	<property name="viewClass" value="org.springframework.web.servlet.view.JstlView"/>
      	<property name="prefix" value="/WEB-INF/jsp/"/>
      	<property name="suffix" value=".jsp"/>
      </bean>
      <!-- 设置multipartResolver才能完成文件上传 -->
      <bean id="multipartResolver" class="org.springframework.web.multipart.commons.CommonsMultipartResolver">
      	<property name="maxUploadSize" value="5000000"/>
      </bean>
      <bean id="exceptionResolver" class="org.springframework.web.servlet.handler.SimpleMappingExceptionResolver">
      </bean>
</beans>
3.Shop.java类
public class Shop {
	private int id;
	private String name;
	private String img;
	private float price;
	private Date addTime;
	public int getId() {
		return id;
	}
	public void setId(int id) {
		this.id = id;
	}
	public String getName() {
		return name;
	}
	public void setName(String name) {
		this.name = name;
	}
	public String getImg() {
		return img;
	}
	public void setImg(String img) {
		this.img = img;
	}
	public float getPrice() {
		return price;
	}
	public void setPrice(float price) {
		this.price = price;
	}
	public Date getAddTime() {
		return addTime;
	}
	public void setAddTime(Date addTime) {
		this.addTime = addTime;
	}
}
4、ShopDao接口类
public interface ShopDao {
	/**
	 * 根据id查找
	 * @param id
	 * @return
	 */
	public Shop getShopById(String str, int id);
	/**
	 * 添加
	 * @param orderDao
	 * @return
	 */
	public int add(String str,Object ob);

	/**
	 * 查找list集合
	 * @return
	 */
	public List<Shop> getAllShop(String str);

}
5、ShopDaoImpl实现类
@Repository("shopDao")
public class ShopDaoImpl implements ShopDao{

	@Resource(name="sqlSessionTemplate")
	private SqlSessionTemplate sqlSession;

	@Override
	public Shop getShopById(String str, int id) {
		// TODO Auto-generated method stub
		return sqlSession.selectOne(str, id);
	}

	@Override
	public int add(String str, Object ob) {
		// TODO Auto-generated method stub
		return sqlSession.insert(str, ob);
	}

	@Override
	public List<Shop> getAllShop(String str) {
		// TODO Auto-generated method stub
		return sqlSession.selectList(str);
	}

}
6、ShopService接口类
public interface ShopService {

	public int addShop(Shop shop);

	public Shop findById(int id);

	public List<Shop> getAllShop();
}
7、ShopServiceImpl实现类
@Service
public class ShopServiceImpl implements ShopService{

	@Resource(name="shopDao")
	private ShopDao shopDao ;

	@Override
	public int addShop(Shop shop) {
		// TODO Auto-generated method stub
		return shopDao.add("com.mvn.dao.ShopDao.add", shop);
	}

	@Override
	public Shop findById(int id) {
		// TODO Auto-generated method stub
		return shopDao.getShopById("com.mvn.dao.ShopDao.getShopById", id);
	}

	@Override
	public List<Shop> getAllShop() {
		// TODO Auto-generated method stub
		return shopDao.getAllShop("com.mvn.dao.ShopDao.getAllShop");
	}

}
8、ShopController类
@Controller
@RequestMapping("/shop")
public class ShopController {

	@Autowired(required=true)
	private ShopService shopService;

	@RequestMapping("/shopData")
	public ModelAndView list(HttpServletRequest request,HttpServletResponse response){
		ModelAndView mv=new ModelAndView("shop/shopList");
		List<Shop> shopList=shopService.getAllShop();
		mv.addObject("shopList", shopList);
		return mv;
	}
	@RequestMapping("/addShop")
	public ModelAndView add(){
		ModelAndView mv=new ModelAndView("shop/shopAdd");
		return mv;
	}
	@RequestMapping(value="/saveShop",method=RequestMethod.POST)
	public ModelAndView save(Shop shop,MultipartFile file,HttpServletRequest request) throws Exception{
		ModelAndView mv=new ModelAndView("redirect:/shop/shopData");
		shop.setAddTime(new Date());
		String path=null;
		//原始名称
        String originalFilename = file.getOriginalFilename();
        //上传图片
        if(file!=null && originalFilename!=null && originalFilename.length()>0){
			// 存储图片的路径
			String realPath=request.getSession().getServletContext().getRealPath("/")+"/images";
			// 自定义的文件名称
			path=realPath+"/"+originalFilename;
			// 转存文件到指定的路径
			file.transferTo(new File(path));
			System.out.println("文件成功上传到指定目录下");
        }
        shop.setImg(originalFilename);
		shopService.addShop(shop);
		return mv;
	}

}
9、applicationContext.xml配置
<?xml version="1.0" encoding="utf-8"?>
<beans xmlns="http://www.springframework.org/schema/beans"
	xmlns:xsi="http://www.w3.org/2001/XMLSchema-instance" xmlns:aop="http://www.springframework.org/schema/aop"
	xmlns:tx="http://www.springframework.org/schema/tx" xmlns:context="http://www.springframework.org/schema/context"
	xsi:schemaLocation="
            http://www.springframework.org/schema/beans http://www.springframework.org/schema/beans/spring-beans-3.0.xsd
            http://www.springframework.org/schema/aop http://www.springframework.org/schema/aop/spring-aop-3.0.xsd
            http://www.springframework.org/schema/context http://www.springframework.org/schema/context/spring-context-3.0.xsd
            http://www.springframework.org/schema/jee http://www.springframework.org/schema/jee/spring-jee-3.0.xsd
            http://www.springframework.org/schema/tx http://www.springframework.org/schema/tx/spring-tx-3.0.xsd">
   <!-- 容器自动扫描IOC组件 -->
   <context:annotation-config/>
   <!-- 启动组件扫描,排除@Controller组件,该组件由SpringMVC配置文件扫描 -->
   <context:component-scan base-package="com.mvn">
   	<context:exclude-filter type="annotation" expression="org.springframework.stereotype.Controller"/>
   </context:component-scan>

   <!-- 设置要调度的对象 -->
   <bean id="jobBean" class="com.mvn.util.TimedTask" />
   <!-- 定义调用对象和调用对象的方法 -->
   <bean id="jobDetail" class="org.springframework.scheduling.quartz.MethodInvokingJobDetailFactoryBean">
   		<property name="targetObject" ref="jobBean"/>
   		<property name="targetMethod" value="execute"/>
   		<!-- 将并发设置为false -->
   		<property name="concurrent" value="false" />
   </bean>
   <!-- 定义触发时间 -->
   <bean id="doTime" class="org.springframework.scheduling.quartz.CronTriggerFactoryBean">
   		<property name="jobDetail" ref="jobDetail" />
   		<!-- 表达式,设置多长时间执行一次 -->
   		<property name="cronExpression" value="0/30 * * * * ?"/>
   </bean>
   <!-- 总管理类如果将lazy-init='false'那么容器启动就会执行调度程序 -->
   <bean id="startQuertz" class="org.springframework.scheduling.quartz.SchedulerFactoryBean" lazy-init="false">
   		<property name="triggers">
   			<list>
   				<!-- 作业调度器,list下可加入其他的调度器 -->
   				<ref bean="doTime"/>
   			</list>
   		</property>
   </bean>
   <!-- 配置数据源 -->
   <bean id="dataSource" class="org.apache.commons.dbcp.BasicDataSource">
        <property name="driverClassName" value="com.mysql.jdbc.Driver"/>
        <property name="url" value="jdbc:mysql://localhost/test"/>
        <property name="username" value="root"/>
        <property name="password" value="root"/>
    </bean>
    <!-- 会话工厂bean SQLSessionFactoryBean -->
    <bean id="sqlSessionFactory" class="org.mybatis.spring.SqlSessionFactoryBean">
    	<!-- 数据源 -->
    	<property name="dataSource" ref="dataSource"/>
    	<!-- configLocation属性指定mybatis的核心配置文件 -->
    	<property name="configLocation" value="classpath:config/Configure.xml"/>
    	<!-- mapper扫描 -->
    	<property name="mapperLocations" value="classpath:config/*Mapper.xml"/>
    </bean>
    <!-- sql会话模版 -->
	<bean id="sqlSessionTemplate" class="org.mybatis.spring.SqlSessionTemplate">
		<constructor-arg ref="sqlSessionFactory" />
	</bean>
    <!-- 配置事务管理器 -->
    <bean id="transactionManager" class="org.springframework.jdbc.datasource.DataSourceTransactionManager">
    	<property name="dataSource" ref="dataSource"/>
    </bean>
    <!-- 配置事务处理面(事务通知) -->
    <tx:advice id="appAdvice" transaction-manager="transactionManager">
        <tx:attributes>
            <!-- 配置事务属性 -->
            <!-- 默认值: isolation="DEFAULT" timeout="-1" propagation="REQUIRED" read-only="false" -->
            <tx:method name="insert*" propagation="REQUIRED" />
            <tx:method name="update*" propagation="REQUIRED" />
            <tx:method name="delete*" propagation="REQUIRED" />
            <tx:method name="batch*" propagation="REQUIRED" />
            <tx:method name="read*" propagation="REQUIRED" read-only="true" />
            <tx:method name="get*" propagation="REQUIRED" read-only="true" />
            <tx:method name="count*" propagation="REQUIRED" read-only="true" />
            <tx:method name="find*" propagation="REQUIRED" read-only="true" />
            <tx:method name="*" read-only="true" />
        </tx:attributes>
    </tx:advice>
    <!-- 配置AOP事务 -->
      <aop:config>
        <!-- 配置事务切点 -->
          <aop:pointcut expression="execution(* com.mvn.service.*Service.*(..))"
                       id="appPoint" />
        <!-- 结合事务切点与切面 -->
          <aop:advisor advice-ref="appAdvice" pointcut-ref="appPoint" />
      </aop:config>

</beans>
<?xml version="1.0" encoding="UTF-8"?>
<!DOCTYPE configuration PUBLIC "-//mybatis.org//DTD Config 3.0//EN"
"http://mybatis.org/dtd/mybatis-3-config.dtd">
<configuration>
	<typeAliases>
		<typeAlias alias="User" type="com.mvn.model.User"/>
		<typeAlias alias="Order" type="com.mvn.model.Order"/>
		<typeAlias alias="Shop" type="com.mvn.model.Shop"/>
	</typeAliases>
</configuration>
11、ShopMapper.xml配置
<?xml version="1.0" encoding="UTF-8"?>
<!DOCTYPE mapper PUBLIC "-//mybatis.org//DTD Mapper 3.0//EN"
"http://mybatis.org/dtd/mybatis-3-mapper.dtd">
<!-- 命名空间应该是对应接口的包名+接口名 -->
<mapper namespace="com.mvn.dao.ShopDao">
	<resultMap type="Shop" id="resultShop">
        <id column="id" property="id" />
        <result column="name" property="name" />
        <result column="img" property="img" />
        <result column="price" property="price" />
        <result column="addTime" property="addTime" />
    </resultMap>
	<!-- id对应接口中的方法,结果类型如没有配置别名则应该使用全名称 -->
	<select id="getAllShop" resultType="Shop">
		select * from `shop`
	</select>
	<select id="getShopById" resultType="Shop">
		select * from `shop` where id=#{id}
	</select>
	<insert id="add">
		insert into `shop`(id,name,img,price,addTime)
		values(#{id},#{name},#{img},#{price},#{addTime})
	</insert>
	<delete id="delete">
		delete from `shop` where id=#{sid}
	</delete>
</mapper>
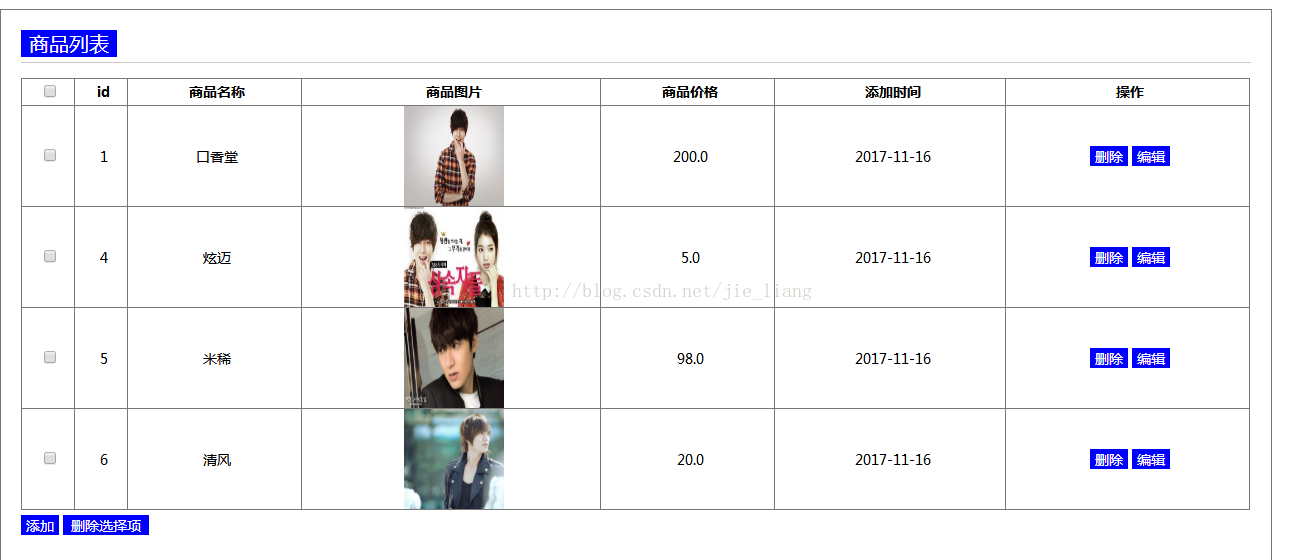
12、shopList.jsp页面
<%@ page language="java" import="java.util.*" pageEncoding="UTF-8"%>
<%@ taglib prefix="c" uri="http://java.sun.com/jsp/jstl/core"%>
<%@ taglib prefix="fmt" uri="http://java.sun.com/jsp/jstl/fmt" %>

<!DOCTYPE HTML PUBLIC "-//W3C//DTD HTML 4.01 Transitional//EN">
<html>
<head>
<meta http-equiv="Content-Type" content="text/html; charset=UTF-8">
<title>订单商品列表页面</title>
<style type="text/css">
* {
    margin: 0;
    padding: 0;
    font-family: microsoft yahei;
    font-size: 14px;
}

body {
    padding-top: 20px;
}

.main {
    width: 90%;
    margin: 0 auto;
    border: 1px solid #777;
    padding: 20px;
}

.main .title {
    font-size: 20px;
    font-weight: normal;
    border-bottom: 1px solid #ccc;
    margin-bottom: 15px;
    padding-bottom: 5px;
    color: blue;
}

.main .title span {
    display: inline-block;
    font-size: 20px;
    background : blue;
    color: #fff;
    padding: 0 8px;
    background: blue;
}

a {
    color: blue;
    text-decoration: none;
}

a:hover {
    color: orangered;
}

.tab td, .tab, .tab th {
    border: 1px solid #777;
    border-collapse: collapse;
}

.tab td, .tab th {
    line-height: 26px;
    height: 26px;
    padding-left: 5px;
    text-align:center;
}

.abtn {
    display: inline-block;
    height: 20px;
    line-height: 20px;
    background: blue;
    color: #fff;
    padding: 0 5px;
}
.btn {
    height: 20px;
    line-height: 20px;
    background: blue;
    color: #fff;
    padding: 0 8px;
    border:0;
}

.abtn:hover,.btn:hover{
    background: orangered;
    color: #fff;
}
p{
    padding:5px 0;
}
</style>
</head>
<body>
	<div class="main">
		<h2 class="title">
			<span>商品列表</span>
		</h2>
		<form action="deletes" method="post">
			<table border="1" width="100%" class="tab">
				<tr>
					<th><input type="checkbox" id="chbAll"></th>
					<th>id</th>
					<th>商品名称</th>
					<th>商品图片</th>
					<th>商品价格</th>
					<th>添加时间</th>
					<th>操作</th>
				</tr>
				<c:forEach items="${shopList}" var="sp">
					<tr>
						<th><input type="checkbox" name="ids" value="${sp.id}"></th>
						<td>${sp.id}</td>
						<td>${sp.name}</td>
						<td><img src="http://localhost:8080/springMvc/images/${sp.img}" style="width:100px;height:100px"/></td>
						<td>${sp.price}</td>

						<td><fmt:formatDate value="${sp.addTime}" type="date" pattern="yyyy-MM-dd"/></td>

						<td>
						<a href="delete/${sp.id}" class="abtn">删除</a>
						<a href="update/${sp.id}" class="abtn">编辑</a>
						</td>
					</tr>
				</c:forEach>
			</table>
			<p>
				<a href="addShop" class="abtn">添加</a>
				<input type="submit" value="删除选择项" class="btn"/>
			</p>
		</form>
	</div>
</body>
</html>
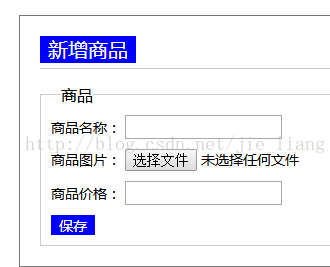
13、shopAdd.jsp
<%@ page language="java" import="java.util.*" pageEncoding="UTF-8"%>
<%@ taglib prefix="sf" uri="http://www.springframework.org/tags/form"%>

<!DOCTYPE HTML PUBLIC "-//W3C//DTD HTML 4.01 Transitional//EN">
<html>
<head>
<meta http-equiv="Content-Type" content="text/html; charset=UTF-8">
<title>添加商品</title>
<style type="text/css">
	* {
    margin: 0;
    padding: 0;
    font-family: microsoft yahei;
    font-size: 14px;
}

body {
    padding-top: 20px;
}

.main {
    width: 90%;
    margin: 0 auto;
    border: 1px solid #777;
    padding: 20px;
}

.main .title {
    font-size: 20px;
    font-weight: normal;
    border-bottom: 1px solid #ccc;
    margin-bottom: 15px;
    padding-bottom: 5px;
    color: blue;
}

.main .title span {
    display: inline-block;
    font-size: 20px;
    background : blue;
    color: #fff;
    padding: 0 8px;
    background: blue;
}

a {
    color: blue;
    text-decoration: none;
}

a:hover {
    color: orangered;
}

.tab td, .tab, .tab th {
    border: 1px solid #777;
    border-collapse: collapse;
}

.tab td, .tab th {
    line-height: 26px;
    height: 26px;
    padding-left: 5px;
}

.abtn {
    display: inline-block;
    height: 20px;
    line-height: 20px;
    background: blue;
    color: #fff;
    padding: 0 5px;
}
.btn {
    height: 20px;
    line-height: 20px;
    background: blue;
    color: #fff;
    padding: 0 8px;
    border:0;
}

.abtn:hover,.btn:hover{
    background: orangered;
    color: #fff;
}
p{
    padding:5px 0;
}
fieldset{
        border: 1px solid #ccc;
        padding:5px 10px;
}
fieldset legend{
    margin-left:10px;
    font-size:16px;
}
</style>
</head>

<body>
	<div class="main">
		<h2 class="title">
			<span>新增商品</span>
		</h2>
		<form action="saveShop" method="post" enctype="multipart/form-data">
			<fieldset>
				<legend>商品</legend>
				<p>
					<label for="title">商品名称:</label> <input type="text" id="name"
						name="name" value="${shop.name}" />
				</p>
				<p>
					<label for="title">商品图片:</label> <input type="file" id="img"
					name="file" value="${shop.img }"/>
				</p>
				<p>
					<label for="title">商品价格:</label> <input type="text" id="price"
						name="price" value="${user.price}" />
				</p>
				<p>
					<input type="submit" value="保存" class="btn">
				</p>
			</fieldset>
		</form>
	</div>
</body>
</html>
添加页面:
以上代码只展示了部分,源码下载地址:http://download.csdn.net/download/u011936251/10123851





 扫一扫
扫一扫


 1408
1408

 被折叠的 条评论
为什么被折叠?
被折叠的 条评论
为什么被折叠?
 到【灌水乐园】发言





