WSL2にPodmanをインストールしてRootlessコンテナを試す

Windows WSL2上にRed Hat Enterprise Linux (RHEL) 10.1をインストールし、その上でPodmanのRootless (ルートレス) コンテナを使えるようにするための構築メモです。
WSL2へのRHEL 10.1のインストール
WSL2のインストール
この記事では割愛します。以下のマイクロソフトのページをご覧ください。
この記事のインストール手順はWindows 11で検証しています。
Red Hat Developer Programへの参加
商用でRHELを使うためにはサブスクリプションの購入が必要ですが、個人で開発する目的であれば無償でRed Hat製品を使うことができます。Red Hatアカウントを作成し、Red Hat Developer Programに参加することで、Red Hatの製品ダウンロードページにアクセスできるようになります。
RHEL 10.1 WSL2 Imageのインストール
Red HatのダウンロードページからRHEL 10.1 WSL2 Imageをダウンロードします(このときRed Hatアカウントが必要)。ファイル名は rhel-10.1-x86_64-wsl2.wsl です。

ダウンロードしたイメージをインストールする前に自分のホームディレクトリの下に作業フォルダを作ります。名前は何でもよいです。ここではC:\Users\fusay\wslというディレクトリを使って説明します。
コマンドプロンプトを開いて作業フォルダの下でwsl --importコマンドを実行します。以下の例ではwslという作業ディレクトリで実行しています。
C:\Users\fusay\wsl> wsl --import RHEL-10.1 RHEL-10.1 C:\Users\fusay\Downloads\rhel-10.1-x86_64-wsl2.wsl
この操作を正しく終了しました。
次に、WSL2のデフォルトとしてRHEL-10.1を設定しておきましょう。デフォルトに設定しておくと、Windowsターミナルでwslコマンドを実行するだけでRHEL10が起動します。
C:\Users\fusay\wsl >wsl -s RHEL-10.1
この操作を正しく終了しました。
ここでwslコマンドを叩くとRHEL10のプロンプトに切り替わります。
C:\Users\fusay>wsl
[root@win11pro fusay]# whoami
root
[root@win11pro fusay]# cat /etc/redhat-release
Red Hat Enterprise Linux release 10.1 (Coughlan)
RHELをインストールした直後にはPodmanはインストールされていません。
[root@win11pro fusay]# podman
-bash: podman: command not found
dnfコマンドを使ってRed HatのリポジトリからPodmanをインストールするためには、subscription-managerコマンドを使ってこのWSL上のRHEL10をRed Hatに登録する必要があります。
RHEL10のホスト名を変更
subscription-managerでサーバーを登録すると、Red Hat側ではホスト名が登録されるので、それに先立ってWSL上のRHEL10のホスト名を設定しておきます。ここでは、rhel10という名前にしておきます。
viを使って/etc/wsl.confに以下の [network] 部分を追加してください。
[boot]
systemd = true

[network]
hostname = rhel10
generateHosts = falseさらに、/etc/hosts に以下の行を追加します。
127.0.0.1   localhost
127.0.0.1 rhel10 # この行を追加
TIP
本来であればRHELのhostnamectl set-hostnameコマンドを使ってホスト名を変更したいところなのですが、WSLが勝手にホスト名を上書きして元に戻してしまいます。
これらのファイルを更新したら、設定を反映させるためWindowsターミナルでwslをシャットダウンしてから、再びwslを実行します。
C:\Users\fusay>wsl --shutdown

C:\Users\fusay>wsl
[root@rhel10 fusay]# hostname
rhel10
subscription-managerでRHEL10サーバーを登録
ここまで準備できたら、subscription-manager registerコマンドを使ってrhel10を登録します。
[root@rhel10 fusay]# subscription-manager register --username <アカウント名> --password <パスワード>
Registering to: subscription.rhsm.redhat.com:443/subscription
The system has been registered with ID: xxx-xxx-xxx-xxx
The registered system name is: rhel10
サーバーの登録が成功したらRHELのBaseOSとAppStreamという2つのリポジトリの設定ができているはずです。
[root@rhel10 fusay]# dnf repolist
Updating Subscription Management repositories.
repo id                                         repo name
rhel-10-for-x86_64-appstream-rpms               Red Hat Enterprise Linux 10 for x86_64 - AppStream (RPMs)
rhel-10-for-x86_64-baseos-rpms                  Red Hat Enterprise Linux 10 for x86_64 - BaseOS (RPMs)
これでようやくソフトウェアパッケージのインストールや更新が可能になりました。ここでdnf updateしてRHELのパッケージを最新版に更新しておきましょう。
[root@rhel10 fusay]# dnf update -y
Updating Subscription Management repositories.
Red Hat Enterprise Linux 10 for x86_64 - BaseOS (RPMs)                                   42 MB/s |  46 MB     00:01
Red Hat Enterprise Linux 10 for x86_64 - AppStream (RPMs)                               6.5 MB/s | 4.3 MB     00:00
Dependencies resolved.
========================================================================================================================
 Package                     Arch       Version                             Repository                             Size
========================================================================================================================
Upgrading:
 ca-certificates             noarch     2025.2.80_v9.0.305-102.el10_1       rhel-10-for-x86_64-baseos-rpms        1.1 M
 cloud-init                  noarch     24.4-6.el10_1.1                     rhel-10-for-x86_64-appstream-rpms     2.1 M
 crypto-policies             noarch     20250905-2.gitc7eb7b2.el10_1.1      rhel-10-for-x86_64-baseos-rpms         98 k
 crypto-policies-scripts     noarch     20250905-2.gitc7eb7b2.el10_1.1      rhel-10-for-x86_64-baseos-rpms        131 k
 curl                        x86_64     8.12.1-2.el10_1.2                   rhel-10-for-x86_64-baseos-rpms        217 k
 expat                       x86_64     2.7.1-1.el10_1.3                    rhel-10-for-x86_64-baseos-rpms        119 k
 glib2                       x86_64     2.80.4-10.el10_1.12                 rhel-10-for-x86_64-baseos-rpms        3.1 M
 glibc                       x86_64     2.39-58.el10_1.7                    rhel-10-for-x86_64-baseos-rpms        2.1 M
 glibc-common                x86_64     2.39-58.el10_1.7                    rhel-10-for-x86_64-baseos-rpms        326 k
<略>
Complete!
RHEL 10.1上でのPodmanのインストール
Podmanのインストール
dnf install podmanコマンドでPodmanをインストールします。インストールが終わったらpodmanコマンドのバージョンを確認します。
[root@rhel10 ~]# dnf install podman -y
Updating Subscription Management repositories.
Last metadata expiration check: 0:09:32 ago on Tue Feb 10 18:03:50 2026.
Dependencies resolved.
========================================================================================================================
 Package                     Arch       Version                             Repository                             Size
========================================================================================================================
Installing:
 podman                      x86_64     7:5.6.0-11.el10_1                   rhel-10-for-x86_64-appstream-rpms      15 M
Installing dependencies:
<略>
Complete!

[root@rhel10 ~]# podman -v
podman version 5.6.0
studentユーザーを作成
RHEL 10.1はインストールできましたが、この段階ではrootのアカウントしかないので、Podmanを操作するための一般ユーザー登録をします。
useraddコマンドでstudentユーザーを登録し、好みのパスワードを設定します。続いて、su - studentコマンドでstudentユーザーに切り替わることを確認します。
[root@rhel10 fusay]# useradd student

[root@rhel10 fusay]# passwd student
New password:
Retype new password:
passwd: password updated successfully

[root@rhel10 fusay]# su - student
[student@rhel10 ~]$ whoami
student
[student@rhel10 ~]$ exit
logout
[root@rhel10 fusay]#
studentユーザーは、sudoで一時的にrootで作業ができた方がよいので、studentの補助グループとしてwheelグループを設定します。/etc/groupのwheelの行を見て、studentが登録されていることを確認します。
[root@rhel10 ~]# usermod -aG wheel student
[root@rhel10 ~]# cat /etc/group | grep wheel
wheel:x:10:student
studentがsudoによってrootになれることを確認します。現在rootのプロンプトが表示されているので、一旦、su - studentでstudentユーザーに切り替えます。studentユーザーになったら、sudo ls -la /rootを実行できることを確認します(ここでstudentのパスワードが求められます)。
[root@rhel10 ~]# su - student
Last login: Tue Feb 10 17:37:35 JST 2026 on pts/2
[student@rhel10 ~]$
[student@rhel10 ~]$ ls -la /root
ls: cannot open directory '/root': Permission denied
[student@rhel10 ~]$ sudo ls -la /root
[sudo] password for student:
total 36
dr-xr-x---.  3 root root 4096 Feb 10 19:31 .
dr-xr-xr-x. 19 root root 4096 Feb 10 19:32 ..
-rw-------   1 root root  370 Feb 10 19:47 .bash_history
-rw-r--r--   1 root root   18 Feb 12  2025 .bash_logout
-rw-r--r--   1 root root  141 Feb 12  2025 .bash_profile
-rw-r--r--   1 root root  429 Feb 12  2025 .bashrc
-rw-r--r--   1 root root  100 Feb 12  2025 .cshrc
drwx------.  2 root root 4096 Feb 10 19:28 .ssh
-rw-r--r--   1 root root  129 Feb 12  2025 .tcshrc
[student@rhel10 ~]$
TIP
studentの補助グループとしてwheelグループを設定すると、sudoが使えるようになります。これは/etc/sudoersに以下の設定があるからです。
## Allows people in group wheel to run all commands
%wheel ALL=(ALL) ALL
Podmanを使ってRootlessコンテナを試す
podman runで警告が表示される!
やっと準備が整ったのでstudentユーザーになってpodmanコマンドを実行してみます。これは一般ユーザーからpodmanコマンドが実行できるかのテストです。試しにUbuntu上でbashを動かしてみます。
[student@rhel10 ~]$ podman run -it ubuntu bash
WARN[0000] "/" is not a shared mount, this could cause issues or missing mounts with rootless containers
Resolved "ubuntu" as an alias (/etc/containers/registries.conf.d/000-shortnames.conf)
Trying to pull docker.io/library/ubuntu:latest...
Getting image source signatures
Copying blob a3629ac5b9f4 done   |
Copying config 493218ed0f done   |
Writing manifest to image destination
root@8da975df53f1:/#
root@8da975df53f1:/# id
uid=0(root) gid=0(root) groups=0(root)
root@8da975df53f1:/# exit
exit
[student@rhel10 ~]$bashの中でidコマンド実行したログを見るとuid=0(root)とあるので、rootでプロセスが動いていることが確認できました。studentユーザーから起動したコンテナは、ホストから見ると一般ユーザーのプロセスなのですが、コンテナ内で見るとrootになっています。このようなコンテナをRootless (ルートレス) コンテナといいます。
TIP
多くのコンテナがrootプロセスで動くように作られているのですが、実はコンテナ内でrootプロセスを動かすのは高いリスクが伴います。コンテナのセキュリティホールによってこのプロセスがコンテナから脱獄できてしまうと、ホストのroot権限を奪われてしまうからです。Rootlessコンテナは、コンテナ内のプロセスはrootで動いているようにふるまうのですが、ホストから見ると非特権プロセスですので、万が一コンテナから脱獄してもroot権限が奪われることはなくセキュリティのリスクを下げます。
でも、上のログをよく見ると最初の行に警告が表示されています。この警告によると、これを解決しないとRootlessコンテナがmountするときに問題が起こるかもしれないとのことです。
WARN[0000] "/" is not a shared mount, this could cause issues or missing mounts with rootless containers
WSLの設定ファイル /etc/wsl.conf を編集する
この警告を消すためには、/etc/wsl.confを変更します。wsl.conf は WSLディストリビューションごとの設定をするためファイルです。まず、この時点では次のような内容になっているはずです。
[boot]
systemd = true

[network]
hostname = rhel10
generateHosts = false
これを次のように [boost] 部にcommand = "mount --make-rshared /"という行を挿入します。これによりルートディレクトリ (/)のmount propagation設定がprivateからsharedに変更されます。
[boot]
systemd = true
command = "mount --make-rshared /"

[network]
hostname = rhel10
generateHosts = false
TIP
Rootlessコンテナを使うためには、ルートディレクトリ (/) のmount propagation設定がsharedになっている必要があります。Windows WSL環境ではルートディレクトリのデフォルトがprivateになっているため、mount --make-rshared /コマンドによってsharedに変更しています。
さらに、WSLでのRHEL10のターミナルを開いたときにstudentユーザーのシェルで始まるようにdefaultユーザーの設定も追加しておきましょう。最終的な/etc/wsl.confは以下のようになります。
[boot]
systemd = true
command = "mount --make-rshared /"

[network]
hostname = rhel10
generateHosts = false

[user]
default=student
/etc/wsl.confを更新したら、設定を反映させるためWindowsターミナルでwslをシャットダウンします。その後、wslコマンドを実行するとrootではなく、studentのプロンプトが表示されているはずです。
C:\Users\fusay>wsl --shutdown

C:\Users\fusa> wsl
[student@rhel10 fusay]$
WSL再起動後にfindmntコマンドを使ってルートディレクトリのプロパゲーション設定がsharedになっていることを確認します。
[student@rhel10 fusay]$ findmnt -o propagation /
PROPAGATION
shared
ここまでの設定変更が正しくおこなわれていれば、podman runで警告が出なくなっているはずです。
[student@rhel10 fusay]$ podman run -it ubuntu bash
root@26aadfbbe1a8:/# id
uid=0(root) gid=0(root) groups=0(root)
WindowsターミナルからのRHEL10.1の起動
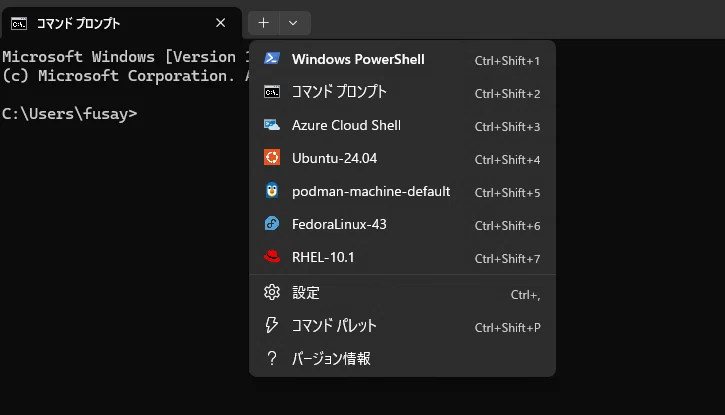
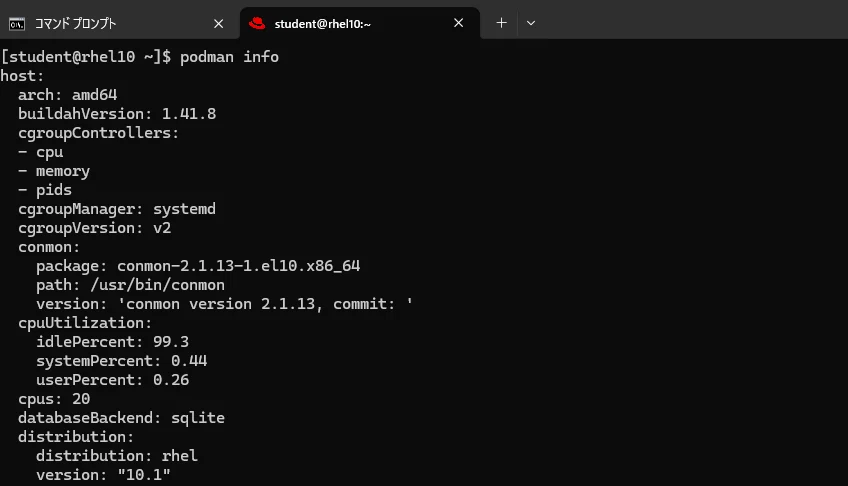
WSLにインストールした他のディストリビューションと同様に、Windowsターミナルのプルダウンメニューから「RHEL-10.1」を選択すれば、RHEL10のターミナルが開きます。
タスクバーにRHEL 10.1をピン留めすると便利
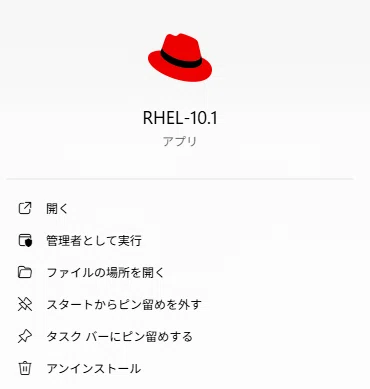
タスクバーにRHEL 10.1をピン留めしておくとすぐにPodmanを起動できて便利です。
WindowsのスタートボタンをクリックしてRHEL-10.1を探し、検索結果のアイコンを右クリックし、「タスクバーにピン留めする」を選択します。あとは、タスクバーから赤い帽子のアイコンをクリックすればRHEL10のターミナルが開きます。

おわりに
Windows WSL2上でPodman Rootlessコンテナを試すためのインストール手順をまとめました。軽い気持ちでこの記事を書き始めたのですが、思いのほか手順が多くなってしまいました。でも、WSL2でサクッとPodmanが試せるのは魅力なんですよね。この記事がどなたかの参考になれば幸いです。
