

In microservices architecture, an API Gateway serves as the primary entry point for all client requests and plays a crucial role in securing backend services. It centralizes security concerns such as authentication, authorization, rate limiting, encryption, and request validation, reducing the need to implement these mechanisms in every microservice individually.
- Provides centralized authentication and authorization for all incoming requests.
- Protects microservices using rate limiting, encryption, and security headers.
- Improves monitoring, auditing, and secure communication across distributed systems.
Why API Gateway Security is Important
Without an API Gateway, every microservice must implement its own security mechanisms, resulting in duplicated code and increased maintenance overhead. API Gateway security provides:
- Centralized access control
- Protection against malicious requests
- Traffic throttling and abuse prevention
- Secure service-to-service communication
- Unified monitoring and logging
Security Strategies in API Gateway
Below are the different ways for best practices for security purposes.
1. Authentication and Authorization
Authentication verifies the identity of users, while authorization determines what resources they can access. Modern API Gateways typically use OAuth2 and JWT-based authentication.
- Use OAuth2 for delegated authorization.
- Use JWT tokens for stateless authentication.
2. Rate Limiting and Throttling
Rate limiting prevents abuse by restricting the number of requests a client can make within a specific period.
- Configure per-user rate limits.
- Apply API quotas.
- Prevent brute-force attacks.
3. Security Headers
Security headers protect APIs against common web vulnerabilities.
- Configure CORS properly.
- Enable HSTS.
- Use Content Security Policy (CSP).
4. Input Validation and Sanitization
Validate all incoming requests before forwarding them to microservices.
- Validate request parameters.
- Sanitize user input.
5. Logging and Monitoring
Comprehensive logging helps identify attacks and troubleshoot issues.
- Log authentication failures.
- Monitor API usage.
- Generate alerts for suspicious activities.
6. Encryption
Encryption ensures data confidentiality.
- Enforce HTTPS/TLS.
- Encrypt sensitive data at rest.
- Rotate encryption keys regularly.
7. Secure Microservice Communication
Communication between API Gateway and backend services must also be secured.
- Use Mutual TLS (mTLS).
- Implement service mesh solutions.
Step-by-Step Implementation of API Gateway Security
Step 1: Create Spring Boot Project
Create a Spring Boot project using Spring Initializr.
Add following dependencies:
- Spring Cloud Gateway
- Spring Security
- OAuth2 Resource Server
- OAuth2 Client
- Spring WebFlux
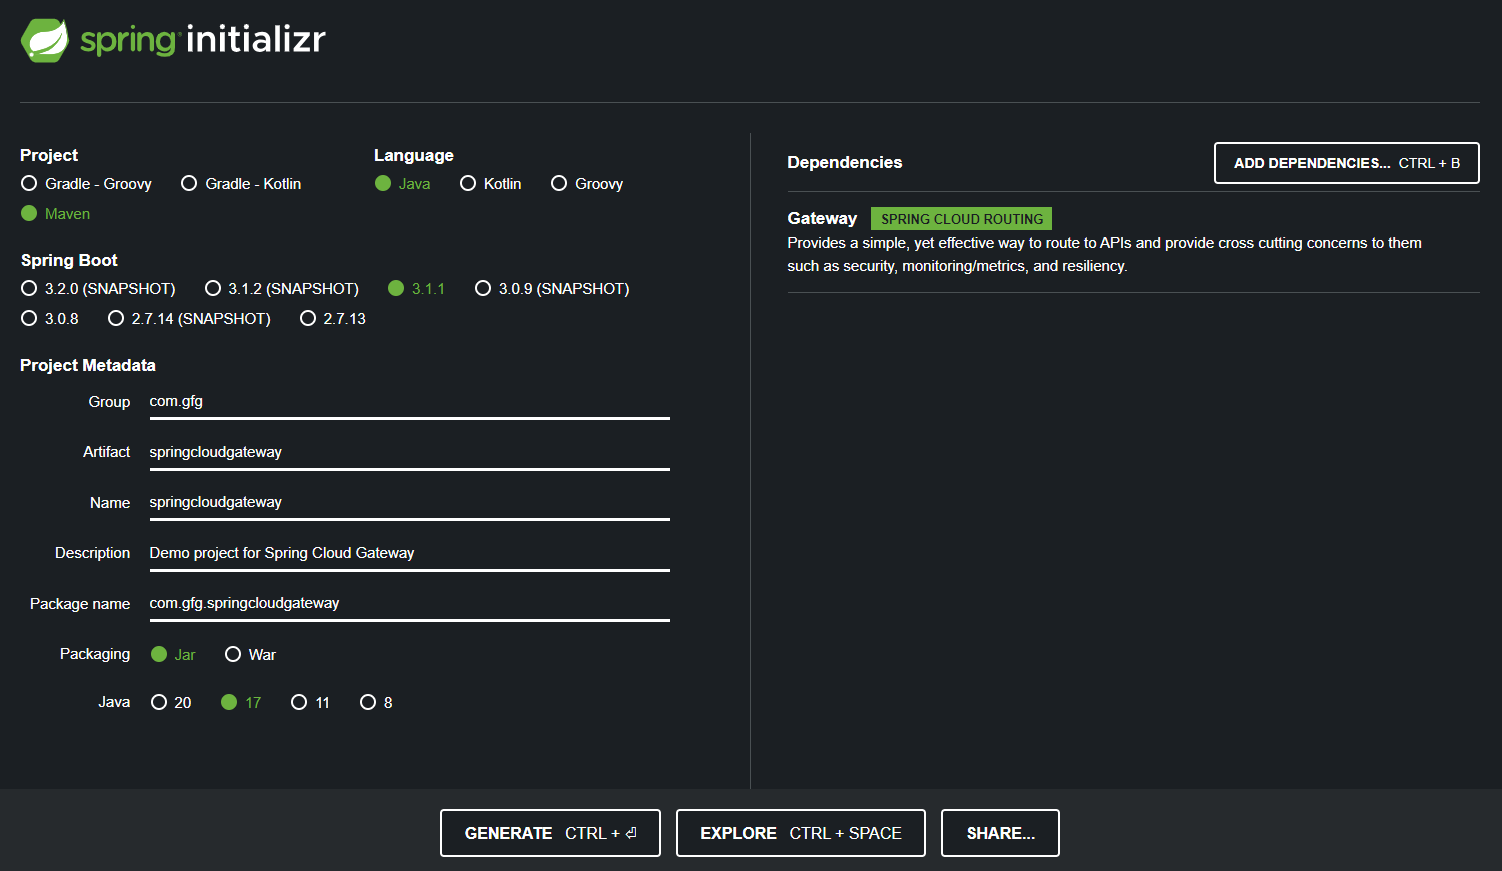
Step 2: Review the Generated pom.xml File.
The generated pom.xml file should contain the following dependency.
<dependencies>

    <!-- Spring WebFlux -->
    <dependency>
        <groupId>org.springframework.boot</groupId>
        <artifactId>spring-boot-starter-webflux</artifactId>
    </dependency>

    <!-- Spring Security -->
    <dependency>
        <groupId>org.springframework.boot</groupId>
        <artifactId>spring-boot-starter-security</artifactId>
    </dependency>

    <!-- OAuth2 Resource Server -->
    <dependency>
        <groupId>org.springframework.boot</groupId>
        <artifactId>spring-boot-starter-oauth2-resource-server</artifactId>
    </dependency>

    <!-- OAuth2 Client -->
    <dependency>
        <groupId>org.springframework.boot</groupId>
        <artifactId>spring-boot-starter-oauth2-client</artifactId>
    </dependency>

    <!-- Spring Cloud Gateway -->
    <dependency>
        <groupId>org.springframework.cloud</groupId>
        <artifactId>spring-cloud-starter-gateway</artifactId>
    </dependency>

    <!-- JWT -->
    <dependency>
        <groupId>io.jsonwebtoken</groupId>
        <artifactId>jjwt</artifactId>
        <version>0.9.1</version>
    </dependency>

    <!-- Spring Boot Test -->
    <dependency>
        <groupId>org.springframework.boot</groupId>
        <artifactId>spring-boot-starter-test</artifactId>
        <scope>test</scope>
    </dependency>

    <!-- Reactor Test -->
    <dependency>
        <groupId>io.projectreactor</groupId>
        <artifactId>reactor-test</artifactId>
        <scope>test</scope>
    </dependency>

</dependencies>
Step 3: Create JWT Token Provider
This component generates JWT tokens containing authenticated user information and authorization roles.
@Component
public class JwtTokenProvider {

    private final String secretKey = "mySecretKey";

    private final long validityInMilliseconds = 3600000;

    public String createToken(String username, String role) {

        Map<String, Object> claims = new HashMap<>();

        claims.put("role", role);

        return Jwts.builder()
                .setClaims(claims)
                .setSubject(username)
                .setIssuedAt(new Date())
                .setExpiration(
                        new Date(System.currentTimeMillis()
                                + validityInMilliseconds))
                .signWith(
                        SignatureAlgorithm.HS256,
                        secretKey.getBytes())
                .compact();
    }
}
Step 4: Create Authentication Controller
This controller provides an endpoint to generate JWT tokens based on the provided username and role, which is useful for authentication purposes.
package com.app;

import org.springframework.beans.factory.annotation.Autowired;
import org.springframework.web.bind.annotation.GetMapping;
import org.springframework.web.bind.annotation.RequestParam;
import org.springframework.web.bind.annotation.RestController;

@RestController
public class AuthController {

    @Autowired
    private JwtTokenProvider jwtTokenProvider;

    @GetMapping("/token")
    public String getToken(@RequestParam String username, @RequestParam String role) {
        return jwtTokenProvider.createToken(username, role);
    }
}
Step 5: Configure Spring Security
This configuration secures all API Gateway endpoints and enables JWT-based authentication.
@Configuration
@EnableWebFluxSecurity
public class SecurityConfig {

    @Bean
    public SecurityWebFilterChain
        springSecurityFilterChain(
            ServerHttpSecurity http) {

        http
            .csrf(csrf -> csrf.disable())
            .authorizeExchange(exchanges ->
                exchanges
                    .pathMatchers("/token")
                    .permitAll()
                    .anyExchange()
                    .authenticated())
            .oauth2ResourceServer(
                ServerHttpSecurity
                    .OAuth2ResourceServerSpec::jwt);

        return http.build();
    }

    @Bean
    public ReactiveJwtDecoder jwtDecoder() {

        return NimbusReactiveJwtDecoder
                .withJwkSetUri(
                    "http://localhost:8080/oauth2/default")
                .build();
    }
}
Step 6: Create Main Application Class
This class acts as the entry point of the Spring Boot API Gateway application and enables the application to start successfully.
package com.app;

import org.springframework.boot.SpringApplication;
import org.springframework.boot.autoconfigure.SpringBootApplication;

@SpringBootApplication
public class ApiGatewaySecurityApplication {

    public static void main(String[] args) {
        SpringApplication.run(
                ApiGatewaySecurityApplication.class,
                args);
    }
}
Step 7: Configure application.properties
Configure the server port and JWT resource server settings.
spring.application.name=API-GATEWAY-SECURITY
server.port=8080
spring.security.oauth2.resourceserver.jwt.jwk-set-uri=http://localhost:8080/oauth2/default
Step 8: Run the Application
You can run the API Gateway application using any of the following methods:
- Right Click ApiGatewaySecurityApplication
- Run 'ApiGatewaySecurityApplication'
By using Maven Commands(Optional)
mvn spring-boot:run
API Information:
Generate a JWT token using the authentication endpoint.
- Method: GET
URL: http://localhost:8080/token?username=testuser&role=ROLE_USER
When we hit the above API then we get a example JWT token like below:
eyJhbGciOiJIUzI1NiJ9.eyJzdWIiOiJ0ZXN0dXNlciIsImV4cCI6MTY0NzMzMDU1MiwiaWF0IjoxNjQ3MzI3NzUyLCJyb2xlIjoiUk9MRV9VU0VSIn0.-v3pxs6H05_MyZxioWt_CqOJhJBC0QX_XO4ZJKy0i8c
Explanation: API Gateway security centralizes authentication, authorization, request validation, and traffic management for all incoming client requests in a microservices architecture. By using technologies such as Spring Cloud Gateway, Spring Security, OAuth2, and JWT, organizations can ensure secure communication, improve system scalability, and reduce security implementation complexity across individual microservices.
