Spring Data JDBC is a lightweight data access framework in the Spring Data ecosystem that simplifies interaction with relational databases using plain Java objects and SQL. Unlike Spring Data JPA, it avoids complex ORM features and provides a more direct, predictable, and efficient way to perform database operations.
- Uses direct mapping between database tables and Java objects.
- Reduces the complexity associated with ORM frameworks.
- Supports CRUD operations through repository interfaces.
Prerequisites
- Basic knowledge of Java Programming
- Understanding of Object-Oriented Programming (OOP)
- Familiarity with the Spring Framework
- Basic knowledge of Spring Boot
- Understanding of SQL and Relational Databases
Step-by-Step Implementation of Spring Data JDBC
Step 1: Create a new Spring Boot project in IntelliJ
- Open IntelliJ IDEA, Eclipse, or STS.
- Create a new Spring Boot project.
Select the below configurations for the project.
- Language: Java
- Project: Maven
- Packaging: Jar
- Java: 17
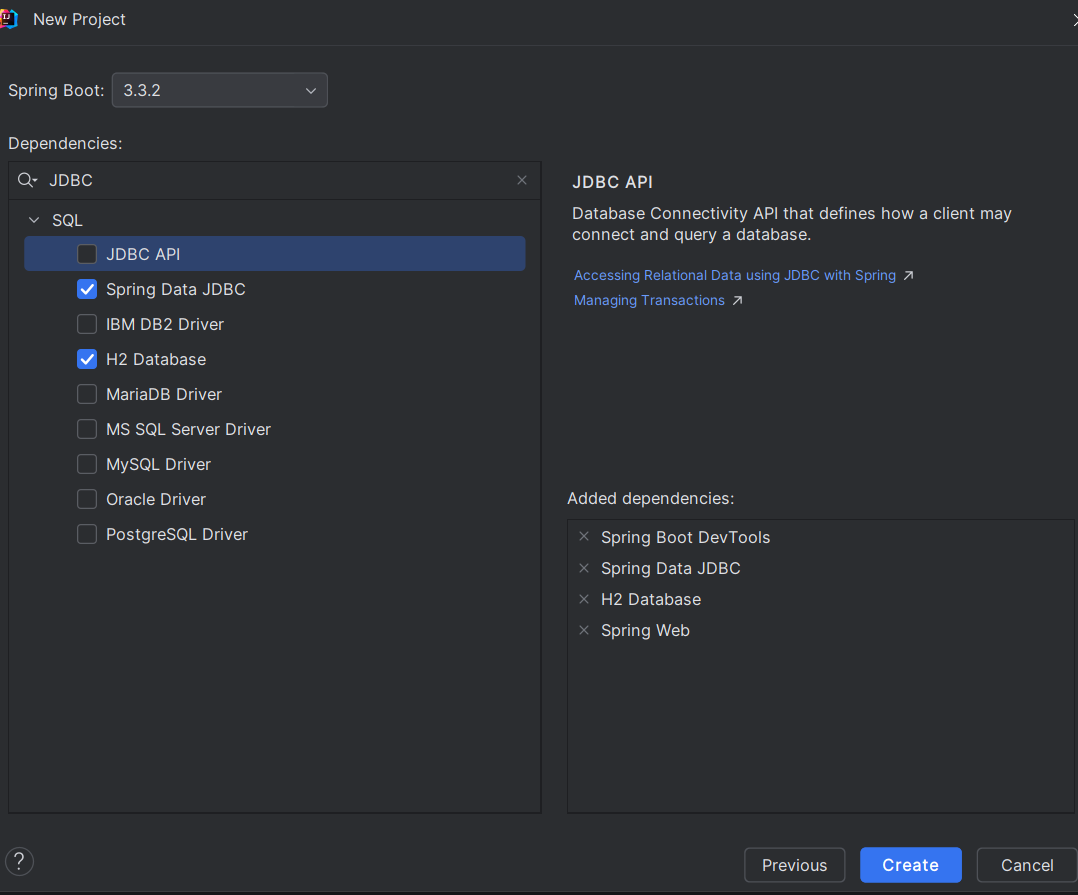
Select the dependencies:
- spring-boot-starter-data-jdbc
- H2 Database (for an in-memory database)
Click Create to generate the project.
Step 2: Configuring the DataSource
- Open application.properties.
- Configure H2 database settings:
spring.datasource.url=jdbc:h2:mem:testdb
spring.datasource.driver-class-name=org.h2.Driver
spring.datasource.username=sa
spring.datasource.password=password
spring.h2.console.enabled=true
spring.h2.console.path=/h2-console
spring.datasource.initialization-mode=always
Step 3: Create the Entity Class
- Create a Book class.
- Add required fields such as: id , title , author
- Generate constructors, getters, setters, and toString() method.
package com.bookmanagement.bookmanagementsystem.entity;

import org.springframework.data.annotation.Id;
import org.springframework.data.relational.core.mapping.Table;

@Table("BOOKS")
public class Book {
    @Id
    private Long id;
    private String title;
    private String author;

    public Book(Long id, String title, String author) {
        this.id = id;
        this.title = title;
        this.author = author;
    }

    public long getId() {
        return id;
    }

    public String getTitle() {
        return title;
    }

    public String getAuthor() {
        return author;
    }

    public void setId(Long id) {
        this.id = id;
    }

    public void setTitle(String title) {
        this.title = title;
    }

    public void setAuthor(String author) {
        this.author = author;
    }

    @Override
    public String toString() {
        return "Book{" +
                "id=" + id +
                ", title='" + title + '\'' +
                ", author='" + author + '\'' +
                '}';
    }
}
Step 4: Creating a Repository Interface
- Create BookRepository.
- Extend CrudRepository<Book, Long>.
- Spring Data JDBC automatically provides CRUD operations such as: save() , findById() , findAll() and deleteById()
package com.bookmanagement.bookmanagementsystem.repository;

import com.bookmanagement.bookmanagementsystem.entity.Book;
import org.springframework.data.repository.CrudRepository;
import org.springframework.stereotype.Repository;

@Repository
public interface BookRepository extends CrudRepository<Book, Long> {

}
Step 5: Create Controller Class
- Create BookController.
- Annotate the class with @RestController.
- Use @RequestMapping to define the base URL.
Note: Also try handling exceptions while making any project on your own, as it is a necessary concept.
package com.bookmanagement.bookmanagementsystem.controller;

import com.bookmanagement.bookmanagementsystem.entity.Book;
import com.bookmanagement.bookmanagementsystem.repository.BookRepository;
import org.springframework.web.bind.annotation.*;

import java.util.List;

@RestController
@RequestMapping("/books")
public class BookController {

    private final BookRepository bookRepository;

    public BookController(BookRepository bookRepository) {
        this.bookRepository = bookRepository;
    }

    @PostMapping("/addBook")
    public Object createBook(@RequestBody Book book) {
        try {
            return bookRepository.save(book);

        }catch (NullPointerException e) {
            return e.getMessage();
        }
    }

    @GetMapping("/getAllBooks")
    public List<Book> getAllBooks() {
        try{
            return (List<Book>) bookRepository.findAll();
        }
        catch (NullPointerException e) {
            return null;
        }

    }

    @GetMapping("/getBookById/{id}")
    public Book getBookById(@PathVariable Long id) {
        try{
            return bookRepository.findById(id).get();
        }
        catch (NullPointerException e) {
            return null;
        }
    }

    @PutMapping("/updateBook/{id}")
    public Book updateBook(@PathVariable Long id, @RequestBody Book updateBook) {
        return bookRepository.findById(id)
                .map(book -> {
                    book.setAuthor(updateBook.getAuthor());
                    book.setTitle(updateBook.getTitle());
                    return bookRepository.save(book);
                })
                .orElseGet(
                    () -> {
                        updateBook.setId(id);
                        return bookRepository.save(updateBook);
                    }
                );
    }

    @DeleteMapping("/deleteBook/{id}")
    public String deleteBook(@PathVariable Long id) {
        try {
            bookRepository.deleteById(id);
        }
        catch(NullPointerException e) {
            return "Delete Book Failed";
        }
        return "Deleted Book Successfully";
    }

    @DeleteMapping("/deleteAllBooks")
    public String deleteAllBooks() {
        try {
            bookRepository.deleteAll();
        }
        catch(NullPointerException e) {
            return "Delete All Books Failed";
        }
        return "Deleted All Books Successfully";
    }
}
Step 6: Create Database Schema and Initial Data
- Create schema.sql file to define the BOOKS table.
- Create data.sql file to insert sample book records.
- Spring Boot automatically executes these files during startup.
-- schema.sql
-- Drop the table if it exists (useful for development purposes)
DROP TABLE IF EXISTS books;
-- Create the books table CREATE TABLE BOOKS (
id BIGINT AUTO_INCREMENT PRIMARY KEY,
title VARCHAR(255) NOT NULL,
author VARCHAR(255) NOT NULL );
-- data.sql
INSERT INTO BOOKS (TITLE, AUTHOR) VALUES ('The Catcher in the Rye', 'J.D. Salinger');
INSERT INTO BOOKS (TITLE, AUTHOR) VALUES ('To Kill a Mockingbird', 'Harper Lee');
INSERT INTO BOOKS (TITLE, AUTHOR) VALUES ('1984', 'George Orwell');
Step 7: Configure Component Scanning (Optional)
- If Spring cannot detect repository or controller classes: Add @ComponentScan.
- Specify packages containing: Controllers , Repositories and Entities
So, in order to avoid this error one needs to add the following code into the main application i.e. BookManagementSystemApplication:
package com.bookmanagement.bookmanagementsystem;

import org.springframework.boot.SpringApplication;
import org.springframework.boot.autoconfigure.SpringBootApplication;
import org.springframework.context.annotation.ComponentScan;

@SpringBootApplication
@ComponentScan({"com.bookmanagement.bookmanagementsystem.repository", "com.bookmanagement.bookmanagementsystem.controller", "com.bookmanagement.bookmanagementsystem.entity"})
public class BookManagementSystemApplication {

	public static void main(String[] args) {

		SpringApplication.run(BookManagementSystemApplication.class, args);
	}

}
Step 8: Run the Application
After doing all the necessary changes the project structure would look similar to the one mentioned below:
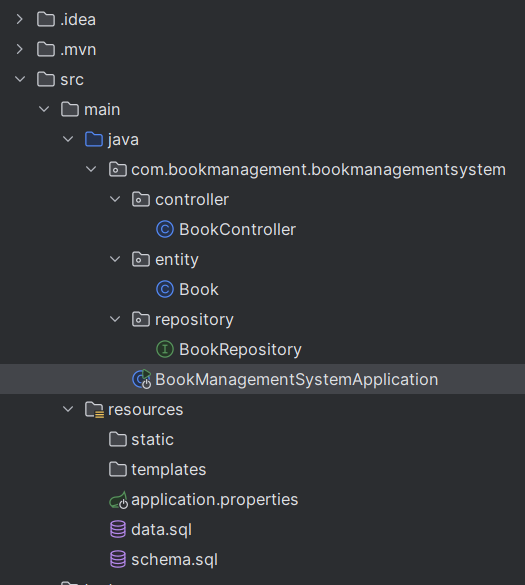
Navigate to your BookManagementSystemApplication then Run your application. After successful build and run the application will start running in the port 8080. Then we can start verifying our API using Postman.
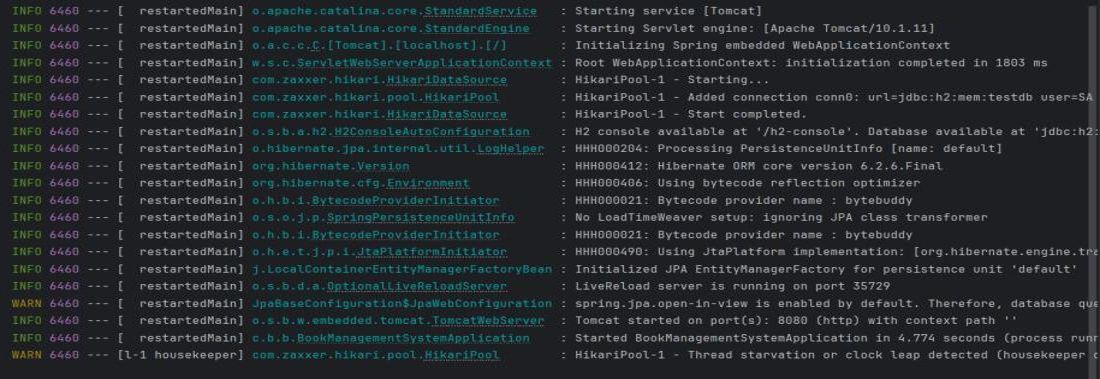
Step 9: Test the API Endpoint in Postman
Now, open the Postman and hit the following URL for verifying:
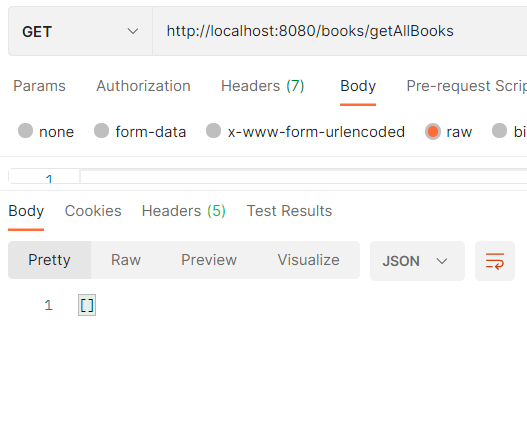
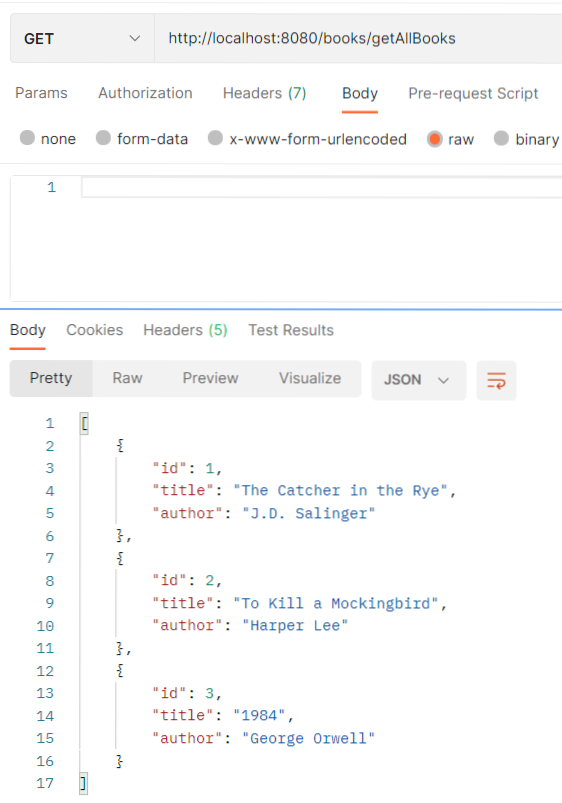
1. GET: get all Books API verification
Enter the below mentioned url and you would get the response to the one mentioned in the same image downwards.
GET: http://localhost:8080/books/getAllBooks
Output:
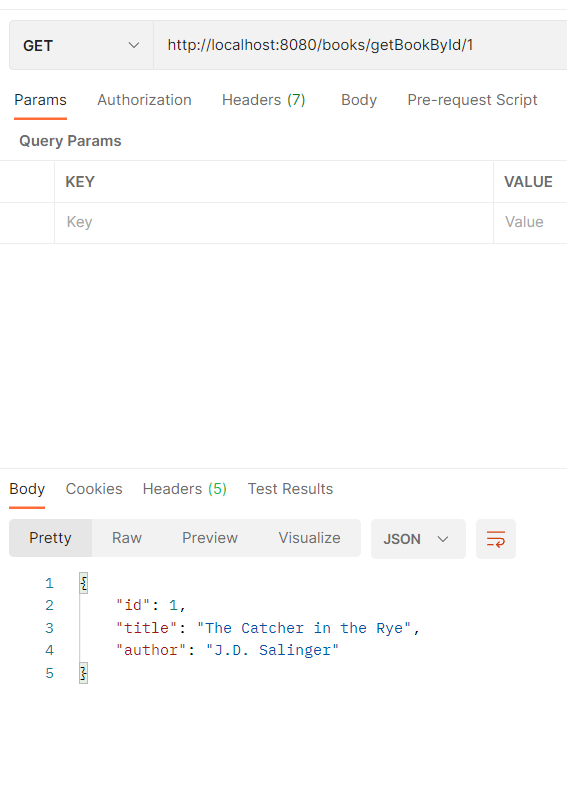
2. GET: get Book by ID API verification
GET: http://localhost:8080/books/getBookById/{id}
Output:
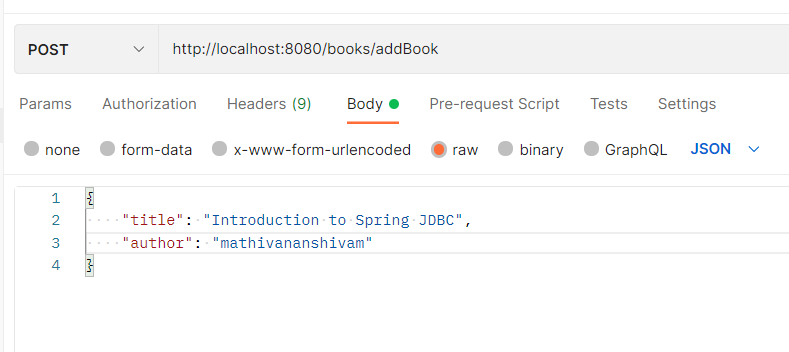
3. POST: add book API verification
POST: http://localhost:8080/books/addBook
Output:
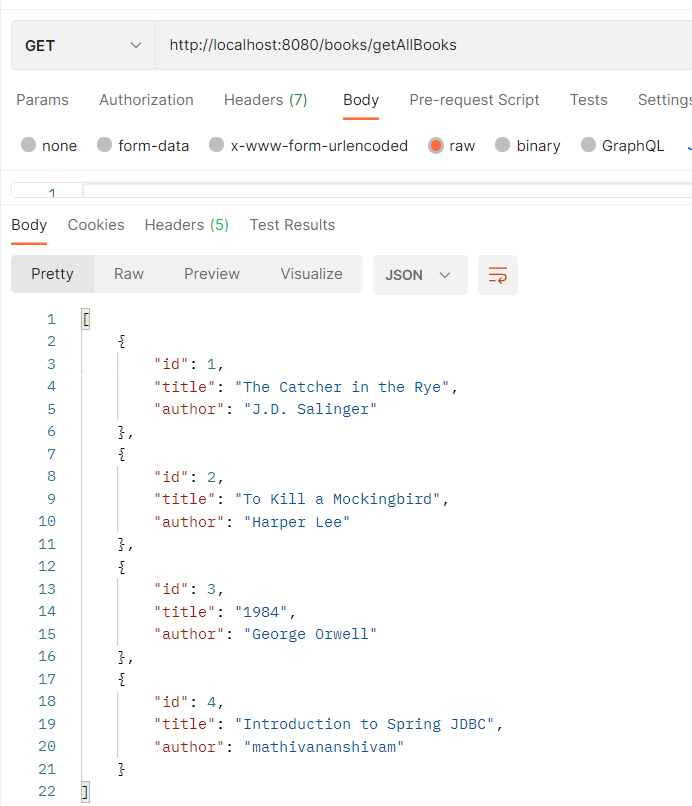
After using POST request the books list would be updated which is mentioned below:
4. PUT: Modifying the existing entry
PUT: http://localhost:8080/books/updateBook/{id}
Output:
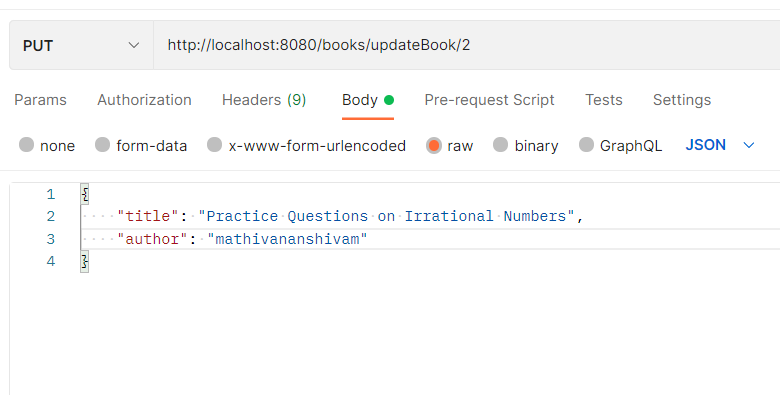
After using PUT request the books list would be updated which is mentioned below:
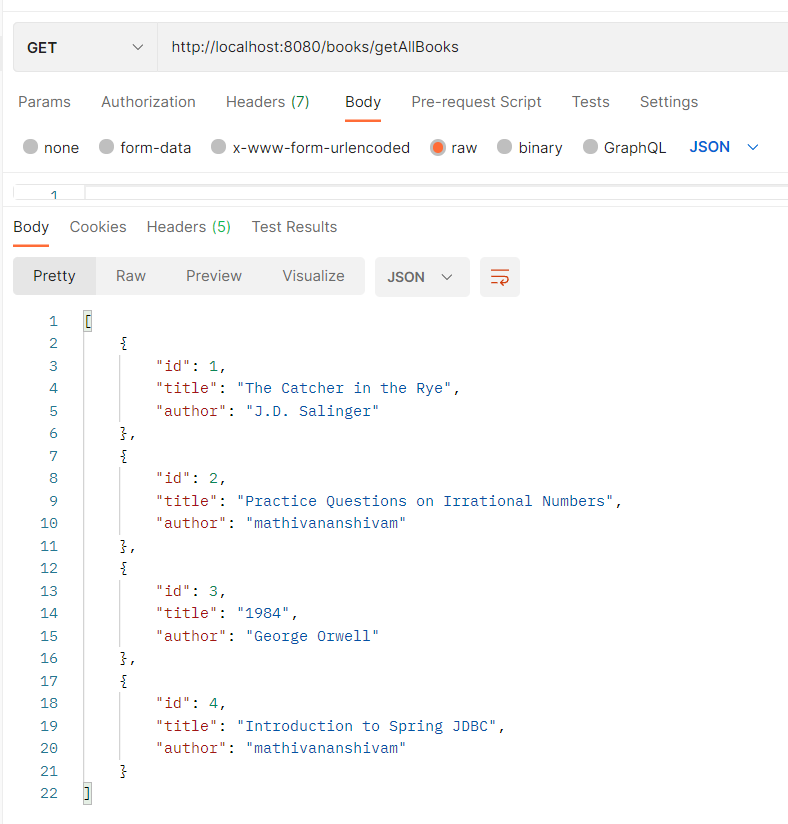
5. DELETE: delete book by ID API verification
DELETE: http://localhost:8080/books/deleteBook/{id}
Output:
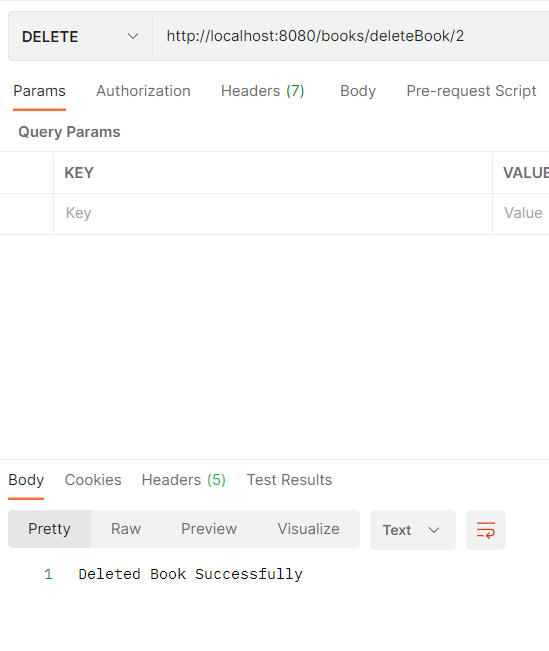
After using DELETE request the books list would be updated which is mentioned below:
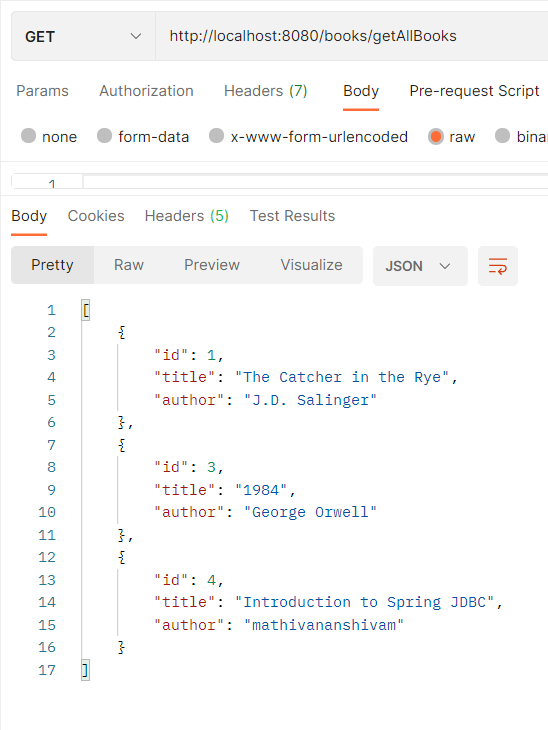
6. DELETE: delete all books API verification
DELETE: http://localhost:8080/books/deleteAllBooks
Output:
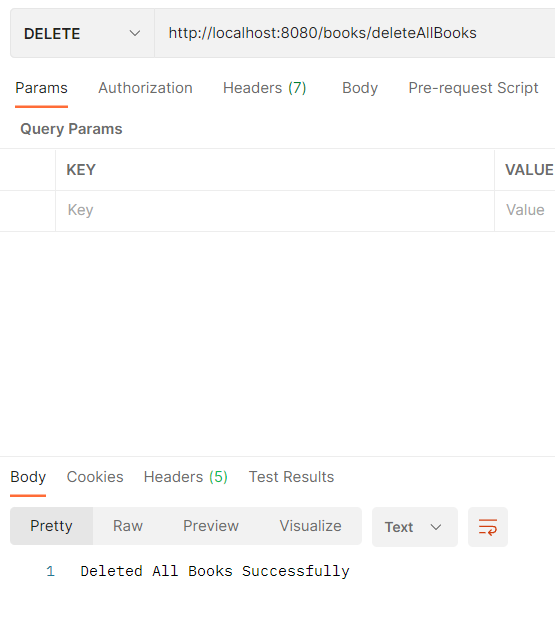
After using DELETE request the books list would be updated which is mentioned below: