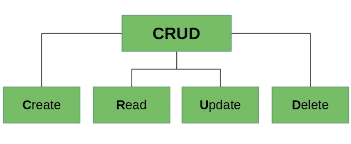
CRUD Operations are the fundamental database operations performed in most applications. In JPA (Java Persistence API), these operations can be implemented easily using repository interfaces, allowing developers to manage database records without writing SQL queries manually.
- Performs Create, Read, Update, and Delete operations on database entities.
- Uses Spring Data JPA repositories to simplify database access.
- Reduces boilerplate code by automatically generating CRUD methods.
Create Operation
The Create operation is used to insert a new record into the database. In JPA, a new entity object is created, its values are assigned, and then it is saved to the database using the persist() method of the EntityManager.
Steps to implement the create operation:
- Create a new instance of the entity class.
- Set values for the entity's attributes.
- Begin a transaction using EntityTransaction.
- Call the persist() method to save the entity.
- Commit the transaction to permanently store the record.
Example:
EntityManager em = entityManagerFactory.createEntityManager();
EntityTransaction transaction = em.getTransaction();

transaction.begin();

// Create a new entity object
Employee employee = new Employee();

// Set entity attributes
employee.setName("John");
employee.setSalary(50000);

// Save the entity
em.persist(employee);

transaction.commit();
Read Operation
The Read operation is used to retrieve existing records from the database. In JPA, you can fetch an entity using its primary key with the find() method of the EntityManager.
Steps to Perform the Read Operation
- Create an EntityManager instance.
- Call the find() method with the entity class and its primary key.
- Use the returned entity object to access the stored data.
Example:
Employee employee = em.find(Employee.class, 1L);
Update Operation
The Update operation is used to modify an existing record in the database. In JPA, you first retrieve the entity, update its fields, and then save the changes using the merge() method of the EntityManager.
Steps to Perform the Update Operation
- Retrieve the entity using the find() method.
- Modify the required attributes of the entity.
- Call the merge() method to update the entity.
- Commit the transaction to save the changes.
Example:
Employee employee = em.find(Employee.class, 1L);
employee.setSalary(55000);
em.merge(employee);
Delete Operation
The Delete operation is used to remove an existing record from the database. In JPA, you first retrieve the entity and then delete it using the remove() method of the EntityManager.
Steps to Perform the Delete Operation
- Retrieve the entity using the find() method.
- Call the remove() method to delete the entity.
- Commit the transaction to permanently remove the record from the database.
Example:
Employee employee = em.find(Employee.class, 1L);
em.remove(employee);
Step-by-step Implementation to perform CRUD Operation in JPA
In this example, we will build a simple JPA application that performs Create, Read, Update, and Delete (CRUD) operations on an Employee entity using a MySQL database and Hibernate as the JPA provider.
Step 1: Create the New Spring Boot Project
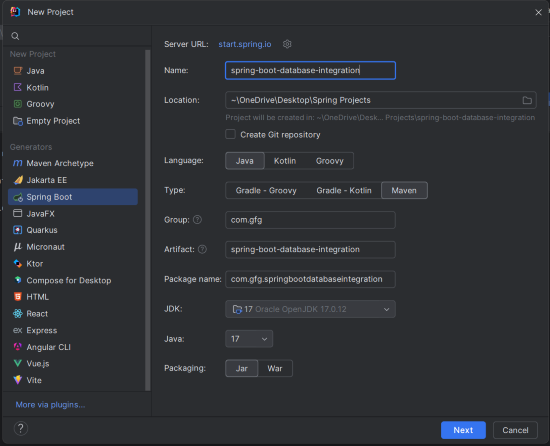
Use your preferred IDE to create a new Spring Boot project with the following settings:
- Name: spring-boot-database-integration
- Language: Java
- Type: Maven
- Packaging: Jar
Click on the Next button.
Step 2: Add the Dependencies
Add the following dependencies into the Spring Boot project.
<?xml version="1.0" encoding="UTF-8"?>
<project xmlns="https://maven.apache.org/POM/4.0.0"
         xmlns:xsi="https://www.w3.org/2001/XMLSchema-instance"
         xsi:schemaLocation="https://maven.apache.org/POM/4.0.0 https://maven.apache.org/xsd/maven-4.0.0.xsd">
    <modelVersion>4.0.0</modelVersion>

    <groupId>org.example</groupId>
    <artifactId>jpa-crud</artifactId>
    <version>1.0-SNAPSHOT</version>
    <name>jpa-crud</name>

    <properties>
        <project.build.sourceEncoding>UTF-8</project.build.sourceEncoding>
        <maven.compiler.target>11</maven.compiler.target>
        <maven.compiler.source>11</maven.compiler.source>
        <junit.version>5.9.2</junit.version>
    </properties>

    <dependencies>
        <dependency>
            <groupId>org.hibernate.orm</groupId>
            <artifactId>hibernate-core</artifactId>
            <version>6.0.2.Final</version>
        </dependency>
        <dependency>
            <groupId>org.glassfish.jaxb</groupId>
            <artifactId>jaxb-runtime</artifactId>
            <version>3.0.2</version>
        </dependency>
        <dependency>
            <groupId>org.junit.jupiter</groupId>
            <artifactId>junit-jupiter-api</artifactId>
            <version>${junit.version}</version>
            <scope>test</scope>
        </dependency>
        <dependency>
            <groupId>org.junit.jupiter</groupId>
            <artifactId>junit-jupiter-engine</artifactId>
            <version>${junit.version}</version>
            <scope>test</scope>
        </dependency>
        <dependency>
            <groupId>mysql</groupId>
            <artifactId>mysql-connector-java</artifactId>
            <version>8.0.28</version>
        </dependency>

    </dependencies>

    <build>
        <plugins>
        </plugins>
    </build>
</project>
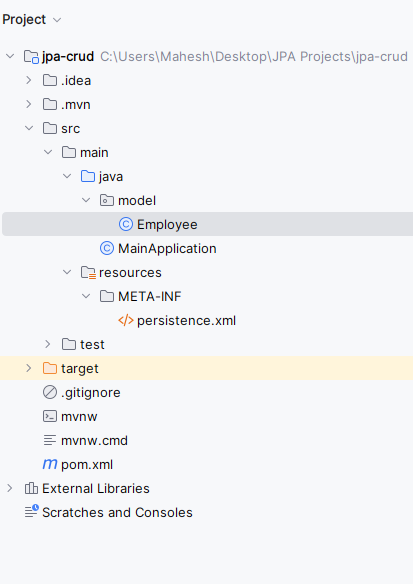
Once the project creation completed, then the file structure will look like the below image.
Step 3: Configure the Persistence Unit (persistence.xml)
Create the persistence.xml file inside the src/main/resources/META-INF directory. This file defines the database connection details, Hibernate properties, and the persistence unit used by JPA.
<?xml version="1.0" encoding="UTF-8" standalone="yes"?>
<persistence xmlns="https://jakarta.ee/xml/ns/persistence/"
             xmlns:xsi="https://www.w3.org/2001/XMLSchema-instance"
             xsi:schemaLocation="https://jakarta.ee/xml/ns/persistence/ https://jakarta.ee/xml/ns/persistence//persistence_3_0.xsd"
             version="3.0">
    <persistence-unit name="persistenceUnitName">
        <class>model.Employee</class>
        <properties>
            <property name="javax.persistence.jdbc.url" value="jdbc:mysql://localhost:3306/example"/>
            <property name="javax.persistence.jdbc.user" value="root"/>
            <property name="javax.persistence.jdbc.password" value=""/>
            <property name="javax.persistence.jdbc.driver" value="com.mysql.jdbc.Driver"/>
            <property name="hibernate.dialect" value="org.hibernate.dialect.MySQL5Dialect"/>
            <property name="hibernate.hbm2ddl.auto" value="update"/>
        </properties>
    </persistence-unit>


</persistence>
Step 4: Create the Entity Class (Employee.java)
Create an Employee entity class that represents the employees table in the database. JPA annotations are used to map the Java class and its fields to the corresponding database table and columns.
package model;

import jakarta.persistence.*;

@Entity // Specifies that this class is an entity, mapped to a database table
@Table(name = "employees") // Specifies the table name in the database
public class Employee {

    @Id // Specifies the primary key of the entity
    @GeneratedValue(strategy = GenerationType.IDENTITY) // Specifies the generation strategy for the primary key
    private Long id; // Primary key field

    private String name; // Field to store employee name
    private double salary; // Field to store employee salary

    // Default constructor
    public Employee() {

    }

    // Parameterized constructor
    public Employee(Long id, String name, double salary) {
        this.id = id;
        this.name = name;
        this.salary = salary;
    }

    // Getter and setter methods for id, name, and salary fields
    public Long getId() {
        return id;
    }

    public void setId(Long id) {
        this.id = id;
    }

    public String getName() {
        return name;
    }

    public void setName(String name) {
        this.name = name;
    }

    public double getSalary() {
        return salary;
    }

    public void setSalary(double salary) {
        this.salary = salary;
    }
}
Step 5: Create the Main Application (MainApplication.java)
Create the main Java class that initializes the EntityManager, manages transactions, and performs all CRUD operations using JPA.
import jakarta.persistence.EntityManager;
import jakarta.persistence.EntityManagerFactory;
import jakarta.persistence.EntityTransaction;
import jakarta.persistence.Persistence;
import model.Employee;

import java.util.List;

public class MainApplication {
    public static void main(String[] args) {
        EntityManagerFactory emf = Persistence.createEntityManagerFactory("persistenceUnitName");
        EntityManager em = emf.createEntityManager();
        EntityTransaction transaction = em.getTransaction();

        try {
            transaction.begin();
            for (int i = 1; i <= 5; i++) {
                Employee emp = new Employee();
                emp.setName("Employee " + i); // Setting unique names for each employee
                emp.setSalary(50000 + (i * 1000)); // Incrementing salary for each employee
                em.persist(emp);
            }
            transaction.commit();

            // Read Operation: Print all employees
            transaction.begin(); // Begin a new transaction
            List<Employee> allEmployees = em.createQuery("SELECT e FROM Employee e", Employee.class)
                    .getResultList();
            System.out.println("All Employees:");
            for (Employee employee : allEmployees) {
                System.out.println(employee.getName() + " - " + employee.getSalary());
            }
            transaction.commit(); // Commit the transaction after reading

            // Update Operation: Update two employees
            transaction.begin(); // Begin a new transaction
            Employee employeeToUpdate1 = em.find(Employee.class, 1L); // Assuming ID 1 and 2 for updating
            employeeToUpdate1.setSalary(employeeToUpdate1.getSalary() + 5000); // Increasing salary
            Employee employeeToUpdate2 = em.find(Employee.class, 2L);
            employeeToUpdate2.setSalary(employeeToUpdate2.getSalary() + 5000); // Increasing salary
            em.merge(employeeToUpdate1);
            em.merge(employeeToUpdate2);
            transaction.commit(); // Commit the transaction after updating

            // Read Operation: Print updated employees
            transaction.begin(); // Begin a new transaction
            List<Employee> updatedEmployees = em.createQuery("SELECT e FROM Employee e WHERE e.id IN (1, 2)", Employee.class)
                    .getResultList();
            System.out.println("\nUpdated Employees:");
            for (Employee employee : updatedEmployees) {
                System.out.println(employee.getName() + " - " + employee.getSalary());
            }
            transaction.commit(); // Commit the transaction after reading

            // Delete Operation
            transaction.begin(); // Begin a new transaction
            for (Employee employee : updatedEmployees) {
                em.remove(employee);
            }
            transaction.commit(); // Commit the transaction after deletion
        } finally {
            em.close();
            emf.close();
        }
    }
}
Step 6: Run the Application
After completing the implementation, run the MainApplication.java file.
In IntelliJ IDEA, navigate as follows:
- Right-click Project
- Run As -> Spring Boot App
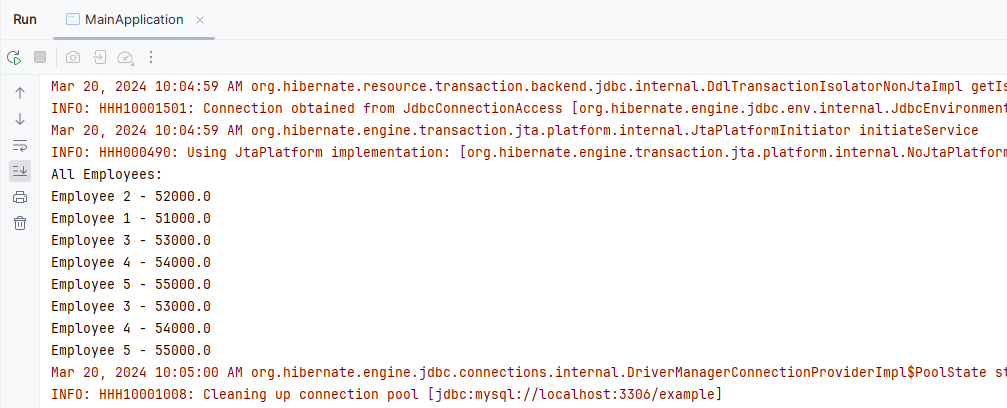
The application will execute all CRUD operations sequentially and display the results in the console