
In a microservices architecture, services need a way to locate and communicate with each other dynamically. Eureka Client enables a Spring Boot application to register itself with the Eureka Server and discover other registered services without hardcoding IP addresses or URLs.
- Automatic Service Registration with Eureka Server.
- Dynamic Service Discovery for inter-service communication.
- Simplifies scaling and deployment of microservices.
Why use Eureka Client in Spring Boot Applications?
Eureka Client allows a microservice to become discoverable within a distributed system. Once registered, other services can locate and communicate with it through the Eureka Server.
Benefits of Eureka Client:
- Automatic Registration: Registers the service with Eureka Server during startup.
- Service Discovery: Enables communication using service names instead of IP addresses.
- Dynamic Scaling: Supports multiple service instances automatically.
- Fault Tolerance: Removes unavailable instances from the registry.
- Spring Cloud Integration: Works seamlessly with Spring Boot and Spring Cloud components.
Steps to Configuring the Eureka Client
Follow these steps To Configure a Eureka Client.
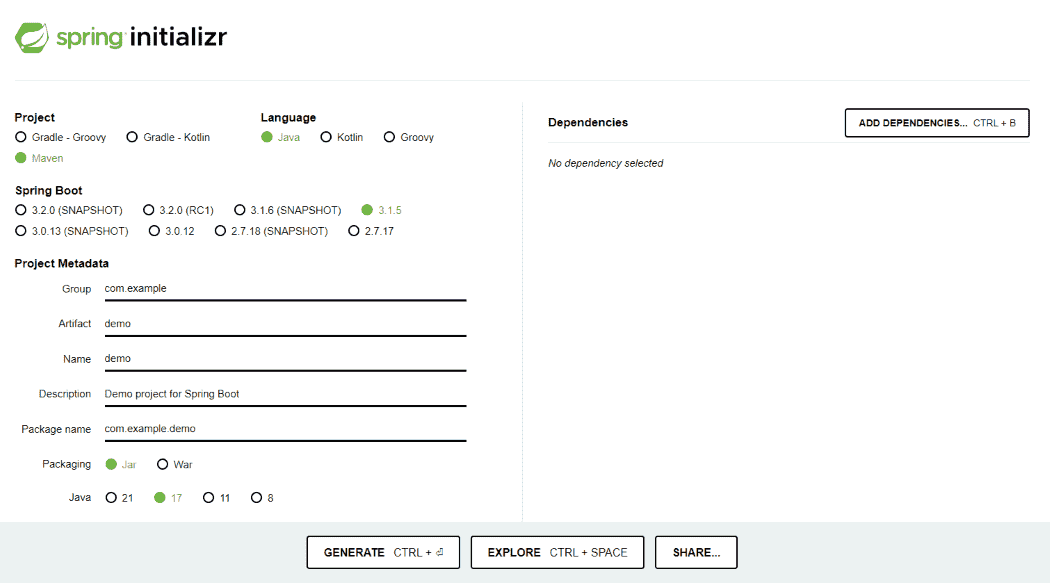
Step 1: Create a Spring Boot Project
Create a Spring Boot project using Spring Initializr.
Add Dependencies:
- Spring Web
- Eureka Discovery Client
- Spring Boot DevTools
Step 2: Review the Generated pom.xml File
The generated pom.xml file should look similar to the following:
<?xml version="1.0" encoding="UTF-8"?>
<project xmlns="http://maven.apache.org/POM/4.0.0"
         xmlns:xsi="http://www.w3.org/2001/XMLSchema-instance"
         xsi:schemaLocation="http://maven.apache.org/POM/4.0.0
         https://maven.apache.org/xsd/maven-4.0.0.xsd">

    <modelVersion>4.0.0</modelVersion>

    <parent>
        <groupId>org.springframework.boot</groupId>
        <artifactId>spring-boot-starter-parent</artifactId>
        <version>3.3.0</version>
        <relativePath/>
    </parent>

    <groupId>org.geeksforgeeks</groupId>
    <artifactId>student-service</artifactId>
    <version>0.0.1-SNAPSHOT</version>
    <name>student-service</name>
    <description>Spring Boot Eureka Client Example</description>

    <properties>
        <java.version>17</java.version>
        <spring-cloud.version>2023.0.2</spring-cloud.version>
    </properties>

    <dependencies>

        <!-- Spring Boot Web -->
        <dependency>
            <groupId>org.springframework.boot</groupId>
            <artifactId>spring-boot-starter-web</artifactId>
        </dependency>

        <!-- Eureka Client -->
        <dependency>
            <groupId>org.springframework.cloud</groupId>
            <artifactId>spring-cloud-starter-netflix-eureka-client</artifactId>
        </dependency>

        <!-- Spring Boot DevTools -->
        <dependency>
            <groupId>org.springframework.boot</groupId>
            <artifactId>spring-boot-devtools</artifactId>
            <scope>runtime</scope>
            <optional>true</optional>
        </dependency>

        <!-- Testing -->
        <dependency>
            <groupId>org.springframework.boot</groupId>
            <artifactId>spring-boot-starter-test</artifactId>
            <scope>test</scope>
        </dependency>

    </dependencies>

    <dependencyManagement>
        <dependencies>
            <dependency>
                <groupId>org.springframework.cloud</groupId>
                <artifactId>spring-cloud-dependencies</artifactId>
                <version>${spring-cloud.version}</version>
                <type>pom</type>
                <scope>import</scope>
            </dependency>
        </dependencies>
    </dependencyManagement>

    <build>
        <plugins>
            <plugin>
                <groupId>org.springframework.boot</groupId>
                <artifactId>spring-boot-maven-plugin</artifactId>
            </plugin>
        </plugins>
    </build>

</project>
Step 3: Configure Eureka Client Properties
Configure Eureka-related settings in the application.yml file.
- spring.application.name: defines the service name registered in Eureka.
- register-with-eureka: enables service registration.
- fetch-registry: allows fetching registry information.
- defaultZone: specifies the Eureka Server URL.
- prefer-ip-address: registers the service using its IP address.
server:
port: 8081
spring:
application:
name: API-GATEWAYeureka:
client:
register-with-eureka: true
fetch-registry: true
service-url:
defaultZone: http://localhost:8761/eureka/
instance:
prefer-ip-address: true
Step 4: Enable Eureka Client Functionality
The main Spring Boot class is used to start the application and enable Eureka Client functionality.
package org.geeksforgeeks.student;

import org.springframework.boot.SpringApplication;
import org.springframework.boot.autoconfigure.SpringBootApplication;
import org.springframework.cloud.netflix.eureka.EnableEurekaClient;

@SpringBootApplication
@EnableEurekaClient
public class StudentApplication {

    public static void main(String[] args) {
        SpringApplication.run(StudentApplication.class, args);
    }
}
Note: In recent Spring Cloud versions, the @EnableEurekaClient annotation is optional because Eureka Client is enabled automatically when the dependency is present.
Step 5: Create a Sample REST Controller
Create a simple REST endpoint to verify that the service is running successfully.
package org.geeksforgeeks.student.controller;

import org.springframework.web.bind.annotation.GetMapping;
import org.springframework.web.bind.annotation.RestController;

@RestController
public class StudentController {

    @GetMapping("/students")
    public String getStudents() {
        return "Student Service is Running";
    }
}
Step 6: Run the Eureka Client Application
After configuring the Eureka Client, run the Spring Boot application to register it with the Eureka Server.
- Right-click StudentApplication.java
- Then select -> Run 'StudentApplication'
Alternatively, you can run the application using Maven:
mvn spring-boot:run
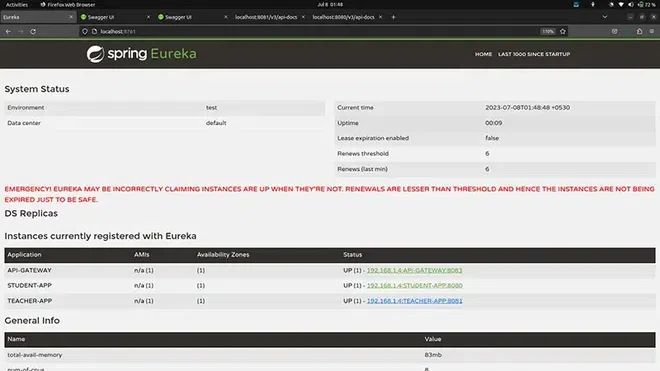
Open the Eureka Dashboard:
http://localhost:8761
When the application starts successfully, it automatically registers itself with the Eureka Server and you should see the registered service:
- API-GATEWAY
- STUDENT-APP
- TEACHER-APP
Step 7: Access the Client Service
Open your browser and hit the Url to Access the service:
http://localhost:8081/students
Output:
Student Service is Running
Use Cases
Eureka Client is commonly used in:
- Microservices-based applications.
- Service discovery environments.
- Cloud-native applications.
- Auto-scaling systems.
- Load-balanced architectures.
