
In Spring MVC, a GET request is used to retrieve data from the server and display it to the user. GET requests are commonly used for loading web pages, fetching records, and displaying information without modifying server-side data.
- @GetMapping is used to handle HTTP GET requests in Spring MVC.
- GET requests are commonly used for retrieving and displaying data.
- Data can be sent from the Controller to the View using the Model object.
Syntax
@GetMapping("/home")
public String showHomePage() {
return "home";
}
@GetMapping: Maps HTTP GET requests to a specific controller method.
GET Request Processing Flow in Spring MVC
- User sends a GET request from the browser.
- DispatcherServlet receives the request.
- DispatcherServlet identifies the appropriate Controller method.
- Controller processes the request and prepares data.
- Data is added to the Model object.
- Controller returns a logical view name.
- ViewResolver resolves the view name to a JSP page.
- JSP page is rendered and returned to the browser.
Steps to Implement GET Request in Spring MVC
In this example, we will create a simple Spring MVC application that handles a GET request and displays user information on a JSP page.
Step 1: Create a Maven Project
- Open STS IDE.
- Click File - New - Maven Project
- Select Create a Simple Project and select Archetypes
- Click Next

Enter the following details:
- Group Id: com.gfg
- Artifact Id: SpringMVCGetRequest
- Packaging: war
Click Finish.
Step 2: Add Required Dependencies
Add Spring MVC, Servlet API, and JSTL dependencies to the pom.xml file.
<dependencies>

    <dependency>
        <groupId>org.springframework</groupId>
        <artifactId>spring-webmvc</artifactId>
        <version>5.3.18</version>
    </dependency>

    <dependency>
        <groupId>javax.servlet</groupId>
        <artifactId>javax.servlet-api</artifactId>
        <version>4.0.1</version>
        <scope>provided</scope>
    </dependency>

    <dependency>
        <groupId>jstl</groupId>
        <artifactId>jstl</artifactId>
        <version>1.2</version>
    </dependency>

</dependencies>
Step 3: Create Model Class
Creates a simple Java Bean to store user information.
package com.gfg.model;

public class User {

    private String name;
    private String email;

    public User() {
    }

    public User(String name, String email) {
        this.name = name;
        this.email = email;
    }

    public String getName() {
        return name;
    }

    public void setName(String name) {
        this.name = name;
    }

    public String getEmail() {
        return email;
    }

    public void setEmail(String email) {
        this.email = email;
    }
}
Step 4: Configure DispatcherServlet
Registers and initializes the Spring MVC DispatcherServlet.
package com.gfg.config;

import org.springframework.web.servlet.support.
AbstractAnnotationConfigDispatcherServletInitializer;

public class AppInitializer
        extends AbstractAnnotationConfigDispatcherServletInitializer {

    @Override
    protected Class<?>[] getRootConfigClasses() {
        return null;
    }

    @Override
    protected Class<?>[] getServletConfigClasses() {
        return new Class[] { AppConfig.class };
    }

    @Override
    protected String[] getServletMappings() {
        return new String[] { "/" };
    }
}
Step 5: Create Spring Configuration Class
Enables Spring MVC and configures the View Resolver.
package com.gfg.config;

import org.springframework.context.annotation.Bean;
import org.springframework.context.annotation.ComponentScan;
import org.springframework.context.annotation.Configuration;
import org.springframework.web.servlet.config.annotation.EnableWebMvc;
import org.springframework.web.servlet.view.InternalResourceViewResolver;

@Configuration
@EnableWebMvc
@ComponentScan(basePackages = "com.gfg.controller")
public class AppConfig {

    @Bean
    public InternalResourceViewResolver viewResolver() {

        InternalResourceViewResolver resolver =
                new InternalResourceViewResolver();

        resolver.setPrefix("/WEB-INF/views/");
        resolver.setSuffix(".jsp");

        return resolver;
    }
}
Step 6: Create Controller
Handles GET requests and sends data to the JSP page using Model.
package com.gfg.controller;

import org.springframework.stereotype.Controller;
import org.springframework.ui.Model;
import org.springframework.web.bind.annotation.GetMapping;

import com.gfg.model.User;

@Controller
public class UserController {

    @GetMapping("/user")
    public String getUser(Model model) {

        User user =
                new User(
                        "Ravi Kumar",
                        "ravi@gmail.com");

        model.addAttribute("user", user);

        return "user-details";
    }
}
Step 7: Create JSP Page
Displays the data received from the Controller.
<html>
<head>
<title>User Details</title>
</head>
<body>

<h2>User Information</h2>

Name : ${user.name}

<br><br>

Email : ${user.email}

</body>
</html>
Step 8: Run the Application
- Right Click Project
- Run As - Run on Server
- Select Apache Tomcat
- Click Finish
Open the following URL:
http://localhost:8080/SpringMVCGetRequest/user
Output:
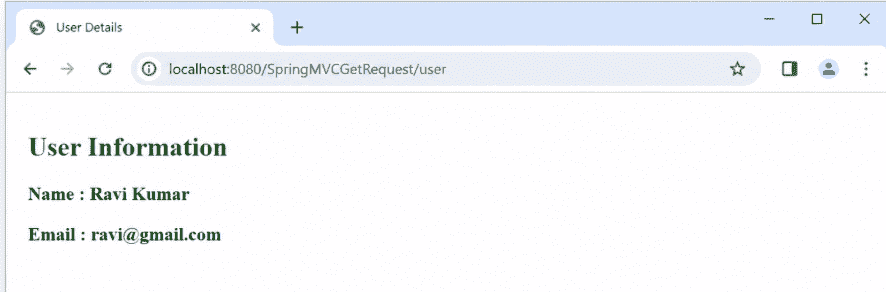
Explanation: When the user accesses the /user URL, a GET request is sent to the Spring MVC application. The DispatcherServlet forwards the request to the appropriate controller method, which prepares the user data and stores it in the Model object. The controller then returns a view name, and the ViewResolver renders the JSP page with the user information displayed in the browser.
