
Spring is a lightweight and widely used Java framework that helps developers build scalable and enterprise-level web applications. It simplifies development by providing built-in support for dependency management, MVC architecture, and web request handling.
- Reduces complexity in Java web application development.
- Provides built-in support for MVC, dependency injection, and modular design.
- Improves productivity compared to traditional technologies like JDBC, JSP, and Servlets.
Multi-Action Controller
A Multi-Action Controller in Spring allows a single controller class to handle multiple types of HTTP requests using different methods, making the application more organized and efficient.
- One controller class can handle multiple URL mappings.
- Each method inside the controller responds to a different request type.
- Helps in reducing the number of controller classes and improves code structure.
Note: We are going to use Spring Tool Suite 4 IDE for this project. Please refer to this article to install STS in your local machine How to Download and Install Spring Tool Suite (Spring Tools 4 for Eclipse) IDE?
Prerequisites
- Eclipse (EE version)/STS IDE
- Spring JAR Files
- Tomcat Apache latest version
Steps To Implements Multi Action Controller
Follow these steps to configure Spring MVC XML with base package scanning with Multi Action Controller.
Step 1: Create Dynamic Web Project
- Open Eclipse or Spring Tool Suite (STS) IDE
- Go to File > New > Other
- Search and select Dynamic Web Project -> Click Next -> Fill Project Details -> Finish
Step 2: Add Spring Libraries
Download the spring JARs file and go to the src > main > webapp > WEB-INF > lib folder and paste these JAR files.
Step 3: Configure Apache Tomcat
Read the article Configuration of Apache Tomcat Server and configure the tomcat server with your application. Now we are ready to go.
Step 4: Configuring Dispatcher Servlet
- Configure the DispatcherServlet in web.xml to handle all incoming requests and act as the front controller in the Spring MVC application.
- Go to the src > main > webapp > WEB-INF > web.xml file and the complete code for web.xml file
<web-app>
<servlet>
<servlet-name>dispatcher</servlet-name>
<servlet-class>org.springframework.web.servlet.DispatcherServlet</servlet-class>
</servlet>
<servlet-mapping>
<servlet-name>dispatcher</servlet-name>
<url-pattern>/</url-pattern>
</servlet-mapping>
</web-app>
Step 5: Create Spring Configuration File
- Now go to the src > main > webapp > WEB-INF and create an XML file.
- Actually, this is a Spring Configuration file like beans.xml file. And the name of the file must be in this format
<?xml version="1.0" encoding="UTF-8"?>
<beans xmlns="http://www.springframework.org/schema/beans" xmlns:xsi="http://www.w3.org/2001/XMLSchema-instance" xmlns:context="http://www.springframework.org/schema/context" xmlns:mvc="http://www.springframework.org/schema/mvc"
xsi:schemaLocation="
http://www.springframework.org/schema/beans https://www.springframework.org/schema/beans/spring-beans.xsd http://www.springframework.org/schema/context https://www.springframework.org/schema/context/spring-context.xsd http://www.springframework.org/schema/mvc
https://www.springframework.org/schema/mvc/spring-mvc.xsd"><!-- Enable annotation-based configuration -->
<mvc:annotation-driven/><!-- Base package for component scanning -->
<context:component-scan base-package="base package Name"></context:component-scan>
</beans>
Step 6: Create Controller Class
- The controller class in Spring MVC is responsible for handling incoming HTTP requests and returning appropriate responses.
- It acts as an intermediary between the user request and the business logic of the application.
package com.student.controllers;

// Importing required classes
import org.springframework.stereotype.Controller;
import org.springframework.web.bind.annotation.RequestMapping;
import org.springframework.web.bind.annotation.ResponseBody;

// Annotation
@Controller

// Class
public class DemoController {

    @ResponseBody
    @RequestMapping("/hello")

    public String helloWorld()
    {
        return "Hello World!";
    }

    @ResponseBody
    @RequestMapping("/geeksforgeeks")

    public String welcomeGfgMessage()
    {
        return "Welcome to GeeksforGeeks";
    }

    @ResponseBody
    @RequestMapping("/happycoding")

    public String happyCodingMesage()
    {
        return "Happy Coding Guyz!";
    }
}
Step 7: Enable Component Scanning
Add the below line inside the frontcontroller-dispatcher-servlet.xml file before running your application.
<context:component-scan base-package="com.student.controllers"></context:component-scan>
Step 8: Run Your Application
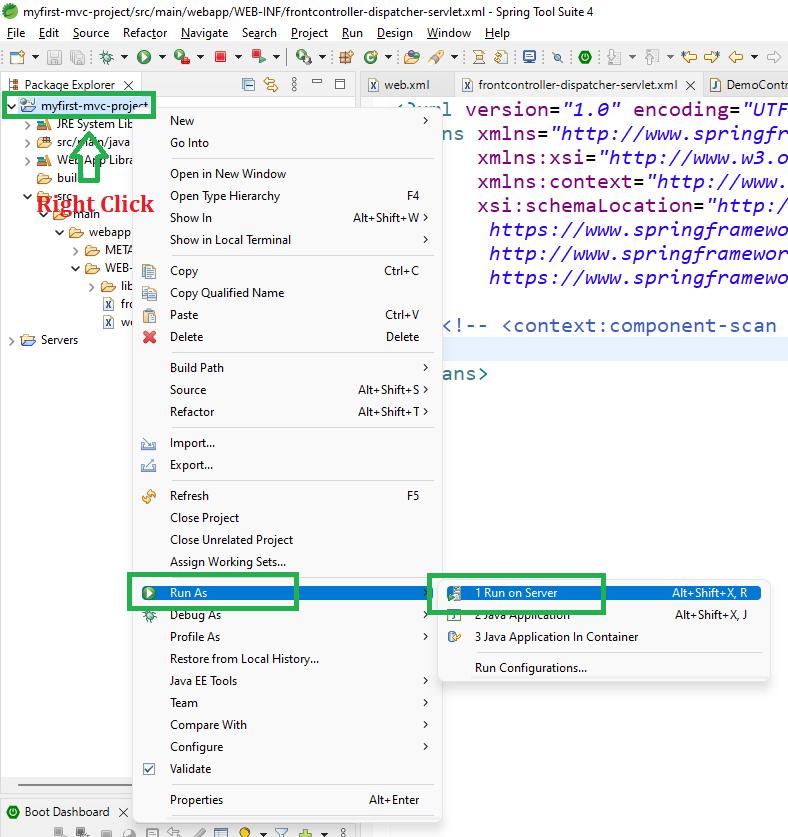
To run your Spring MVC Application right-click on your project > Run As > Run on Server and run your application as shown in the below image as follows:
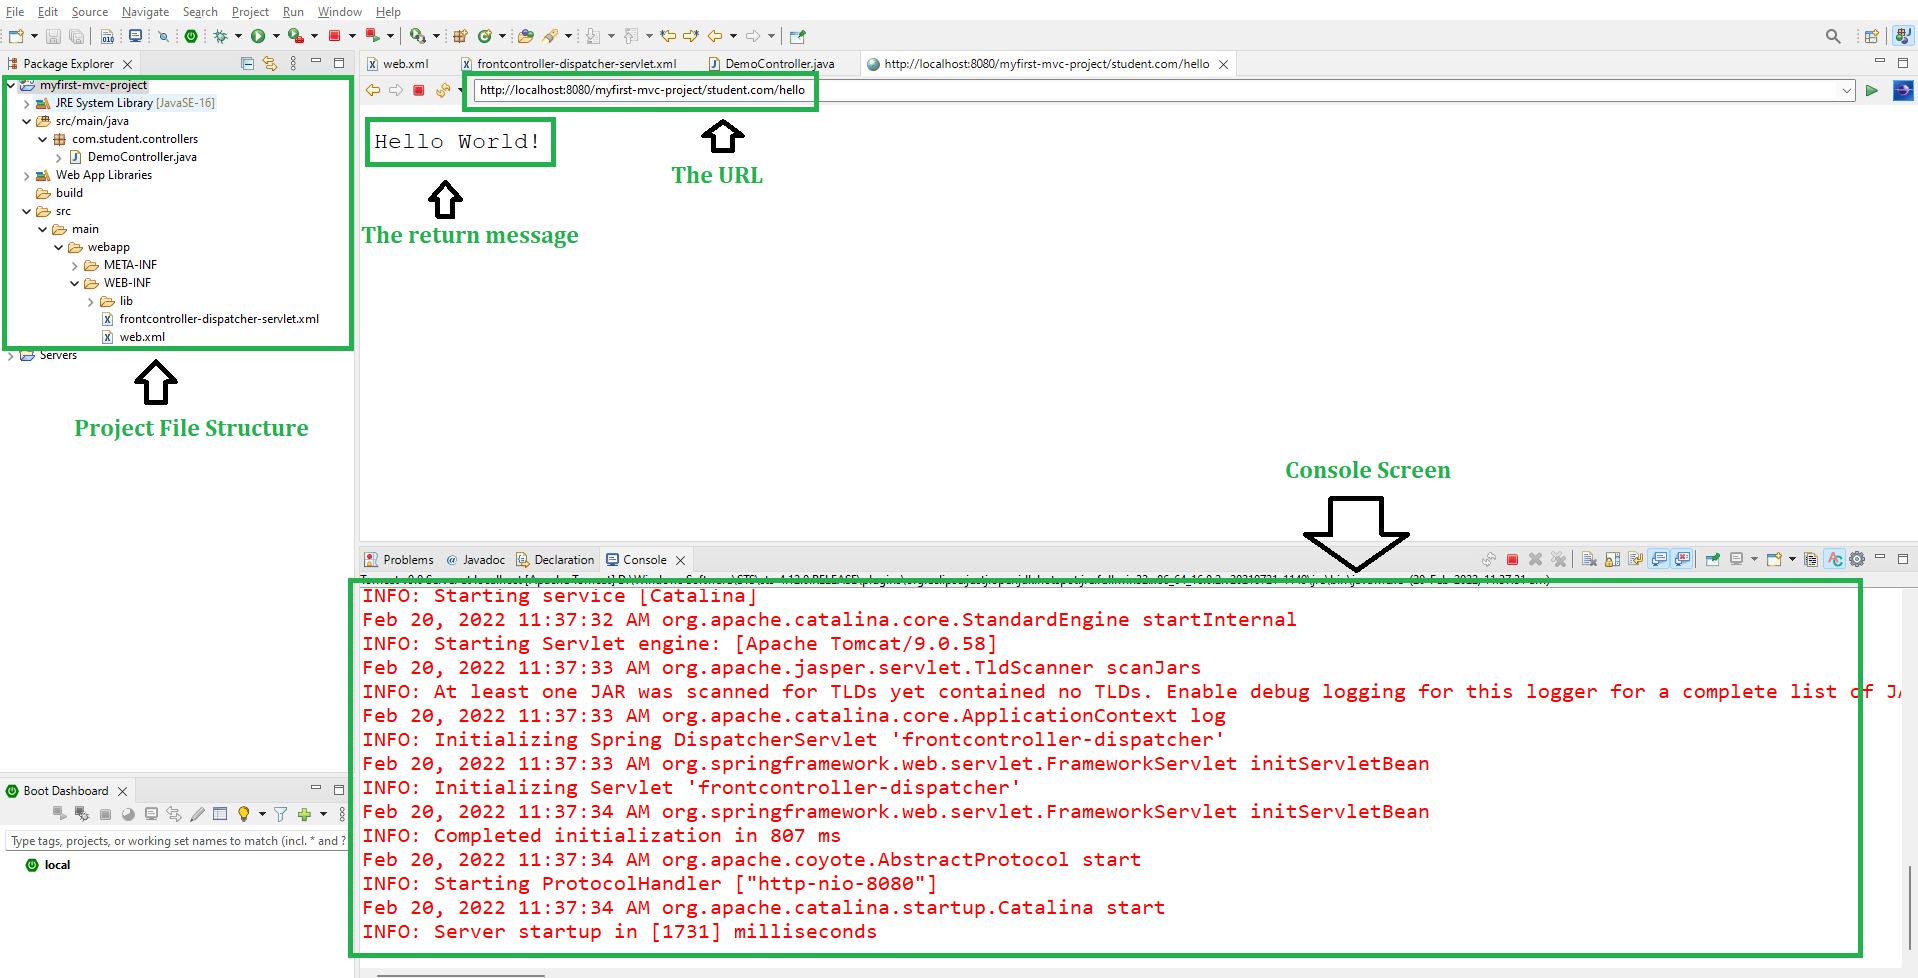
After that use the following URL to run your controller as shown in the below image. All other details are mentioned in the image.
Output:
To run the '/hello' request hit the following URL
http://localhost:8080/myfirst-mvc-project/student.com/hello
Similarly, to run the '/geeksforgeeks' request hit the following URL:
http://localhost:8080/myfirst-mvc-project/student.com/geeksforgeeks
Output on the Browser:
Welcome to GeeksforGeeks
To run our Last Controller '/happycoding' request hit the following URL as follows:
http://localhost:8080/myfirst-mvc-project/student.com/happycoding
Output on the Browser:
Happy Coding Guyz!
