

In-Memory Authentication is a simple authentication mechanism provided by Spring Security where user credentials (username, password, and roles) are stored directly in the application's memory. It is commonly used for learning, testing, and small applications where a database is not required.
- No database configuration is required.
- Supports multiple users and roles.
- Implemented using inMemoryAuthentication() method.
Login page of simple authentication of Spring Security:

Password:

In-Memory Authentication in Spring Security
- Spring Security generates a random password by default, which can be difficult to remember.
- For applications with multiple users and different roles, In-Memory Authentication allows you to define usernames, passwords, and roles directly in the application configuration.
- User details are stored in the application's memory and remain available only while the server is running.
- When the server stops, all stored credentials are lost, making it suitable mainly for development and testing purposes.
- The inMemoryAuthentication() method of AuthenticationManagerBuilder is used to create and manage users with their respective roles and passwords in memory.
Step-by-Step Implementation
Step 1: Create a Spring Boot Project
Create a Spring Boot project with the following configuration:
Project Configuration
- Project: Maven
- Language: Java
- Packaging: JAR
- Java Version: 8
Dependencies
- Spring Web
- Spring Security

Step 2: Import the Project
Extract the downloaded project and import it into your preferred IDE.
Project Structure:

Extract the zip file. Now open a suitable IDE and then go to File > New > Project from existing sources > Spring-boot-app and select pom.xml. Click on import changes on prompt and wait for the project to sync as pictorially depicted below as follows:
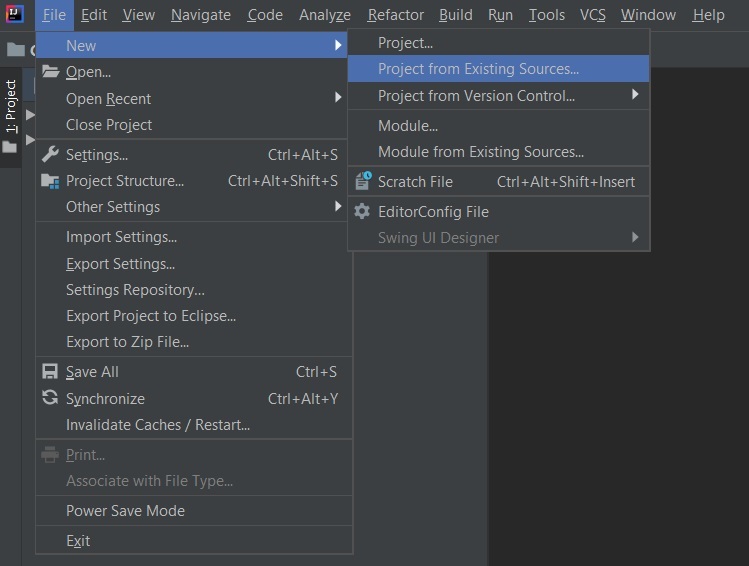
Note: In the Import Project for Maven window, make sure you choose the same version of JDK which you selected while creating the project.
Step 3: Create Controller Class
Create a controller to handle incoming requests.
- @RestController marks the class as a REST controller.
- @GetMapping("/delete") maps the /delete URL to the method.
controller.java
@RestController
public class controller {

    @GetMapping("/delete") public String delete()
    {
        return "This is the delete request";
    }
}
The above java file is used to set the controller for handling the incoming request from the client side. Now we have to configure the request for that we will use the config.java file.
Step 4: Create Security Configuration Class
Create a class config.java. This config file is extending the WebSecurityConfigureAdapter class and we override two methods configure(AuthenticationManagerBuilder auth) and configure(HttpSecurity Http) both methods are used for handling the multiple authentications on the Spring application.
- The first method is used for adding the credentials of the users with respective roles in the inMemory of SpringApplication.
- The second method is used for handling the user-defined API in the Spring application.
package com.example.SpringBootApp;

import org.springframework.context.annotation.Bean;
import org.springframework.security.config.annotation.authentication.builders.AuthenticationManagerBuilder;
import org.springframework.security.config.annotation.web.builders.HttpSecurity;
import org.springframework.security.config.annotation.web.configuration.EnableWebSecurity;
import org.springframework.security.config.annotation.web.configuration.WebSecurityConfigurerAdapter;
import org.springframework.security.crypto.password.NoOpPasswordEncoder;
import org.springframework.security.crypto.password.PasswordEncoder;

@EnableWebSecurity
public class config extends WebSecurityConfigurerAdapter {

    // Adding the roles
    @Override
    protected void configure(AuthenticationManagerBuilder auth) throws Exception {
        auth.inMemoryAuthentication()
                .withUser("Zack")
                .password("aayush")
                .roles("admin_role")
                .and()
                .withUser("GFG")
                .password("Helloword")
                .roles("student");
    }

    // Configuring the api
    // according to the roles.
    @Override
    protected void configure(HttpSecurity http) throws Exception {
        http.
                httpBasic()
                .and()
                .authorizeRequests()
                .antMatchers("/delete").hasRole("admin_role")
                .antMatchers("/details").hasAnyRole("admin_role","student")
                .and()
                .formLogin();
    }

    // Function to encode the password
    // assign to the particular roles.
    @Bean
    public PasswordEncoder getPasswordEncoder(){
        return NoOpPasswordEncoder.getInstance();
    }
}
Step 7: Run the Spring Boot Application
Start the application by running the main class.
package com.example.SpringBootApp;

import org.springframework.boot.SpringApplication;
import org.springframework.boot.autoconfigure.SpringBootApplication;

@SpringBootApplication
public class SpringBootAppApplication {

    public static void main(String[] args) {
        SpringApplication.run(SpringBootAppApplication.class, args);
    }
}

Note: There is no default password is generated because we have already used external configuration for handling the user credentials.
Testing the API in Postman
Go to the postman and type localhost:8080/delete
Using the admin roles:

Using the student role: Try to access the details API using the student role's user name and password.

Advantages of In-Memory Authentication
- Easy to configure.
- No database required.
- Fast authentication process.
- Suitable for testing and development.
- Supports multiple users and roles.
- Minimal setup effort.
