



 本文介绍了在Excel中如何使合并的单元格行高自适应文本内容变化。通常,合并单元格会导致行高需要手动调整,但通过添加特定的事件代码到工作表,可以实现合并单元格行高的自动调整。当文本内容改变时,行高会自动调整以适应内容,避免了因忘记调整行高而隐藏关键信息的问题。代码基于Excel MVP Jim Rech的旧示例,通过 Worksheet_Change 事件检查 OrderNote 范围内的变化,并相应地调整行高。
合并单元格如何自适应行高
autofit
You've most likely heard this warning -- "Avoid merged cells in your Excel worksheets!", and that is excellent advice. Merged cells can cause problems, especially when they're in a table that you'll be sorting and filtering. You'll run into more problems if you try to autofit merged cell row height.
您最有可能听到此警告-“避免在Excel工作表中合并单元格!”,这是极好的建议。 合并的单元格可能会导致问题,尤其是当它们位于要进行排序和过滤的表中时。 如果尝试自动调整合并单元格的行高,则会遇到更多问题。
被迫合并 (Forced to Merge)
Occasionally though, you might have no choice but to use one or more merged cells on a worksheet. As long as you avoid merging table cells, and proceed with caution, things might be okay.
但是,有时您可能别无选择,只能在工作表上使用一个或多个合并的单元格。 只要您避免合并表格单元格并谨慎行事,事情就可能会好的。
In the example shown below, there is an order form, and space for a note about the order. If the note will always be short, there's no need to merge the cells – just let the text flow across the columns.
在下面显示的示例中,有一个订购单,并在其中留有关于订单的备注。 如果注释始终很短,则无需合并单元格–只需让文本跨列流动即可。
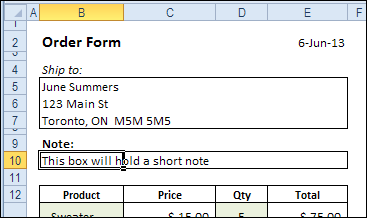
However, if the notes will be two or more lines, you'll need to merge the cells, and turn on Wrap Text. Adjusting the column width would affect the product list that starts in row 12, so that's not an option.
但是,如果注释为两行或更多行,则需要合并单元格,然后启用“自动换行”。 调整列宽会影响从第12行开始的产品列表,因此这不是一种选择。
合并单元格行高 (Merged Cell Row Height)
Usually, if you add more text to a single cell, and Wrap Text is turned on, the row height automatically adjusts, to fit the text.
通常,如果将更多文本添加到单个单元格,并且“环绕文本”处于打开状态,则行高会自动调整以适合文本。
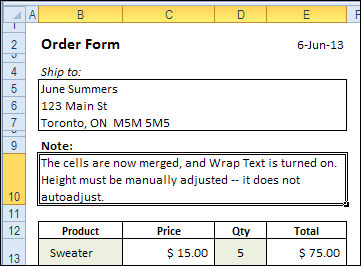
When the cells are merged in row 10, the row height has to be manually adjusted when the text changes. That works well, as long as you remember to do it, but it can be a nuisance, if the text changes frequently.
在第10行中合并单元格时,在更改文本时必须手动调整行高。 只要您记得这样做就可以很好地工作,但是如果文本经常更改,可能会很麻烦。
And if you forget to adjust the row height, you might print the order form, while key instructions are hidden.
而且,如果您忘记调整行高,则可以在隐藏关键说明的情况下打印订单。
AutoFit合并的单元格行高 (AutoFit Merged Cell Row Height)
To fix the worksheet, so the merged cells adjust automatically, you can add event code to the worksheet.
要修复工作表,以便合并的单元格自动调整,您可以将事件代码添加到工作表中。
[Update: The original code is below, and there are several modified versions of the code in the comments. There is also an updated version of Smallman's code in this December 2015 blog post.]
[ 更新 :原始代码在下面,并且注释中有多个代码的修改版本。 2015年12月的博客文章中还提供了Smallman代码的更新版本 。]
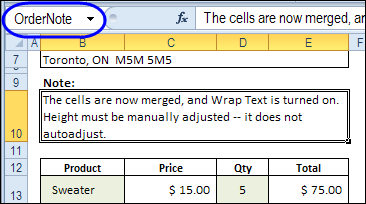
The merged cells are named OrderNote, and that name will be referenced in the event code.
合并的单元格命名为 OrderNote,并且该名称将在事件代码中引用。
自动调整合并的单元格行高的代码 (Code to AutoFit Merged Cell Row Height)
We want the row height to adjust if the OrderNote range is changed, so we'll add code to the Worksheet_Change event.
如果希望更改OrderNote范围,我们希望调整行高,因此我们将代码添加到Worksheet_Change事件中。
The code that I use is based on an old Excel newsgroup example, that was posted by Excel MVP, Jim Rech.
我使用的代码基于Excel MVP Jim Rech发布的旧Excel新闻组示例。
Note: As Jeff Weir pointed out in the comments below, this code will wipe out the Undo stack, so you won't be able to undo any steps you've previously taken. So, instead of using the Worksheet_Change event, you could use the workbook's BeforePrint event, to reduce the Undo problem.
注意:正如Jeff Weir在下面的注释中指出的那样,此代码将清除“撤消”堆栈,因此您将无法撤消以前执行的任何步骤。 因此,代替使用Worksheet_Change事件,可以使用工作簿的BeforePrint事件来减少撤消问题。
- Right-click on the sheet tab, and paste the following code on the worksheet module. Note: Only one Worksheet_Change event is allowed in each worksheet module. 右键单击工作表选项卡,然后将以下代码粘贴到工作表模块上。 注意:每个工作表模块中仅允许一个Worksheet_Change事件。
- Change the range name from "OrderNote", to the named range on your worksheet. 将范围名称从“ OrderNote”更改为工作表上的命名范围。
- If your worksheet is protected, you can add code to unprotect and protect the worksheet. 如果您的工作表受到保护,则可以添加代码以取消保护并保护工作表。
Private Sub Worksheet_Change(ByVal Target As Range)
Dim MergeWidth As Single
Dim cM As Range
Dim AutoFitRng As Range
Dim CWidth As Double
Dim NewRowHt As Double
Dim str01 As String
str01 = "OrderNote"
  If Not Intersect(Target, Range(str01)) Is Nothing Then
    Application.ScreenUpdating = False
    On Error Resume Next
    Set AutoFitRng = Range(Range(str01).MergeArea.Address)
    With AutoFitRng
      .MergeCells = False
      CWidth = .Cells(1).ColumnWidth
      MergeWidth = 0
      For Each cM In AutoFitRng
          cM.WrapText = True
          MergeWidth = cM.ColumnWidth + MergeWidth
      Next
      'small adjustment to temporary width
      MergeWidth = MergeWidth + AutoFitRng.Cells.Count * 0.66
      .Cells(1).ColumnWidth = MergeWidth
      .EntireRow.AutoFit
      NewRowHt = .RowHeight
      .Cells(1).ColumnWidth = CWidth
      .MergeCells = True
      .RowHeight = NewRowHt
    End With
    Application.ScreenUpdating = True
  End If
End Sub
这个怎么运作 (How It Works)
The event code checks to see if the changed cell is in the OrderNote range. If it is, the code runs, and does the following:
事件代码检查以查看更改后的单元格是否在OrderNote范围内。 如果是这样,代码将运行,并执行以下操作:
- Unmerge the cells 取消细胞
- Get the width of the first column in the OrderNote range 获取OrderNote范围内第一列的宽度
- Get the total width for all columns in the OrderNote range 获取OrderNote范围内所有列的总宽度
- Add a little extra to the calculated width 在计算出的宽度上添加一些额外的内容
- Set the first column to the calculated total width 将第一列设置为计算出的总宽度
- Autofit the row, based on the note next in the first column 根据第一列中的下一个注释自动调整行
- Get the new row height 获取新行高度
- Change the first column to its original width 将第一列更改为其原始宽度
- Merge the cells 合并细胞
- Set the row height to the new height 将行高度设置为新高度
Screen updating is turned off while the code runs, and it all happens in the blink of an eye.
在代码运行时,屏幕更新被关闭,所有这些操作都在眨眼之间发生。
测试事件代码 (Test the Event Code)
To test the code, make a change to the text in the named merged cells, then press Enter. The row height should adjust automatically.
要测试代码,请对命名的合并单元格中的文本进行更改,然后按Enter。 行高应自动调整。
Is this code, to AutoFit merged cell row height, something that you'll use in your workbooks? Please let me know in the comments. __________________
这段代码是否要用于AutoFit合并的单元格行高,是您将在工作簿中使用的代码? 请在评论中让我知道。 __________________
翻译自: https://contexturesblog.com/archives/2012/06/07/autofit-merged-cell-row-height/
autofit





 扫一扫
扫一扫


 被折叠的 条评论
为什么被折叠?
被折叠的 条评论
为什么被折叠?
 到【灌水乐园】发言





