


序论
BEV系列的感知算法是指在BEV上进行预测分割,这样对于下游任务更加友好,而BEV算法类别之间最大的区别就是在图像特征到BEV转换这一块(img2bev),根据这一块不同,我们将算法分为三类:
第一类显示转换:根据像素坐标以及模型预测的像素深度分布得到(x,y,z),然后通过相机内外参转换到BEV上得到BEV下的(X,Y,Z)
第二类隐式转换:首先根据BEV上的分辨率进行位置编码同时加上lidar特征,然后让其作为transformer里的Q查询向量往图像特征,图像位置编码和内外参编码组成的KV里面查询,经过交叉注意力机制最终输出查询后得到的BEV特征。
第三类显示逆向转换:显式转换是将图像向BEV转,那我直接先指定好BEV空间的体素位置,根据体素的位置(X,Y,Z)这样根据内外参可以查询得到像素空间的(x,y,z)直接把对应的像素特征赋给BEV的体素。
一、显示转换的BEV感知
1.LSS
论文链接:https://arxiv.org/pdf/2008.05711.pdf
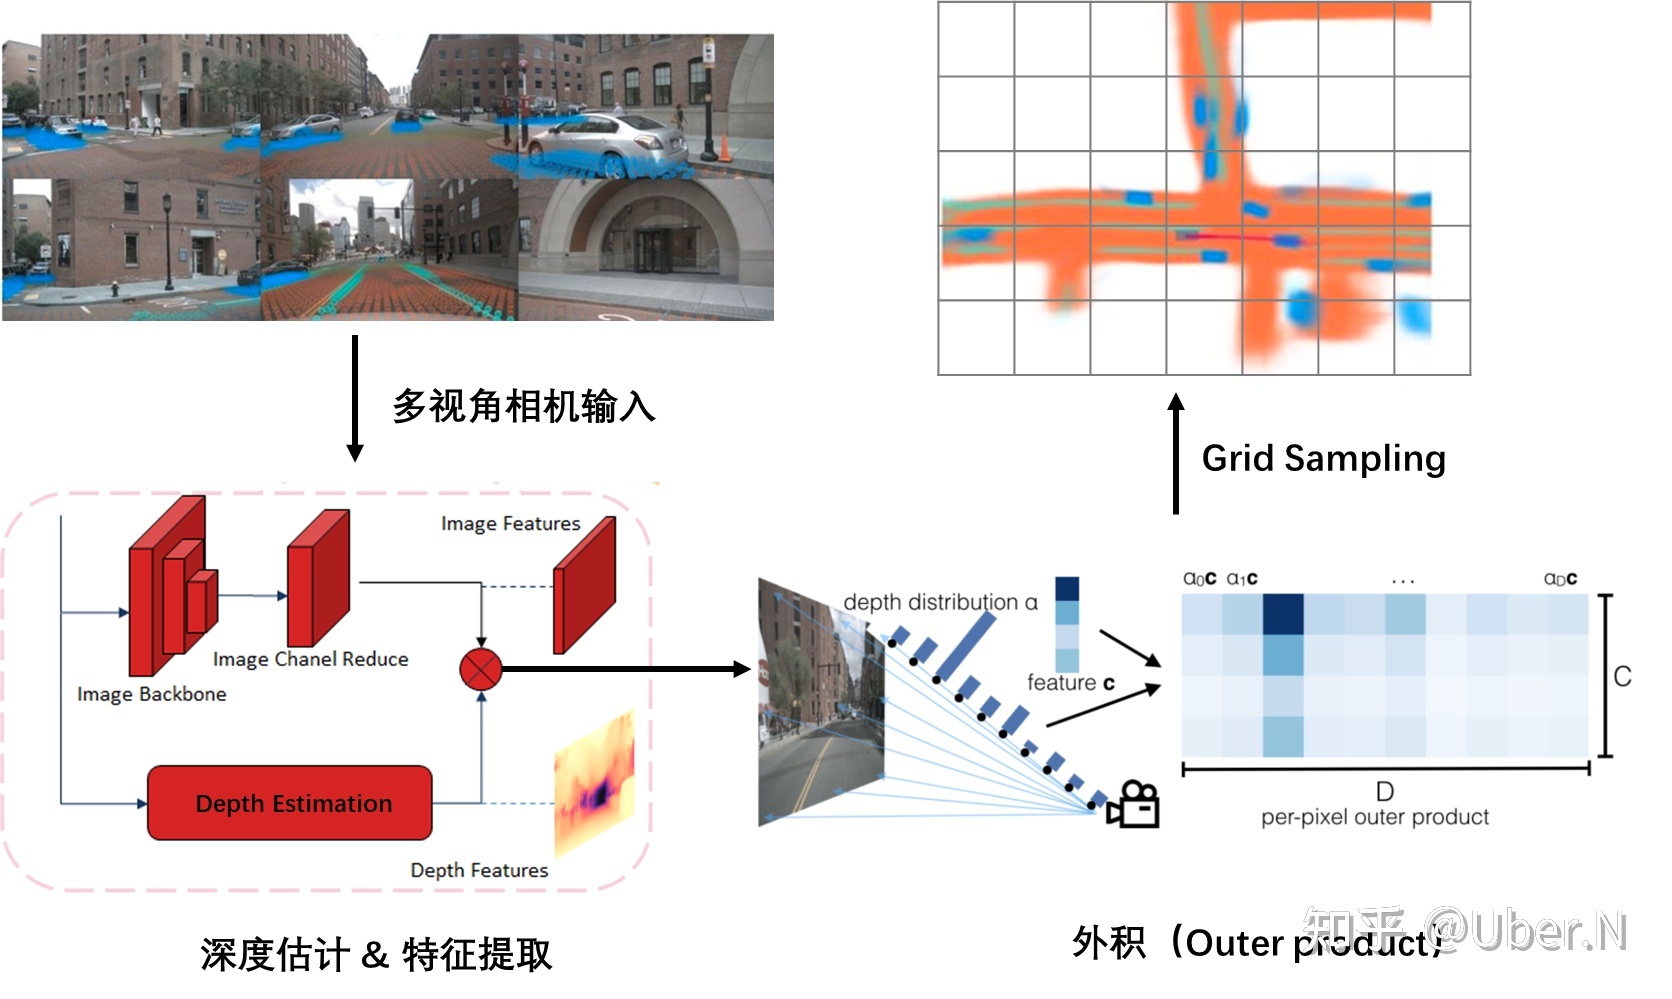
概述:LSS的思想是对每个像素预测一个D维的深度分布,然后HWD与HWC外积,得到一个HWDC的特征,给定一个hwd,我们根据相机内外参可以将其转化到BEV空间里的一个XYZ,这样把所有像素空间的HWD都转到BEV,最终按照体素pooling池化一下,就得到了BEV特征
优点:实现了相机特征到BEV特征的转换
缺点:极度的依赖depth预测的准确性,同时矩阵外积过于耗时,要想在depth维度有较高的精度,HWD计算量特别大。
A:Lift操作
LSS中的L表示lift,升维的意思,表示把H*W*C的图像特征升维到H*W*D*C,D表示在每个像素点都预测了一个D维的深度信息,比如D是50维,相当于这个像素点在0-50m里出现的概率。D的一个维度表示在这一米出现的概率。
第一步:get_geometry(得到特征图与3D空间的索引对应)
torch.arange生成D的列表,view加expand变成(D,H,W)的维度
torch.linespace生成特征图长宽HW的列表分布,里面的值是像素坐标,同样view+expand变为(D,H,W),然后用torch.stack将这三个在-1维度拼接。得到(D,H,W,3)的矩阵,相当于给定一个D,H,W的特征点,我们可以得到三维的像素坐标表示,这个像素坐标需要转换到真实车身坐标系。
将图像数据增强进行抵消,同时根据相机内外参矩阵与上面的相乘,得到(D,H,W,3)这个3表示的就是车身坐标系的3D位置。此时我们就可以根据一个D,H,W索引的特征点,得到其在真实空间的位置。这一步是接下来投影的关键。
第二步:get_cam_feats(得到相机的D,H,W型feature)
图像经过骨干网络处理之后,用一个1*1的卷积,将channel变为D+C,在channel维度选取前D维,进行softmax操作,相当于说这个H,W的特征点在D的深度上的分布概率。将(N,1,D)和(N,C,1)做乘法,相当于矩阵外积,得到(N,C,D)的张量,N表示的是H*W,所以我们就得到了(D,H,W,C)的图像特征。
B:Splat操作
splat表示拍平的意思,上一步我们得到了像素空间与真实3D空间的坐标索引,同时也得到了(D,H,W,C)的图像特征高维表示。这一步就是把特征转换到BEV空间中,并拍平为2D,相当于pointpillar的操作。
第一步:预处理操作
传进来的就是geom_feats维度为(D,H,W,3)和X图像高维特征(D,H,W,C),首先geom_feats里3这个维度,里面的值是车身坐标系的3D位置,有正有负,我们先把他变为从0开始的长整形分布,比如x是0-100m,y是0-60m,z是0-5m这样,全为正的表示,相当于做个平移。然后view成(Nprime,3),然后循环batch,用torch.cat以及torch.full生成一个(Nprime,1)的batch索引,再和geom_feats用torch.cat一下,得到新的geom_feats维度为(Nprime,4),里面是真实空间的xyzb,然后用xyz的范围进行过滤一下。
第二步:拍平操作
得到维度为(Nprime,4)的geom_feats,这里说的也不准确,因为过滤了范围外的,第一维度就不再是Nprime,大家理解就行。然后根据BEV分辨率对geom_feats进行排序,geom_feats[:,0]*Y*Z*B+geom_feats[:,1]*Z*B+geom_feats[:,2]*B+geom_feats[:,3],然后argsort排序,对X以及geom_feats进行排序。X维度为(Nprime,C),对其进行cumsum操作,也叫前缀和操作,然后找到网格变化的节点,用当前变化节点减去前面的变化节点,就是中间这个网格的和,起到了一个sum_pooling操作,最后根据geom_feats的索引,把X放入到(B,C,Z,X,Y)里面,再把Z用unbind和cat操作压缩即可。
代码分析
"""
Copyright (C) 2020 NVIDIA Corporation.  All rights reserved.
Licensed under the NVIDIA Source Code License. See LICENSE at https://github.com/nv-tlabs/lift-splat-shoot.
Authors: Jonah Philion and Sanja Fidler
"""

import torch
from torch import nn
from efficientnet_pytorch import EfficientNet
from torchvision.models.resnet import resnet18

from .tools import gen_dx_bx, cumsum_trick, QuickCumsum


class Up(nn.Module):
    def __init__(self, in_channels, out_channels, scale_factor=2):
        super().__init__()

        self.up = nn.Upsample(scale_factor=scale_factor, mode='bilinear',
                              align_corners=True)

        self.conv = nn.Sequential(
            nn.Conv2d(in_channels, out_channels, kernel_size=3, padding=1, bias=False),
            nn.BatchNorm2d(out_channels),
            nn.ReLU(inplace=True),
            nn.Conv2d(out_channels, out_channels, kernel_size=3, padding=1, bias=False),
            nn.BatchNorm2d(out_channels),
            nn.ReLU(inplace=True)
        )

    def forward(self, x1, x2):
        x1 = self.up(x1)
        x1 = torch.cat([x2, x1], dim=1)
        return self.conv(x1)


class CamEncode(nn.Module):
    def __init__(self, D, C, downsample):
        super(CamEncode, self).__init__()
        self.D = D
        self.C = C

        self.trunk = EfficientNet.from_pretrained("efficientnet-b0")

        self.up1 = Up(320+112, 512)
        self.depthnet = nn.Conv2d(512, self.D + self.C, kernel_size=1, padding=0)

    def get_depth_dist(self, x, eps=1e-20):
        return x.softmax(dim=1)

    def get_depth_feat(self, x):
        x = self.get_eff_depth(x)
        # Depth
        x = self.depthnet(x) #得到(B*N, D+C, fH,fW)

        depth = self.get_depth_dist(x[:, :self.D]) #在深度维度进行softmax操作
        new_x = depth.unsqueeze(1) * x[:, self.D:(self.D + self.C)].unsqueeze(2) #(B*N,1,D,fH,fW) *(B*N,C,1,fH,fW)

        return depth, new_x #返回维度为 (B*N,C,D,fH,fW)

    def get_eff_depth(self, x):
        # adapted from https://github.com/lukemelas/EfficientNet-PyTorch/blob/master/efficientnet_pytorch/model.py#L231
        endpoints = dict()

        # Stem
        x = self.trunk._swish(self.trunk._bn0(self.trunk._conv_stem(x)))
        prev_x = x

        # Blocks
        for idx, block in enumerate(self.trunk._blocks):
            drop_connect_rate = self.trunk._global_params.drop_connect_rate
            if drop_connect_rate:
                drop_connect_rate *= float(idx) / len(self.trunk._blocks) # scale drop connect_rate
            x = block(x, drop_connect_rate=drop_connect_rate)
            if prev_x.size(2) > x.size(2):
                endpoints['reduction_{}'.format(len(endpoints)+1)] = prev_x
            prev_x = x

        # Head
        endpoints['reduction_{}'.format(len(endpoints)+1)] = x
        x = self.up1(endpoints['reduction_5'], endpoints['reduction_4'])
        return x

    def forward(self, x):
        depth, x = self.get_depth_feat(x)

        return x


class BevEncode(nn.Module):
    def __init__(self, inC, outC):
        super(BevEncode, self).__init__()

        trunk = resnet18(pretrained=False, zero_init_residual=True)
        self.conv1 = nn.Conv2d(inC, 64, kernel_size=7, stride=2, padding=3,
                               bias=False)
        self.bn1 = trunk.bn1
        self.relu = trunk.relu

        self.layer1 = trunk.layer1
        self.layer2 = trunk.layer2
        self.layer3 = trunk.layer3

        self.up1 = Up(64+256, 256, scale_factor=4)
        self.up2 = nn.Sequential(
            nn.Upsample(scale_factor=2, mode='bilinear',
                              align_corners=True),
            nn.Conv2d(256, 128, kernel_size=3, padding=1, bias=False),
            nn.BatchNorm2d(128),
            nn.ReLU(inplace=True),
            nn.Conv2d(128, outC, kernel_size=1, padding=0),
        )

    def forward(self, x):
        x = self.conv1(x)
        x = self.bn1(x)
        x = self.relu(x)

        x1 = self.layer1(x)
        x = self.layer2(x1)
        x = self.layer3(x)

        x = self.up1(x, x1)
        x = self.up2(x)

        return x


def cumsum_trick(x, geom_feats, ranks):
    x = x.cumsum(0)  #(N,C) 0表示后面的行累加前面的行。
    kept = torch.ones(x.shape[0], device=x.device, dtype=torch.bool)
    kept[:-1] = (ranks[1:] != ranks[:-1])#当后面一位与前面的值不一样时,为1.相当于得到voxel变化时的边界点

    x, geom_feats = x[kept], geom_feats[kept] #得到变化时的特征和坐标映射
    x = torch.cat((x[:1], x[1:] - x[:-1]))#后面的减去前面的得到当前voxel的特征和。

    return x, geom_feats #此时得到每个voxel的特征和


class LiftSplatShoot(nn.Module):
    def __init__(self, grid_conf, data_aug_conf, outC):
        super(LiftSplatShoot, self).__init__()
        self.grid_conf = grid_conf
        self.data_aug_conf = data_aug_conf

        dx, bx, nx = gen_dx_bx(self.grid_conf['xbound'],
                                              self.grid_conf['ybound'],
                                              self.grid_conf['zbound'],
                                              )
        self.dx = nn.Parameter(dx, requires_grad=False)
        self.bx = nn.Parameter(bx, requires_grad=False)
        self.nx = nn.Parameter(nx, requires_grad=False)

        self.downsample = 16
        self.camC = 64
        self.frustum = self.create_frustum()
        self.D, _, _, _ = self.frustum.shape
        self.camencode = CamEncode(self.D, self.camC, self.downsample)
        self.bevencode = BevEncode(inC=self.camC, outC=outC)

        # toggle using QuickCumsum vs. autograd
        self.use_quickcumsum = True

    def create_frustum(self):
        # make grid in image plane
        ogfH, ogfW = self.data_aug_conf['final_dim']  #得到原始图片的分辨率
        fH, fW = ogfH // self.downsample, ogfW // self.downsample  #得到图片特征图上的分辨率
        #预设的深度范围,如4-45m,每隔1m取个点,得到ds维度 [D,fH,fW]
        ds = torch.arange(*self.grid_conf['dbound'], dtype=torch.float).view(-1, 1, 1).expand(-1, fH, fW)
        D, _, _ = ds.shape
        # 在原始分辨率上取fW个x,fH个y,他们的维度是[D,fH,fW]
        xs = torch.linspace(0, ogfW - 1, fW, dtype=torch.float).view(1, 1, fW).expand(D, fH, fW)
        ys = torch.linspace(0, ogfH - 1, fH, dtype=torch.float).view(1, fH, 1).expand(D, fH, fW)

        # D x H x W x 3
        frustum = torch.stack((xs, ys, ds), -1)
        return nn.Parameter(frustum, requires_grad=False)

    def get_geometry(self, rots, trans, intrins, post_rots, post_trans):
        """Determine the (x,y,z) locations (in the ego frame)
        of the points in the point cloud.
        Returns B x N x D x H/downsample x W/downsample x 3
        """
        B, N, _ = trans.shape

        # undo post-transformation
        # self.frustum是一个图像像素3D坐标,维度为B x N x D x H x W x 3,B是batch_size,N是相机个数。
        points = self.frustum - post_trans.view(B, N, 1, 1, 1, 3) #减去数据增强的平移矩阵
        points = torch.inverse(post_rots).view(B, N, 1, 1, 1, 3, 3).matmul(points.unsqueeze(-1)) #数据增强旋转矩阵的逆与像素3D坐标相乘

        # cam_to_ego 这一块看像素坐标系到车身坐标系的转换公式。λ(x,y,1) = .....
        points = torch.cat((points[:, :, :, :, :, :2] * points[:, :, :, :, :, 2:3],
                            points[:, :, :, :, :, 2:3]
                            ), 5)
        combine = rots.matmul(torch.inverse(intrins)) #外参旋转矩阵与内参矩阵的逆相乘
        points = combine.view(B, N, 1, 1, 1, 3, 3).matmul(points).squeeze(-1) #旋转矩阵与内参矩阵的逆与像素坐标相乘
        points += trans.view(B, N, 1, 1, 1, 3) #加上外参平移矩阵得到BEV车身坐标系下的xyz

        return points

    def get_cam_feats(self, x):
        """Return B x N x D x H/downsample x W/downsample x C
        """
        B, N, C, imH, imW = x.shape #得到原始图片

        x = x.view(B*N, C, imH, imW) #把batch_size和N个相机合并
        x = self.camencode(x) #先送入骨干,然后把特征维度变为D+C,前D维softmax,然后外积得到(B*N,C,D,fH,fW)
        x = x.view(B, N, self.camC, self.D, imH//self.downsample, imW//self.downsample)
        x = x.permute(0, 1, 3, 4, 5, 2)

        return x  #返回特征维度 [B,N,D,fH,fW,C]

    def voxel_pooling(self, geom_feats, x):
        B, N, D, H, W, C = x.shape
        Nprime = B*N*D*H*W

        # flatten x
        x = x.reshape(Nprime, C) #将所有的维度压缩在一起,除了C

        # B x N x D x H x W x 3将车身坐标系的坐标变为从000开始的
        geom_feats = ((geom_feats - (self.bx - self.dx/2.)) / self.dx).long()
        geom_feats = geom_feats.view(Nprime, 3)
        #得到[Nprime,1]的batch_idx下标。
        batch_ix = torch.cat([torch.full([Nprime//B, 1], ix,
                             device=x.device, dtype=torch.long) for ix in range(B)])
        #得到(Nprime, 4)里面4维是三维的BEV坐标和一个batch_idx
        geom_feats = torch.cat((geom_feats, batch_ix), 1)

        # 过滤掉不在BEV范围里的下标。
        kept = (geom_feats[:, 0] >= 0) & (geom_feats[:, 0] < self.nx[0])\
            & (geom_feats[:, 1] >= 0) & (geom_feats[:, 1] < self.nx[1])\
            & (geom_feats[:, 2] >= 0)

 8895


 扫一扫


 被折叠的 条评论
为什么被折叠?
 到【灌水乐园】发言


