



 本文介绍如何通过自定义ScrollLayout实现界面间的滑动切换效果。文章详细讲解了自定义ViewGroup的过程,包括重写onLayout和onMeasure方法,并提供了一种使用自定义GridView的实现方案。
参考的一篇文章 :http://my.oschina.net/sfshine/blog/151673
先看一下做出来的效果图
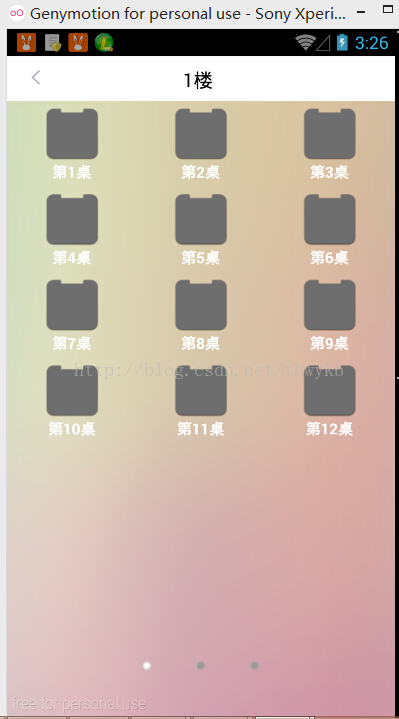
可以滑动切换界面 ,这就要用到了自定义的ScrollLayout了,听说每个安卓程序员都要学会自定义ScrollView,好吧,今天我就边学边用。
可以这样理解,要做出滑动的效果,必须定义一个大于屏幕宽度的Layout,然后通过划动,在屏幕显示形成切换效果。
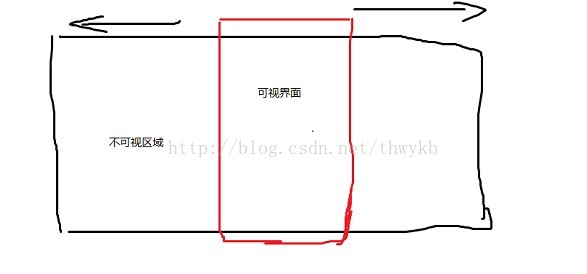
之前也有用过ViewPage+Fragment也可以达成这样的效果,不过两者区别较大。
自定义ScrollLayout,继承ViewGroup,主要是重写onLayout() 和 onMeasure()方法。
package com.lin.helper;


import android.R.integer;
import android.content.Context;
import android.util.AttributeSet;
import android.util.Log;
import android.view.MotionEvent;
import android.view.VelocityTracker;
import android.view.View;

import android.view.ViewGroup;
import android.widget.Scroller;

public class MyScrollLayout extends ViewGroup {

	private VelocityTracker mVelocityTracker;//判断甩手姿势
	private static final int SNAP_VELOCITY = 600; //定义翻页的速度
	private Scroller mScroller;//
	private int mCurScreen;
	private int mDefaultScreen;
	private float mLastMotionX;

	private OnViewChangeListener mOnViewChangeListener; //自定义的接口类

	public MyScrollLayout(Context context) {
		super(context);
		// TODO Auto-generated constructor stub
		init(context);
	}
	public MyScrollLayout(Context context,AttributeSet attrs){
		super(context, attrs);
		init(context);
	}
	public MyScrollLayout(Context context, AttributeSet attrs, int defStyle)
	{
		super(context, attrs, defStyle);
		init(context);
	}

	private void init(Context context)
	{
		//初始化数据
		mCurScreen = mDefaultScreen;
		mScroller = new Scroller(context);//自定义Scoller,当滑动时View不会滚动
	}
	@Override
	protected void onLayout(boolean changed, int l, int t, int r, int b) {
		// TODO Auto-generated method stub
		if (changed) {
			//view有新的尺寸或位置
			int childLeft = 0 ;
			final int childCount = getChildCount();
			for(int i =0;i<childCount;i++)
			{
				//生成View(滑动的页面)
				final View childView = getChildAt(i);
				if (childView.getVisibility()!= View.GONE) {
					final int childWidth = childView.getMeasuredWidth();
					childView.layout(childLeft, 0, childLeft+childWidth, childView.getMeasuredHeight());
					childLeft +=childWidth;
				}
			}
		}
	}

	@Override
	protected void onMeasure(int widthMeasureSpec, int heightMeasureSpec) {
		// TODO Auto-generated method stub
		super.onMeasure(widthMeasureSpec, heightMeasureSpec);
		final int Width = MeasureSpec.getSize(widthMeasureSpec);
		final int WidthMode = MeasureSpec.getMode(widthMeasureSpec);
		final int Count = getChildCount();
		for(int i = 0;i<Count;i++)
		{
			getChildAt(i).measure(widthMeasureSpec, heightMeasureSpec);
		}
		scrollTo(mCurScreen*Width, 0);//定位
	}

	public void snapToDestination()
	{
		//重置
		final int ScreenWidth = getWidth();
		final int destScreen = (getScrollX()+ScreenWidth/2)/ScreenWidth;
		snapToScreen(destScreen);
	}
	public void snapToScreen(int whichScreen)
	{
		//切换到页面
		whichScreen = Math.max(0, Math.min(whichScreen,getChildCount()-1));//限制不越界
		if (getScrollX() != (whichScreen*getWidth())) {
			final int detla = whichScreen * getWidth() - getScrollX();
			mScroller.startScroll(getScrollX(), 0, detla, 0, Math.abs(detla)*2);//设置切换的效果
			mCurScreen = whichScreen;
			invalidate();//重画Layout
			if (mOnViewChangeListener!=null) {
				mOnViewChangeListener.OnViewChange(mCurScreen);
		}

		}
	}
	@Override
	public void computeScroll() {
		// TODO Auto-generated method stub
		if (mScroller.computeScrollOffset()) {
			//位置偏移
			scrollTo(mScroller.getCurrX(), mScroller.getCurrY());
			postInvalidate();
		}
	}

	@Override
	public boolean onTouchEvent(MotionEvent event) {
		// TODO Auto-generated method stub
		final int action = event.getAction();
		final float x = event.getX();
		final float y = event.getY();
		switch (action) {
		case MotionEvent.ACTION_DOWN:
			//Log.i("", "actiondown");
			if (mVelocityTracker==null) {
				mVelocityTracker = VelocityTracker.obtain();
				mVelocityTracker.addMovement(event);
			}
			if (!mScroller.isFinished()) {
				mScroller.abortAnimation();
			}
			mLastMotionX = x;
			break;
		case MotionEvent.ACTION_MOVE:
			int deltaX =(int)( mLastMotionX - x);
			if (IsCanMove(deltaX)) {
				if (mVelocityTracker!=null) {
					mVelocityTracker.addMovement(event);
				}
				mLastMotionX = x;
				scrollBy(deltaX, 0);
			}
			break;
		case MotionEvent.ACTION_UP:
			int VelocityX = 0;
			if (mVelocityTracker!=null) {
				mVelocityTracker.addMovement(event);
				mVelocityTracker.computeCurrentVelocity(1000);
				VelocityX = (int)mVelocityTracker.getXVelocity();
				}
			if (VelocityX > SNAP_VELOCITY && mCurScreen>0) {
				//可以向左滑动
				snapToScreen(mCurScreen-1);
			}else if (VelocityX < - SNAP_VELOCITY && mCurScreen < getChildCount()-1) {
				//向右滑动
				snapToScreen(mCurScreen+1);
			}else {
				snapToDestination();
			}
			if (mVelocityTracker!= null) {
				mVelocityTracker.recycle();
				mVelocityTracker = null;
			}
			break;
		}
		return true;
	}

	public boolean IsCanMove(int deltaX)
	{
		if(getScrollX()<=0 && deltaX<0){
			return false;
		}
		if (getScrollX()>= (getChildCount()-1)*getWidth() && deltaX > 0  ) {
			return false;
		}
		return true;
	}
	public void SetOnViewChangeListenner(OnViewChangeListener listener)
	{
		mOnViewChangeListener = listener;
	}

}
一个空白的自定义ScrollLayout就出来了。然后是可以在里面放Gridview,也就是子View,需要多少个页面就可以在xml布局里放多少个Gridview
这里还是用到了自定义的GridView,更美观一些。
package com.lin.helper;

import android.content.Context;
import android.util.AttributeSet;
import android.widget.GridView;

public class MyGridView extends GridView{
	public MyGridView(Context context, AttributeSet attrs) {
		super(context, attrs);
		// TODO Auto-generated constructor stub
	}

	//自定义GridView 因为ScrollLayout与GridView都有滚动条,当他们嵌套在一起就会出现问题,所以自定义了一个GridView
	//重写了onMeasure()方法使其不出现滚动条
	@Override
	protected void onMeasure(int widthMeasureSpec, int heightMeasureSpec) {
		// TODO Auto-generated method stub
		int expandSpec = MeasureSpec.makeMeasureSpec(Integer.MAX_VALUE>>2, MeasureSpec.AT_MOST);
		super.onMeasure(widthMeasureSpec, heightMeasureSpec);
	}
}
<?xml version="1.0" encoding="utf-8"?>
<RelativeLayout xmlns:android="http://schemas.android.com/apk/res/android"
    android:layout_width="match_parent"
    android:layout_height="match_parent"
    android:background="@drawable/choose_default">

    <LinearLayout
        android:id="@+id/c_taglayout"
	    android:layout_width="fill_parent"
	    android:layout_height="wrap_content"
	    android:background="@android:color/background_light"
	    android:orientation="horizontal">

	    <TextView
	        android:id="@+id/choose_back"
	        android:layout_width="wrap_content"
	        android:layout_height="32dp"
	        android:gravity="left"
	        android:background="@drawable/back"
	        android:textColor="#EC6806"
	        android:layout_marginLeft="10dp"
	        />

	    <TextView
	        android:id="@+id/choose_tag"
	        android:layout_width="fill_parent"
	        android:layout_height="32dp"
	        android:layout_marginTop="10dp"
	        android:layout_marginLeft="-50dp"
	        android:gravity="center_horizontal"
	        android:text="@string/choose_tag"
	        android:textColor="@android:color/black"
	        android:textSize="18sp" />

	</LinearLayout>

    <com.lin.helper.MyScrollLayout
        xmlns:android="http://schemas.android.com/apk/res/android"
        android:id="@+id/ScrollLayout"
        android:layout_width="fill_parent"
        android:layout_height="wrap_content"
        android:layout_below="@id/c_taglayout"
        >


        <com.lin.helper.MyGridView
            android:id="@+id/gridview_01"
            android:layout_width="fill_parent"
            android:layout_height="fill_parent"
            android:columnWidth="90dp"
            android:horizontalSpacing="10dp"
            android:numColumns="auto_fit"
            android:stretchMode="columnWidth"
            android:verticalSpacing="10dp"
            >


        </com.lin.helper.MyGridView>

       <com.lin.helper.MyGridView
            android:id="@+id/gridview_02"
            android:layout_width="fill_parent"
            android:layout_height="fill_parent"
            android:columnWidth="90dp"
            android:horizontalSpacing="10dp"
            android:numColumns="auto_fit"
            android:stretchMode="columnWidth"
            android:verticalSpacing="10dp"
           ></com.lin.helper.MyGridView>

       <com.lin.helper.MyGridView
            android:id="@+id/gridview_03"
            android:layout_width="fill_parent"
            android:layout_height="fill_parent"
            android:columnWidth="90dp"
            android:horizontalSpacing="10dp"
            android:numColumns="auto_fit"
            android:stretchMode="columnWidth"
            android:verticalSpacing="10dp"
           ></com.lin.helper.MyGridView>

    </com.lin.helper.MyScrollLayout>

    <!-- 底部小圆点 -->
    <LinearLayout

        android:id="@+id/llayout"
        android:orientation="horizontal"
        android:layout_width="wrap_content"
        android:layout_height="wrap_content"
        android:layout_alignParentBottom="true"
        android:layout_centerHorizontal="true"
        android:layout_marginBottom="24dp"
        >
        <ImageView
            android:layout_width="wrap_content"
            android:layout_height="wrap_content"
            android:layout_gravity="center_vertical"
            android:padding="15dp"
            android:clickable="true"
            android:src="@drawable/notcurrent"
            android:contentDescription="@null"
            />
        <ImageView
            android:layout_width="wrap_content"
            android:layout_height="wrap_content"
            android:layout_gravity="center_vertical"
            android:padding="15dp"
            android:clickable="true"
            android:src="@drawable/notcurrent"
            android:contentDescription="@null"
            />
        <ImageView
            android:layout_width="wrap_content"
            android:layout_height="wrap_content"
            android:layout_gravity="center_vertical"
            android:padding="15dp"
            android:clickable="true"
            android:src="@drawable/notcurrent"
            android:contentDescription="@null"
            />

    </LinearLayout>


</RelativeLayout>
这是主Activity
package com.lin.view;

import java.util.ArrayList;
import java.util.HashMap;

import com.example.order_client.R;
import com.lin.helper.MyGridView;
import com.lin.helper.MyScrollLayout;
import com.lin.helper.OnViewChangeListener;

import android.R.integer;
import android.app.Activity;
import android.os.Bundle;
import android.view.View;
import android.view.View.OnClickListener;
import android.widget.AdapterView;
import android.widget.AdapterView.OnItemClickListener;
import android.widget.ImageView;
import android.widget.LinearLayout;
import android.widget.SimpleAdapter;
import android.widget.TextView;

public class ChooseTableActivity extends Activity implements OnViewChangeListener ,OnClickListener,OnItemClickListener{

	private MyScrollLayout scrollLayout;
	private MyGridView myGridView_01;
	private MyGridView myGridView_02;
	private MyGridView myGridView_03;
	private ImageView[] imageViews;
	private int mViewCount;
	private int mCurSel;
	private  TextView c_tagView;
	private  TextView c_backView;
	@Override
	protected void onCreate(Bundle savedInstanceState) {
		// TODO Auto-generated method stub
		super.onCreate(savedInstanceState);
		setContentView(R.layout.activity_choosetable);
		scrollLayout = (MyScrollLayout)findViewById(R.id.ScrollLayout);
		myGridView_01 = (MyGridView)findViewById(R.id.gridview_01);
		myGridView_02 = (MyGridView)findViewById(R.id.gridview_02);
		myGridView_03 = (MyGridView)findViewById(R.id.gridview_03);
		c_tagView = (TextView)findViewById(R.id.choose_tag);
		c_backView = (TextView)findViewById(R.id.choose_back);
		c_backView.setOnClickListener(this);
		LinearLayout layout = (LinearLayout)findViewById(R.id.llayout);
		myGridView_01.setAdapter(getMeunAdapter());
		myGridView_02.setAdapter(getMeunAdapter());
		myGridView_03.setAdapter(getMeunAdapter());
		myGridView_01.setOnItemClickListener(this);
		myGridView_02.setOnItemClickListener(this);
		myGridView_03.setOnItemClickListener(this);
		mViewCount = scrollLayout.getChildCount();
		imageViews = new ImageView[mViewCount];
		for (int i = 0; i < mViewCount; i++) {
			//
			imageViews[i]=(ImageView)layout.getChildAt(i);
			imageViews[i].setEnabled(true);
			imageViews[i].setOnClickListener(this);
			imageViews[i].setTag(i);
		}
		mCurSel = 0;
		imageViews[mCurSel].setEnabled(false);
		imageViews[mCurSel].setImageDrawable(getResources().getDrawable(R.drawable.current));
		scrollLayout.SetOnViewChangeListenner(this);

	}

	private void setCurPoint(int index)
	{
		//底部小圆点
		if (index<0 ||index == mCurSel || index > mViewCount-1) {
			return;
		}
		imageViews[mCurSel].setEnabled(true);
		imageViews[index].setEnabled(false);
		imageViews[mCurSel].setImageDrawable(getResources().getDrawable(R.drawable.notcurrent));
		imageViews[index].setImageDrawable(getResources().getDrawable(R.drawable.current));
		mCurSel = index ;
		c_tagView.setText(index+1+"楼");

	}


	@Override
	public void OnViewChange(int view) {
		// TODO Auto-generated method stub
		setCurPoint(view);
	}

	@Override
	public void onClick(View v) {
		// TODO Auto-generated method stub
		if(v.getClass()==ImageView.class)
		{
			//点击小圆点
			int pos =(Integer) v.getTag();
			setCurPoint(pos);
			scrollLayout.snapToScreen(pos);
		}
		if (v.getId()==c_backView.getId()) {

			finish();
		}

		System.out.println("click"+v.getId());
	}

	private SimpleAdapter getMeunAdapter()
	{
		ArrayList<HashMap<String, Object>> list = new ArrayList<HashMap<String,Object>>();
		for (int i = 0; i < 12; i++) {
			HashMap<String, Object> map = new HashMap<String, Object>();
			map.put("itemimage", R.drawable.seat_normal);
			map.put("itemtext", "第"+(i+1)+"桌");
			list.add(map);
		}

		SimpleAdapter adapter = new SimpleAdapter(ChooseTableActivity.this, list, R.layout.griditem,
				new String[]{"itemimage","itemtext"},
				new int[]{R.id.item_image,R.id.item_text});
		return adapter;

	}

	@Override
	public void onItemClick(AdapterView<?> arg0, View v, int loc, long arg3) {
		// TODO Auto-generated method stub
		int whichfloat =49;
		whichfloat = c_tagView.getText().charAt(0)-48;
		System.out.println(whichfloat+"楼"+(loc+1)+"桌");


	}


}
GridView 的Adapter跟ListView 的比较相似,都要创建两个layout文件
<?xml version="1.0" encoding="utf-8"?>
<RelativeLayout xmlns:android="http://schemas.android.com/apk/res/android"
    android:layout_width="match_parent"
    android:layout_height="match_parent" >

    <ImageView
        android:id="@+id/item_image"
        android:layout_width="wrap_content"
        android:layout_height="wrap_content"
        android:layout_centerHorizontal="true"
        android:contentDescription="@null"
        />
    <TextView
        android:id="@+id/item_text"
        android:layout_width="wrap_content"
        android:layout_height="wrap_content"
        android:layout_centerHorizontal="true"
        android:layout_below="@id/item_image"
        android:textColor="@android:color/white"
        android:textStyle="bold"
        />

</RelativeLayout>
<?xml version="1.0" encoding="utf-8"?>
<LinearLayout xmlns:android="http://schemas.android.com/apk/res/android"
    android:layout_width="wrap_content"
    android:layout_height="wrap_content"
     >
    <!-- 用来加载Item -->
    <com.lin.helper.MyGridView
        android:id="@+id/gridview_only"
        android:layout_width="fill_parent"
        android:layout_height="fill_parent"
        android:columnWidth="90dp"
        android:gravity="center"
        android:numColumns="auto_fit"
        android:horizontalSpacing="10dp"
        android:verticalSpacing="10dp"
        android:stretchMode="columnWidth"

        ></com.lin.helper.MyGridView>

</LinearLayout>
差不多这样啦,上面的MyscrollLayout其实还自定义了一个onViewChangeListerner()接口





 扫一扫
扫一扫


 被折叠的 条评论
为什么被折叠?
被折叠的 条评论
为什么被折叠?
 到【灌水乐园】发言





