NextResponse is a built-in Next.js API used to create and modify HTTP responses in Middleware and API route handlers.
- Creates and customizes HTTP responses.
- Supports cookies, headers, and JSON responses.
- Enables redirects, rewrites, and request forwarding.
Features of NextResponse
NextResponse provides built-in methods to create and modify HTTP responses, manage cookies, return JSON data, and control request flow in Next.js.
1. Cookies
Cookies are a way to store small amounts of data on the client side, allowing for persistent state across requests. NextResponse provides several methods to interact with cookies easily.
set(name, value)
This method sets a cookie in the response.
import { NextResponse } from 'next/server';

export function middleware(req) {
    const response = NextResponse.next();
    response.cookies.set('userToken', 'abc123');
    return response;
}
Output:
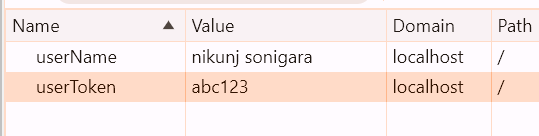
delete(name)
Deletes a cookie from the response.
import { NextResponse } from 'next/server';

export function middleware(req) {
    const response = NextResponse.next();
    response.cookies.delete('userToken');
    return response;
}
Output:

Note: To read cookies using get(name) or getAll(), use the cookies API of NextRequest.
2. JSON Response
The json() method creates and returns a JSON response with the specified data.
import { NextResponse } from 'next/server';

export function GET() {
    return NextResponse.json({
        message: 'Hello, world!',
    });
}
Output:
{
  "message": "Hello, world!"
}
3. Redirect
The redirect() method allows you to redirect the user to a different URL.
import { NextResponse } from "next/server";

export function middleware(request: Request) {
  return NextResponse.redirect(new URL("/new-path", request.url));
}

export const config = {
  matcher: ["/old-path"],
};
Output:

4. Rewrite
The rewrite() method rewrites the request to a different URL without changing the URL displayed in the browser.
import { NextResponse } from "next/server";
import type { NextRequest } from "next/server";

export function middleware(request: NextRequest) {
  return NextResponse.rewrite(
    new URL("/another-path", request.url)
  );
}

export const config = {
  matcher: ["/old-path"],
};
Output:

5. Next
The next() method passes the request to the next middleware or route handler without modifying the response.
import { NextResponse } from 'next/server';

export function middleware(request) {
    // Middleware logic

    return NextResponse.next();
}
Note: Since NextResponse.next() simply forwards the request, there is no visible change in the browser. The expected output is the normal rendering of the requested page.
Steps to Implement NextResponse in Next.js
Follow the steps given below:
Step 1: Create a New Next.js Application
Create a new Next.js project using the following commands:
npx create-next-app@latest next-response-example
cd next-response-example
Step 2: Create the Middleware File
Create a middleware.js (or middleware.ts) file in the project root.
middleware.jsStep 3: Add the NextResponse Code
- app/page.js
- app/new-path/page.js
- middleware.js
export default function Home() {
    return (
        <div>
            <h1>Welcome to Next.js!</h1>
        </div>
    );
}
export default function NewPath() {
    return (
        <div>
            <h1>Welcome to New Path</h1>
        </div>
    );
}
// middleware.js
import { NextResponse } from "next/server";

export function middleware(request) {
    const response = NextResponse.redirect(
        new URL("/new-path", request.url)
    );

    response.cookies.set("user", "nikunj sonigara");
    response.headers.set("X-Custom-Header", "example-value");

    return response;
}

export const config = {
    matcher: ["/old-path"],
};
Step 4: Run the Application
Start the development server using:
npm run devVisit:
http://localhost:3000/old-pathOutput:
The browser is redirected to:
http://localhost:3000/new-pathand displays: