
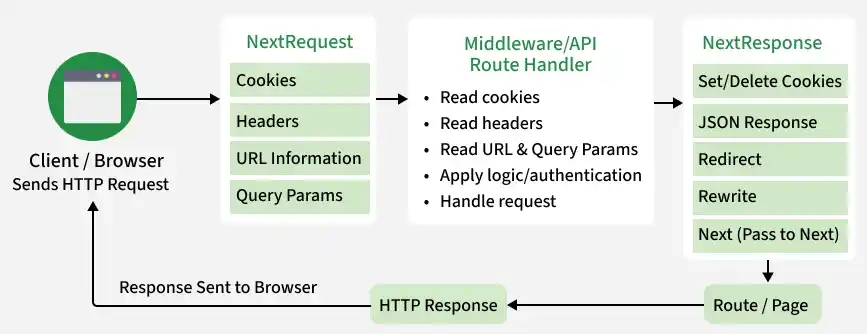
NextRequest is a built-in Next.js API that represents an incoming HTTP request. It is commonly used in Middleware and API route handlers to access and process request data.
- Represents an incoming HTTP request.
- Provides access to request headers, cookies, and URL information.
- Used in Middleware and API route handlers.
- Extends the standard Web Request API with features such as nextUrl.
Syntax:
import { NextRequest, NextResponse } from 'next/server';

export function middleware(request: NextRequest) {

    // Get a cookie
    const token = request.cookies.get('token');
    // Check if a cookie exists
    const hasToken = request.cookies.has('token');
    // Access the request pathname
    const path = request.nextUrl.pathname;

    // Continue processing the request
    return NextResponse.next();
}
- request.cookies.get('token'): Retrieves the value of the specified cookie.
- request.cookies.has('token'): Checks whether the specified cookie exists.
- request.nextUrl.pathname: Returns the pathname of the incoming request URL.
- NextResponse.next(): Continues processing the request and passes control to the next middleware or route handler.
Note: To set or delete cookies, use the cookies API on NextResponse instead of NextRequest.
Features of NextRequest
1. Cookies Management
NextRequest provides methods to read and inspect cookies sent with an incoming request.
- Get a Cookie: Retrieves the value of a cookie by its name. Returns
undefinedif the cookie does not exist.
const bannerStatus = request.cookies.get('show-banner');- Get All Cookies: Retrieves all cookies or all cookies with a specific name.
const experiments = request.cookies.getAll('experiments');- Check for a Cookie: Checks whether a cookie exists.
const hasExperiments = request.cookies.has('experiments');Note: To set, update, or delete cookies, use the cookies API on NextResponse.
2. nextUrl Property
nextUrl extends the standard URL API with Next.js-specific features, making it easier to access and manipulate request URLs.
const path = request.nextUrl.pathname;
const params = request.nextUrl.searchParams;
- pathname: Returns the pathname of the request URL.
- searchParams: Provides access to the URL query parameters.
- basePath: Returns the configured base path of the application (if any).
- origin: Returns the origin (protocol, hostname, and port) of the request URL.
Working with NextRequest
1. Using NextRequest in Middleware
NextRequest can be used in middleware to inspect and process incoming requests before they reach route handlers.
// middleware.ts

import { NextRequest, NextResponse } from 'next/server';

export function middleware(request: NextRequest) {
    const { pathname } = request.nextUrl;

    if (pathname === '/old-page') {
        const url = request.nextUrl.clone();
        url.pathname = '/new-page';
        return NextResponse.redirect(url);
    }

    return NextResponse.next();
}

export const config = {
    matcher: '/:path*',
};
- request.nextUrl provides access to the request URL.
- NextResponse.redirect() redirects requests from /old-page to /new-page.
- NextResponse.next() allows the request to continue.
2. Using NextRequest in API Route Handlers
NextRequest provides access to request headers, cookies, query parameters, and the request body in API route handlers.
// app/api/hello/route.ts

import { NextRequest, NextResponse } from 'next/server';

export async function GET(request: NextRequest) {
    const userAgent = request.headers.get('user-agent');
    const name = request.nextUrl.searchParams.get('name') || 'World';

    return NextResponse.json({
        message: `Hello, ${name}!`,
        userAgent,
    });
}
- request.headers.get() retrieves the User-Agent header.
- request.nextUrl.searchParams accesses query parameters.
- NextResponse.json() returns a JSON response.
3. Handling Multiple HTTP Methods
In the App Router, each HTTP method is handled by a separate exported function.
// app/api/data/route.ts

import { NextRequest, NextResponse } from 'next/server';

export async function GET(request: NextRequest) {
    return NextResponse.json({
        message: 'GET request received',
    });
}

export async function POST(request: NextRequest) {
    const data = await request.json();

    return NextResponse.json({
        message: 'POST request received',
        data,
    });
}
- GET() handles GET requests.
- POST() processes POST requests and reads the request body using request.json().
- Each HTTP method is implemented as a separate exported function in an App Router route handler.
Steps to Implement NextRequest in Next.js
Follow the steps given below:
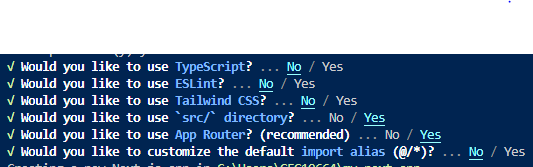
Step 1: Create a New Next.js Application
Create a new Next.js project using the following commands:
npx create-next-app@latest my-next-app
cd my-next-app
Folder Structure:
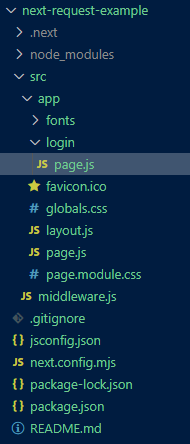
Step 2: Create the Middleware File
Create a middleware.ts (or middleware.js) file in the project root and add the NextRequest implementation to handle incoming requests.
//src/middleware.js

import { NextRequest, NextResponse } from 'next/server';

export function middleware(request) {
    const path = request.nextUrl.pathname;
    const query = request.nextUrl.searchParams.get('name') || 'guest';

    if (path === '/dashboard' && query === 'guest') {
        return NextResponse.redirect(new URL('/login', request.url));
    }

    return NextResponse.next();
}

export const config = {
    matcher: '/:path*',
};
//app/login/page.js

"use client";

export default function LoginPage() {
    const handleSubmit = (e) => {
        e.preventDefault();
        alert("Logged in successfully!");
    };

    return (
        <div className="min-h-screen flex items-center justify-center bg-gray-100">
            <div className="bg-white p-8 rounded shadow-md w-80">
                <h2 className="text-2xl font-bold mb-6">Login</h2>
                <form onSubmit={handleSubmit}>
                    <div className="mb-4">
                        <label
                            htmlFor="username"
                            className="block text-sm font-medium text-gray-700"
                        >
                            Username
                        </label>
                        <input
                            type="text"
                            id="username"
                            className="mt-1 p-2 border border-gray-300 rounded w-full"
                            required
                        />
                    </div>
                    <div className="mb-6">
                        <label
                            htmlFor="password"
                            className="block text-sm font-medium text-gray-700"
                        >
                            Password
                        </label>
                        <input
                            type="password"
                            id="password"
                            className="mt-1 p-2 border border-gray-300 rounded w-full"
                            required
                        />
                    </div>
                    <button
                        type="submit"
                        className="w-full bg-blue-500 text-white py-2 rounded hover:bg-blue-600"
                    >
                        Login
                    </button>
                </form>
            </div>
        </div>
    );
}
Step 3: Run the Application
Start the development server using:
npm run dev