
Author’s note: if you’ve been using Responses’ image_generation on APIYI to “chat and generate images at the same time,” you can keep iterating on images the same way after moving to the standalone Images API — just follow the approach in this article.
Bottom line first: migrate only the image-generation part; leave your existing text conversation untouched. Previously, previous_response_id implicitly linked back to “the last image.” Now your app stores that image itself and explicitly selects it each time you re-edit, uploading it as the source image to POST /v1/images/edits. Do that, and multi-turn image editing behaves exactly as before — the only thing that changes is who remembers “the last image.”
This conclusion rests on the documentation update APIYI published on 2026-11-21 22:30 (Beijing time). Five official-proxy image models are now recommended to go through two standalone image endpoints. OpenAI hasn’t retired Responses, and on-site text chat still works as usual. Every endpoint, field, and billing convention below comes from the APIYI apiyi.com docs and OpenAI’s official image generation guide. The code is documentation sample code and doesn’t represent tested results.
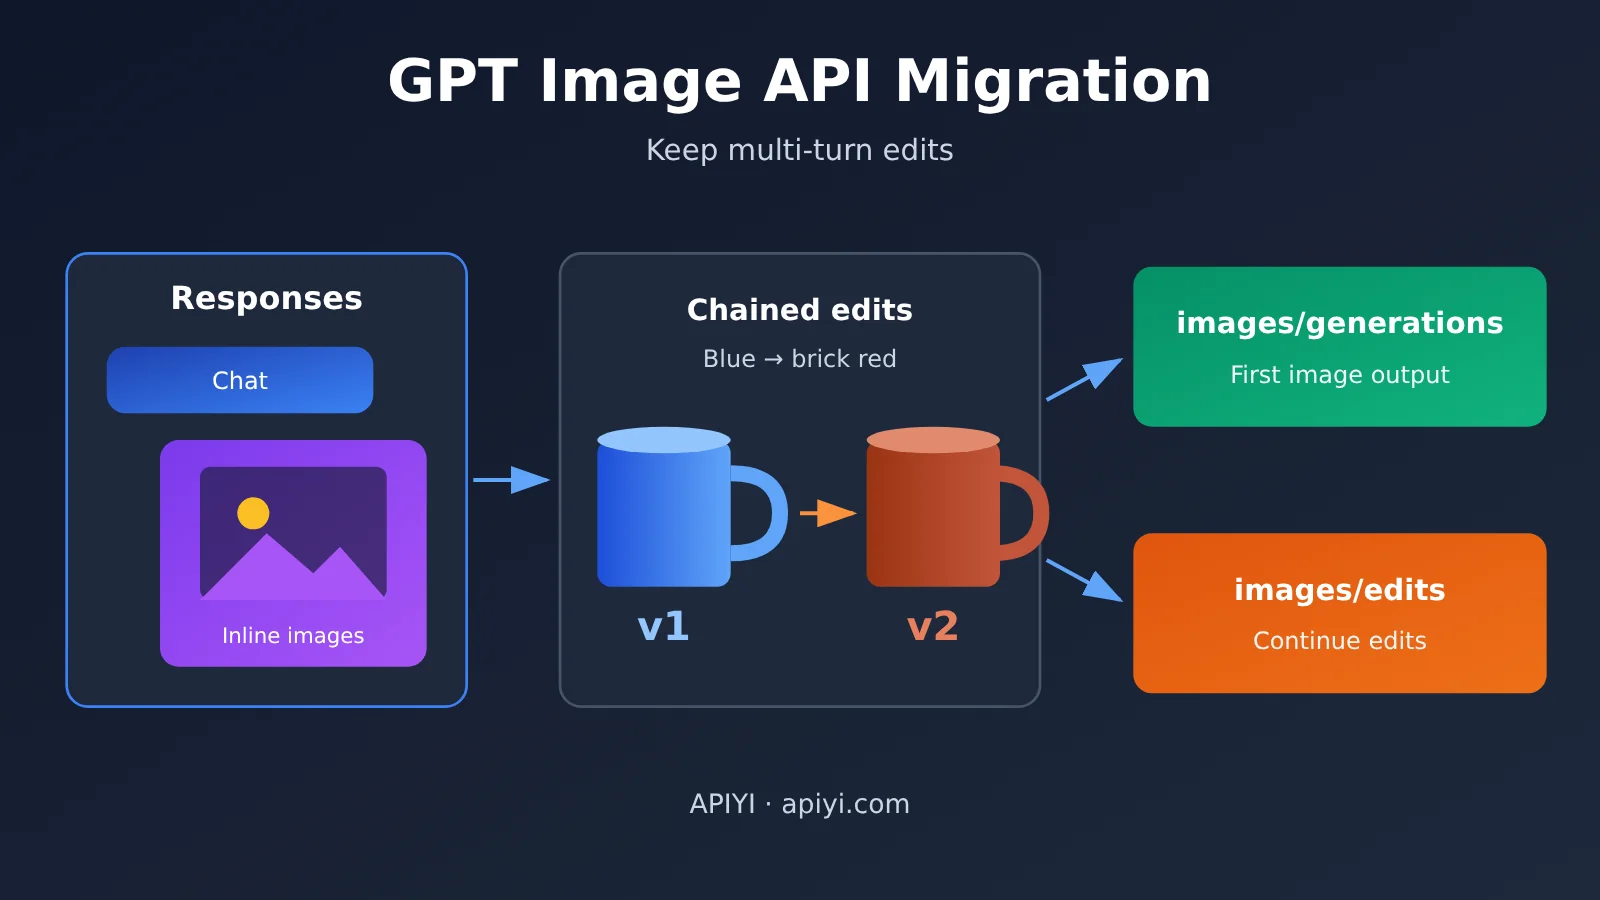
GPT Image API Migration Knowledge Map and Index
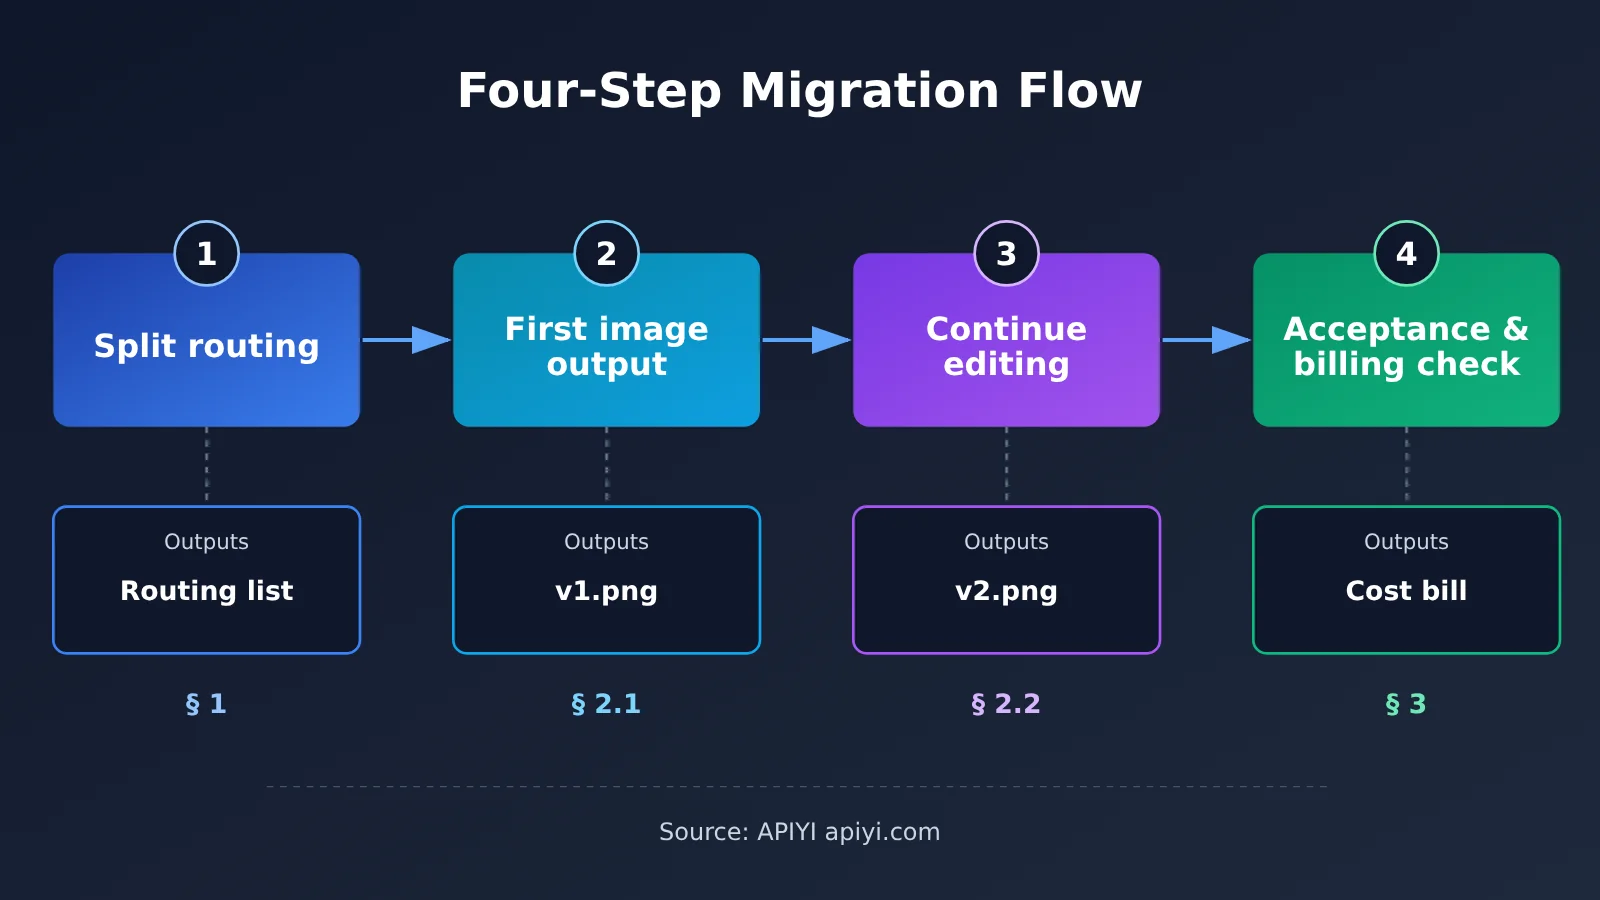
The whole migration moves forward in four steps, and each step’s output becomes the next step’s input:
Identify legacy calls and route them (Section 1)
   └─> Output: whether each request should go to chat, generations, or edits
Generate and save the first image (Section 2.1)
   └─> Output: a validated v1.png plus an asset record
Hand the chosen source image to the edit endpoint (Section 2.2)
   └─> Output: v2.png plus a parent_asset_id link
Accept and reconcile the bill (Section 3)
   └─> Output: a list of usable images plus the cost of each accepted image
| Step | Depends on | Why it sits here | Goal |
|---|---|---|---|
| 1 Routing | The call inventory in your existing code | Decide what to change first, so you don’t accidentally touch text chat | Move only image requests over to the Images API |
| 2.1 First image | The generations route decided in step 1 | Later edits need a real, saved source image | Get a validated v1 into your asset store |
| 2.2 Continue editing | The v1 file saved in step 2.1 | The standalone endpoint doesn’t honor previous_response_id; it only knows the image you upload |
Get v2 and record the parent/child relationship |
| 3 Acceptance and reconciliation | The images from step 2 and the console logs | Only accepted images count toward the cost denominator | Deliverable images plus an explainable bill |
Suggested reading order: Section 1 is a must-read; follow along with Section 2 in code order; come back to Section 3 before launch, or whenever you hit disconnects or billing questions.
To Know: GPT Image API Migration Terms
| Term | Plain-language explanation |
|---|---|
| Official relay | The official forwarding channel models offered by APIYI; in this article it refers to the five image model IDs |
| image_generation | The image generation tool inside the Responses API; the legacy pipeline used it to produce images mid-conversation |
| previous_response_id | The Responses parameter used to carry over the previous turn’s context; standalone Images requests don’t accept it |
| multipart | A form-upload format; /images/edits uses it to send real image binaries |
| b64_json | The field in which standalone image endpoints return the image, holding the base64-encoded image data |
| parent_asset_id | An application-side field recording “which image this one was edited from” |
1 Which GPT Image API Calls Need to Migrate Away from Responses
1.1 The Scope of the 11/21 GPT Image API Change and the Five Official-Proxy Models
This documentation update covers the following five official-proxy model IDs:
gpt-image-2.6-sunburstgpt-image-2.6-flaregpt-image-2.5-sunburstgpt-image-2.5-flaregpt-image-2
The two separate image endpoints are POST /v1/images/generations (JSON request body) and POST /v1/images/edits (multipart form). APIYI doesn’t recommend generating images through the Responses image_generation pipeline anymore, for two reasons: supply is unstable, and it incurs extra tool fees. On top of that, Chat Completions doesn’t support image generation with these five official-proxy image models — if your old code does that, it belongs on the migration list too.
Worth noting: this change only affects image generation. OpenAI hasn’t retired Responses, and text chat on APIYI hasn’t been retired either. So the migration scope is limited to code that “calls an image tool or image model in the request.” Which of the five models to pick is a separate topic — see the model selection article in the APIYI apiyi.com help center; this article won’t go into it.
1.2 Routing for GPT Image API Text Chat, First-Time Image Generation, and Follow-Up Edits
The combination recommended in APIYI’s FAQ is: the chat model figures out the user’s intent, and the app calls the Images API separately and manages images itself. Following that approach, the three things a single Responses request used to handle can be split into three routes:
| User intent | New route | Request format | Image source |
|---|---|---|---|
| Pure text chat, Q&A | Keep the existing text chat endpoint | Unchanged | None |
| First-time image generation | POST /v1/images/generations |
JSON | prompt only |
| Continue editing an image | POST /v1/images/edits |
multipart | App uploads the original image the user selected |
In native Responses, you could chain edits via previous_response_id, or just pass the image in directly. A standalone Images request doesn’t accept previous_response_id — that’s the fundamental reason “multi-turn editing” has to be handled by your app. The model no longer remembers the previous image for you; you have to hand it the file.
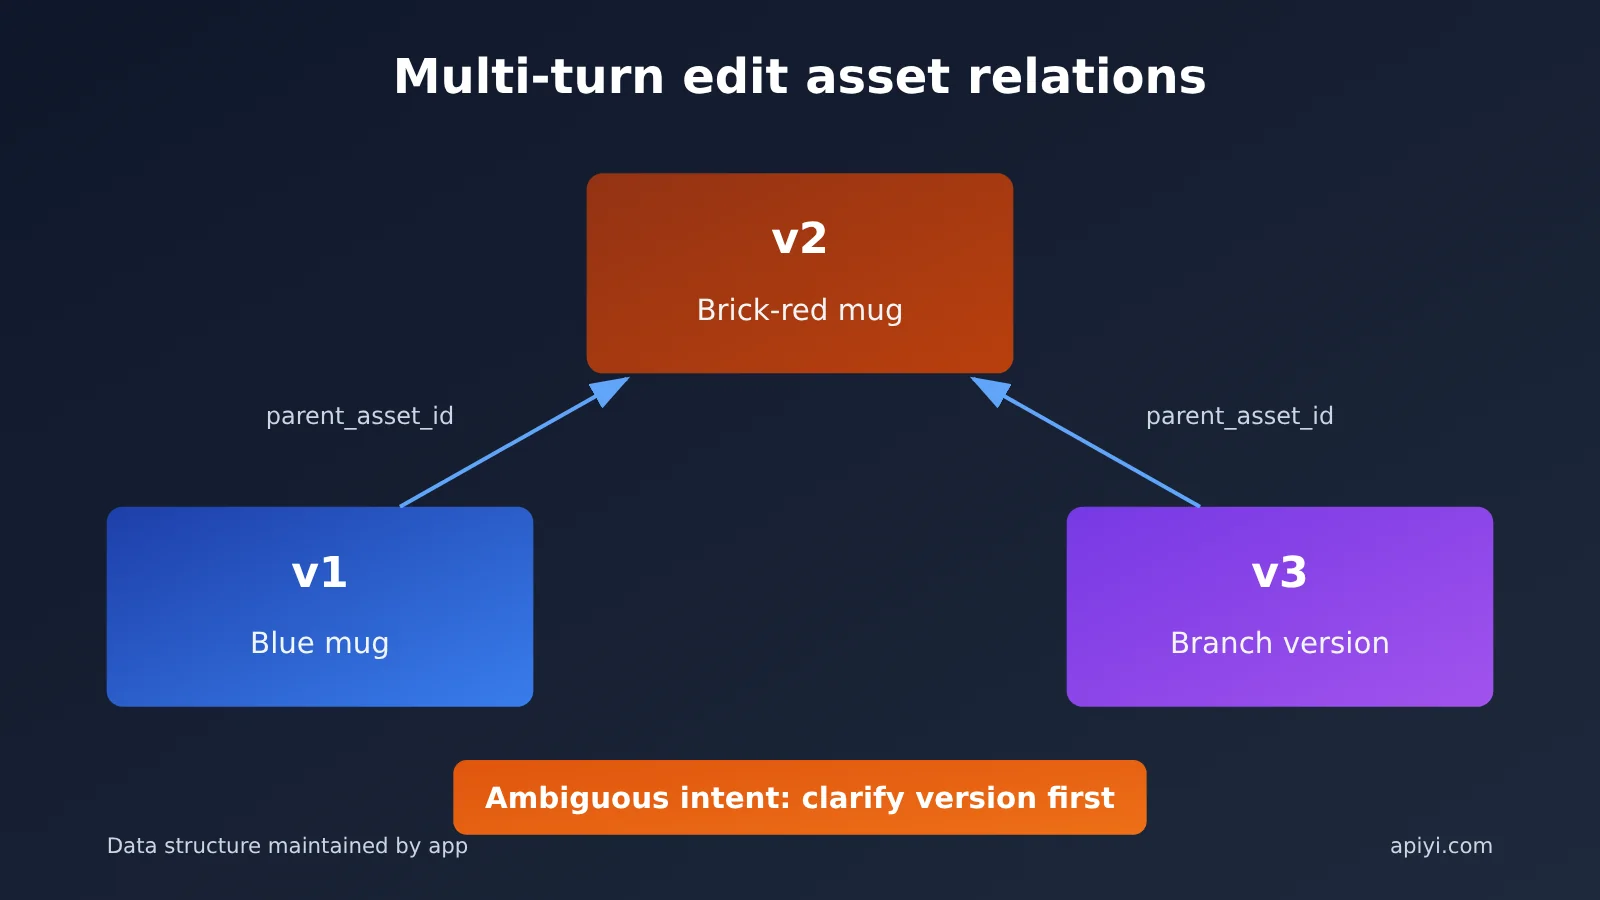
If a user says “make it a bit redder” but the conversation already has v1, v2, and v3, the app can’t tell which one they mean — ask the user to confirm instead of guessing. Defaulting to the latest version looks convenient, but if the user actually wanted to go back to v2 and redo it, you’ve burned an extra charge for nothing and confused them along the way.
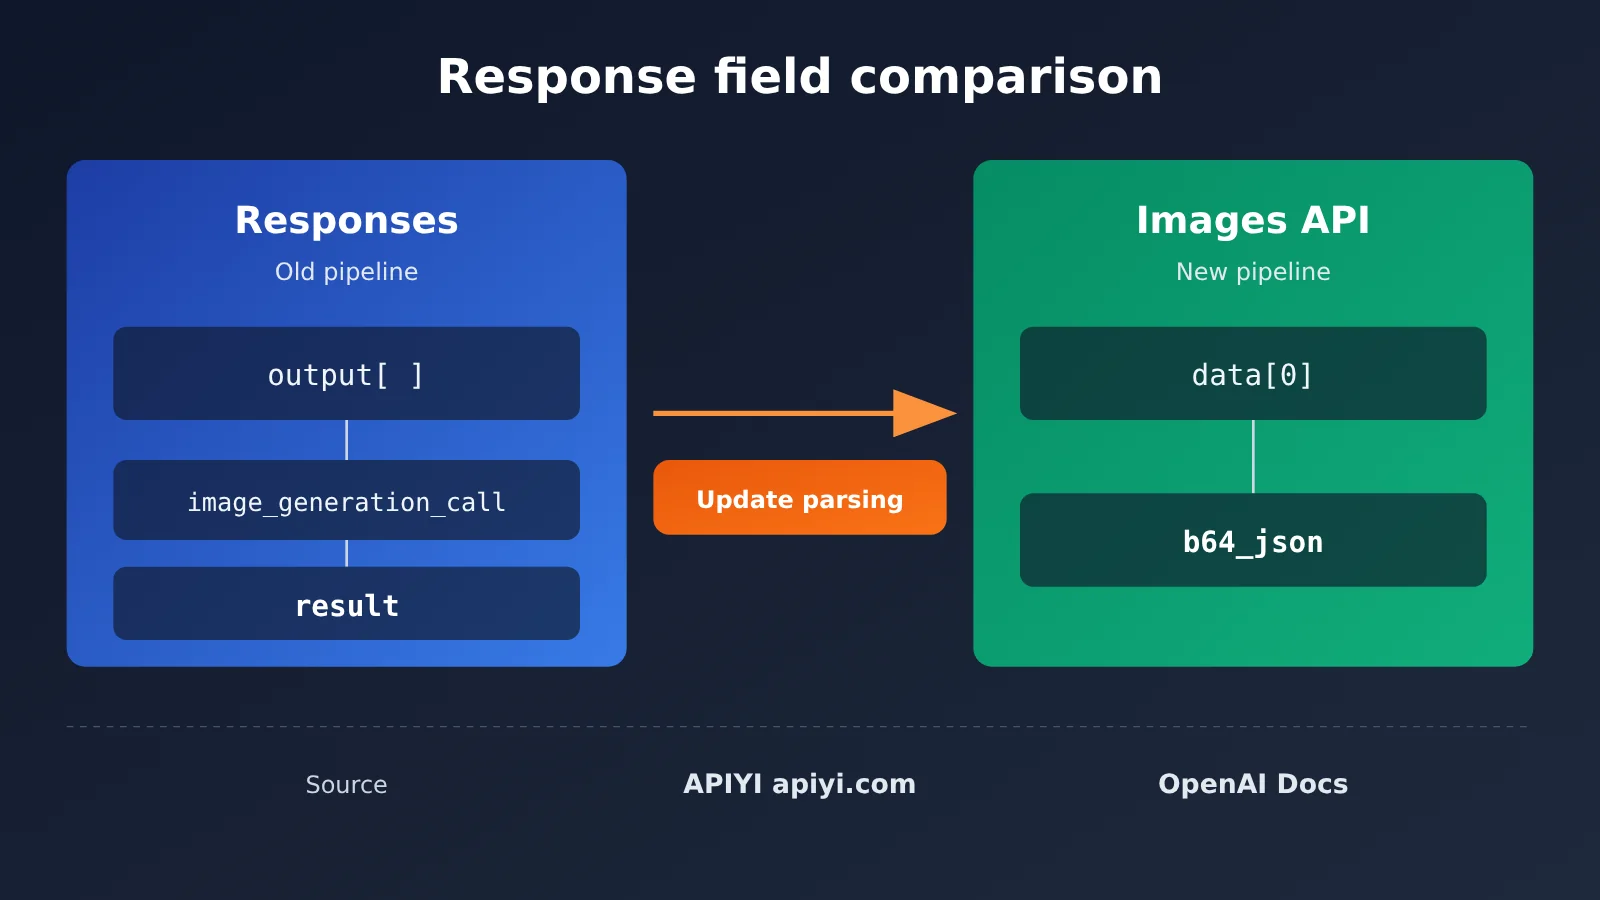
Response parsing needs to change too:
| Pipeline | Where the image lives in the response | How context continues |
|---|---|---|
| Responses + image_generation | The result of the item with type=image_generation_call in output |
previous_response_id or pass the image in |
| Standalone Images API | data[0].b64_json |
App uploads the original image it already has |
2 How to Make Follow-Up Edits to the Previous Image with the GPT Image API
Here’s a two-round example to walk through the full workflow. The first round generates a blue mug, and the second round changes only the mug body to brick red. The parameters follow the APIYI documentation example: model gpt-image-2.5-sunburst, size 1024x1024, quality=medium, and output_format=png. The token is read from the APIYI_KEY environment variable and passed as a Bearer token.
2.1 Generate and validate the blue mug PNG with the GPT Image API
The first round calls the generations endpoint. The prompt describes: a light gray background, a blue ceramic mug centered in the frame, handle pointing right, soft side lighting, and no text in the image. After you get the response, process it in this order:
- Call
raise_for_status()to rule out failures at the HTTP layer. - Strictly base64-decode
b64_json; if it can’t be decoded, treat it as a failure. - Open it with Pillow and call
load()to confirm the file really decodes into an image. - Confirm the format is PNG and the size is 1024×1024, then save it as
v1.png. - Register this asset in the application; later edits will pull the source image from here.
You can’t skip step 3. open() only reads the file header; whether the image data has been truncated won’t show up until load() is called.
2.2 GPT Image API Upload the Selected Original Image and Change Only the Mug Body to Brick Red
This is the second round of calls to the edits endpoint. In data, pass model, prompt, size, quality, and output_format; in files, use the image[] field to upload the actual binary bytes of v1.png. The prompt means: change only the mug body to brick red, and keep the mug shape, handle, composition, lighting, and background unchanged.
There are a few pitfalls at this step:
- Do not pass
response_format. - Do not manually set
Content-Type. requests will automatically generate a multipart header with a boundary; setting it manually can cause the boundary to be lost. - Do not upload a base64 string as a file. What you upload must be the raw bytes of the image.
After the edit, decode and validate in the same way, then save it as v2.png. Keep v1, and at the same time record parent_asset_id = v1 in the asset record. This parent-child relationship is the “multi-turn context” under the new architecture. Also note that this is generative editing: the model will try to preserve other areas, but it does not guarantee that pixels outside the mug body will be exactly identical.
Below is a minimal complete example (documentation example, not tested in this article):
import base64
import io
import os
import uuid

import requests
from PIL import Image

BASE_URL = "https://api.apiyi.com/v1"  # APIYI unified endpoint
API_KEY = os.environ["APIYI_KEY"]
HEADERS = {"Authorization": f"Bearer {API_KEY}"}
MODEL = "gpt-image-2.5-sunburst"
SIZE = "1024x1024"
# Example mid-range timeout; tune for your network and quality. No auto retry.
TIMEOUT = (10, 360)

assets = {}  # asset_id -> {"path": ..., "parent_asset_id": ...}


def decode_and_check(resp, path):
    resp.raise_for_status()
    item = resp.json()["data"][0]
    b64 = item.get("b64_json")
    if not b64:
        raise ValueError("no b64_json in response, check body before any resend")
    raw = base64.b64decode(b64, validate=True)
    img = Image.open(io.BytesIO(raw))
    img.load()
    if img.format != "PNG" or img.size != (1024, 1024):
        raise ValueError(f"unexpected image: {img.format} {img.size}")
    with open(path, "wb") as f:
        f.write(raw)
    return path


def save_asset(path, parent_asset_id=None):
    asset_id = str(uuid.uuid4())
    assets[asset_id] = {"path": path, "parent_asset_id": parent_asset_id}
    return asset_id


# Round 1: text-to-image via JSON
gen_resp = requests.post(
    f"{BASE_URL}/images/generations",
    headers=HEADERS,
    json={
        "model": MODEL,
        "prompt": (
            "Light gray background, a blue ceramic mug centered, "
            "handle facing right, soft side lighting, no text."
        ),
        "size": SIZE,
        "quality": "medium",
        "output_format": "png",
    },
    timeout=TIMEOUT,
)
v1_id = save_asset(decode_and_check(gen_resp, "v1.png"))

# Round 2: edit the explicitly selected original via multipart
selected_id = v1_id  # if the user's target version is unclear, ask first
with open(assets[selected_id]["path"], "rb") as f:
    edit_resp = requests.post(
        f"{BASE_URL}/images/edits",
        headers=HEADERS,  # no manual Content-Type; requests sets the boundary
        data={
            "model": MODEL,
            "prompt": (
                "Change only the mug body to brick red. Keep the mug shape, "
                "handle, composition, lighting and background unchanged."
            ),
            "size": SIZE,
            "quality": "medium",
            "output_format": "png",
        },
        files={"image[]": ("v1.png", f, "image/png")},
        timeout=TIMEOUT,
    )
v2_id = save_asset(decode_and_check(edit_resp, "v2.png"), parent_asset_id=selected_id)
print(assets)
The timeout=(10, 360) in the example is just a mid-range setting for documentation. The actual value should be determined based on your network path and quality tier. The example also deliberately does not include automatic retries; see Section 3.2 for the reason.
🚀 Quick verification: Set
APIYI_KEYto the token you created in the APIYI apiyi.com console, and the script above will run through both rounds. New users can first use the free test quota to confirm routing and parsing logic, then switch to production traffic.
3 How to Validate and Reconcile After GPT Image API Migration
3.1 Four Gates for GPT Image API Image Acceptance
Only when all four gates pass can an image be marked as “usable” in the app:
- HTTP success:
raise_for_status()didn’t throw an exception. - Decodable: strict base64 decoding succeeds and Pillow
load()succeeds. - Specs are correct: format and dimensions match the request—in this example, PNG, 1024×1024.
- The visual change actually happened: the body of the mug in v2 actually turned brick red, while the mug shape, handle, composition, and background stayed largely the same.
The fourth gate requires manual inspection or a separate review step, because HTTP status codes can’t tell whether the model made the right change. An image that passes only the first three gates is at best “technically valid” and isn’t ready to deliver. If there’s no image in the response at all, check the response content first before deciding whether to retry; a dedicated help center article covers this, so I won’t repeat it here.
3.2 Legacy Tool Fees and Cost per Accepted Image for GPT Image API
Billing works differently before and after migration:
| Item | Legacy Responses image_generation pipeline | Standalone Images API |
|---|---|---|
| Extra fee | About $0.20 APIYI image tool extra call fee | No such tool fee |
| What that number means | Only this extra tool fee—not the total order price, and not OpenAI’s general pricing | Usage-based billing |
| Appropriate comparison method | Compare on “cost per accepted image” | Compare on “cost per accepted image” |
Don’t compare unit prices alone—use this formula consistently:
Cost per accepted image = related actual charges (including required text calls, charged failed requests, and retries) ÷ number of images that passed acceptance
The numerator needs to include all related charges, including conversation calls used to determine intent, charged failed requests, and retries. The denominator counts only images that pass the four gates in section 3.1. If no image passed, don’t calculate a per-image cost, because the conclusion then should be “the process has a problem,” not “the unit price is high.” How much you save from migration depends on your retry rate and acceptance pass rate; this article won’t give specific percentages.
Reconciliation data comes from console usage logs, where usage records have type=2. If you’re reading the quota field, convert it to an amount using quota ÷ 500000 per the platform docs.
Pay special attention to connection drops. The standalone Images endpoint returns synchronously. If the connection drops mid-request, the request may already have been charged, and you can’t retrieve the image via request ID. The right order is: first check the APIYI apiyi.com console usage logs to confirm whether this request was charged, then decide whether to resend. That’s also why the sample code doesn’t include automatic retries—automatic retries can easily cause duplicate charges when connections drop. If you hit rate limits or need to switch channels, see the help center article on channel selection and 429 fallback.
Migration completion criteria are straightforward: text chat works as usual; first-round image generation reliably returns a v1 that passes all four gates; every image edit has a clear parent_asset_id in the asset record; every image charge in the console logs maps to an accepted image, a known failure, or a logged resend. Once all of these are met, you can switch the remaining Responses image-generation traffic over to the Images API. When you need multi-model comparison testing, APIYI apiyi.com provides a unified OpenAI-compatible API—switching models only requires changing the single MODEL parameter.
References
-
APIYI Documentation Update: Official-Relay Image Models Move to the Images API
- Link:
docs.apiyi.com/live/2026-11/gpt-image-official-relay-images-api - Description: the five official-relay IDs, the two independent endpoints, and why the old path isn’t recommended
- Link:
-
APIYI FAQ: Handling Text and Images Together in One API
- Link:
docs.apiyi.com/faq/text-and-image-in-one-api - Description: how the chat model determines intent, and the combined pattern where the app calls the Images API separately
- Link:
-
OpenAI Image Generation Guide
- Link:
developers.openai.com/api/docs/guides/image-generation - Description: continuation editing with Responses and the response structure
- Link:
-
APIYI GPT Image 2 Text-to-Image / Image Editing
- Link:
docs.apiyi.com/api-capabilities/gpt-image-2/text-to-image - Link:
docs.apiyi.com/api-capabilities/gpt-image-2/image-edit - Description: request parameters, multipart uploads, and decode-and-verify examples
- Link:
-
APIYI Responses Image Tool / Image API Best Practices / Log Queries
- Link:
docs.apiyi.com/api-capabilities/gpt-image-2/responses-image-tool - Link:
docs.apiyi.com/api-capabilities/image-api-best-practices - Link:
docs.apiyi.com/api-capabilities/log-query - Description: how tool fees are counted, disconnect handling, and consumption log conversion
- Link:
Author: APIYI Technical Team
Technical Discussion: If you run into routing or billing issues during migration, feel free to reach us through the APIYI apiyi.com homepage. For more API details, check the docs.apiyi.com documentation center.